
If you’ve ever wanted to build your own Discord bot but felt intimidated by all the coding, setup, and documentation, you’re in the right place.
In this tutorial, we’ll build a Discord Welcome Bot from scratch, but with a twist. Instead of spending hours writing code line by line, we’ll use Emergent, an AI-powered development environment that builds entire projects from simple prompts.
Think of it like having your own team of AI developers. You tell Emergent what you want to create, and it figures out the rest, generating the code, organizing files, testing functionality, and even packaging it for you to download and run locally.
So even if you’ve never built a bot before, by the end of this tutorial you’ll have:
- A fully functional Discord bot that welcomes new users to your server.
- A working understanding of how Emergent’s AI agents collaborate to create real software.
- A peek under the hood at how Discord bots work using Node.js and discord.js v14.
Whether you’re a beginner exploring automation or a developer curious about AI-assisted coding, this guide will walk you through every step, from setting up Discord to deploying your bot, all explained in plain English.
Let’s start by understanding what exactly we’re going to build.
Before we start creating anything, let’s take a look at what our bot will actually do.
What we’re building?
We’re going to build a Discord Welcome Bot that greets new members when they join your server. The welcome message will include two interactive buttons:
- 📊 Server Stats - shows how many people are in the server, how many are online, and how many are bots.
- 📜 Server Rules - displays the main rules of your community inside a neat embedded message.
When someone joins your Discord server, the bot will automatically send a message in a specific channel, such as #welcome. The message will look friendly and professional, with two buttons side by side. When a member clicks either of them, the bot will respond with a clean, well-styled embedded message that provides the relevant information.
To make this happen, the bot will use:
- Node.js as the runtime environment
- discord.js v14 for Discord’s API and event handling
- Emergent to generate the full project structure, landing page, and setup instructions
Emergent will handle most of the heavy lifting for us. You will simply describe what you want in plain English, and Emergent will create everything - including the landing page where users can download the bot’s code and follow the setup steps.
What is Node.js?
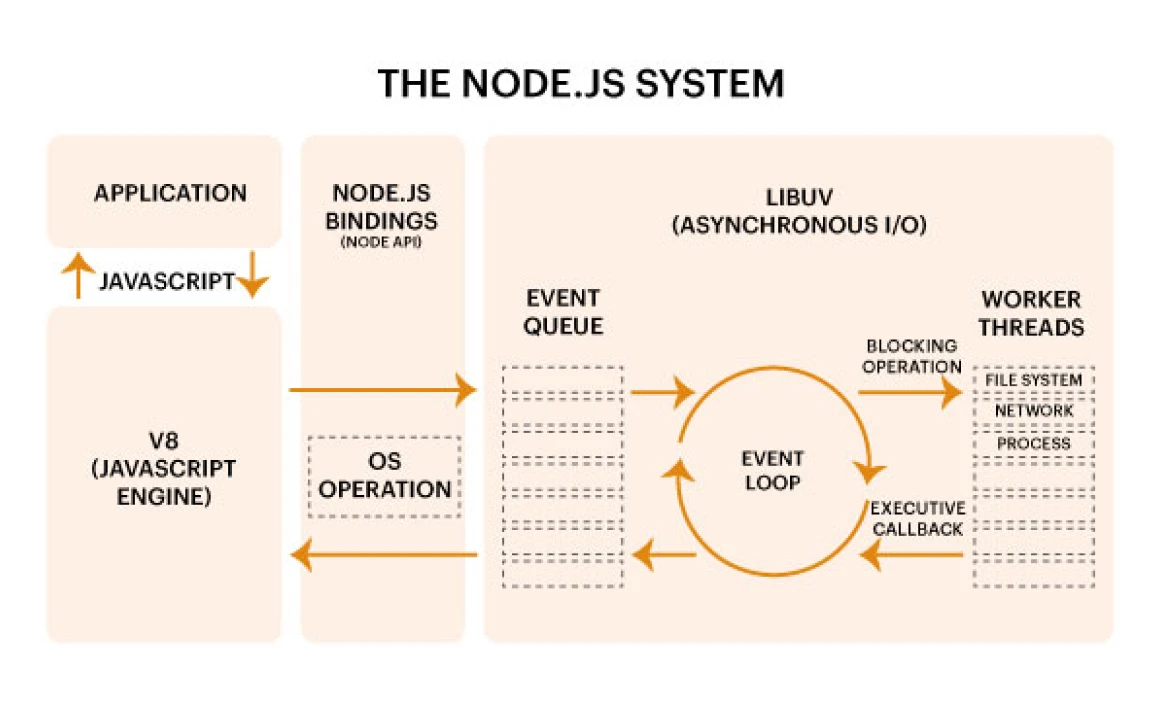
Node.js is a JavaScript runtime environment, which means it allows you to run JavaScript code outside the browser. Normally, JavaScript is used for websites and runs inside your browser, but Node.js lets us use the same language to build server-side applications - like APIs, automation tools, and Discord bots.
Think of Node.js as the engine that makes your bot run.
It handles events, listens for new messages or members joining the server, and tells your bot how to respond.
Why We’re Using Node.js for the Bot
Discord provides a powerful API that allows developers to interact with their platform. The discord.js library is one of the most popular and stable ways to connect to that API, and it’s built for Node.js.
Setting Up Your Discord Developer Account
Before we start writing any code, we need to create a Discord Application and a Bot User. This is what will connect your code to Discord’s servers and allow it to act as a bot inside your server.
Follow these steps carefully - this part only takes a few minutes but it’s very important.
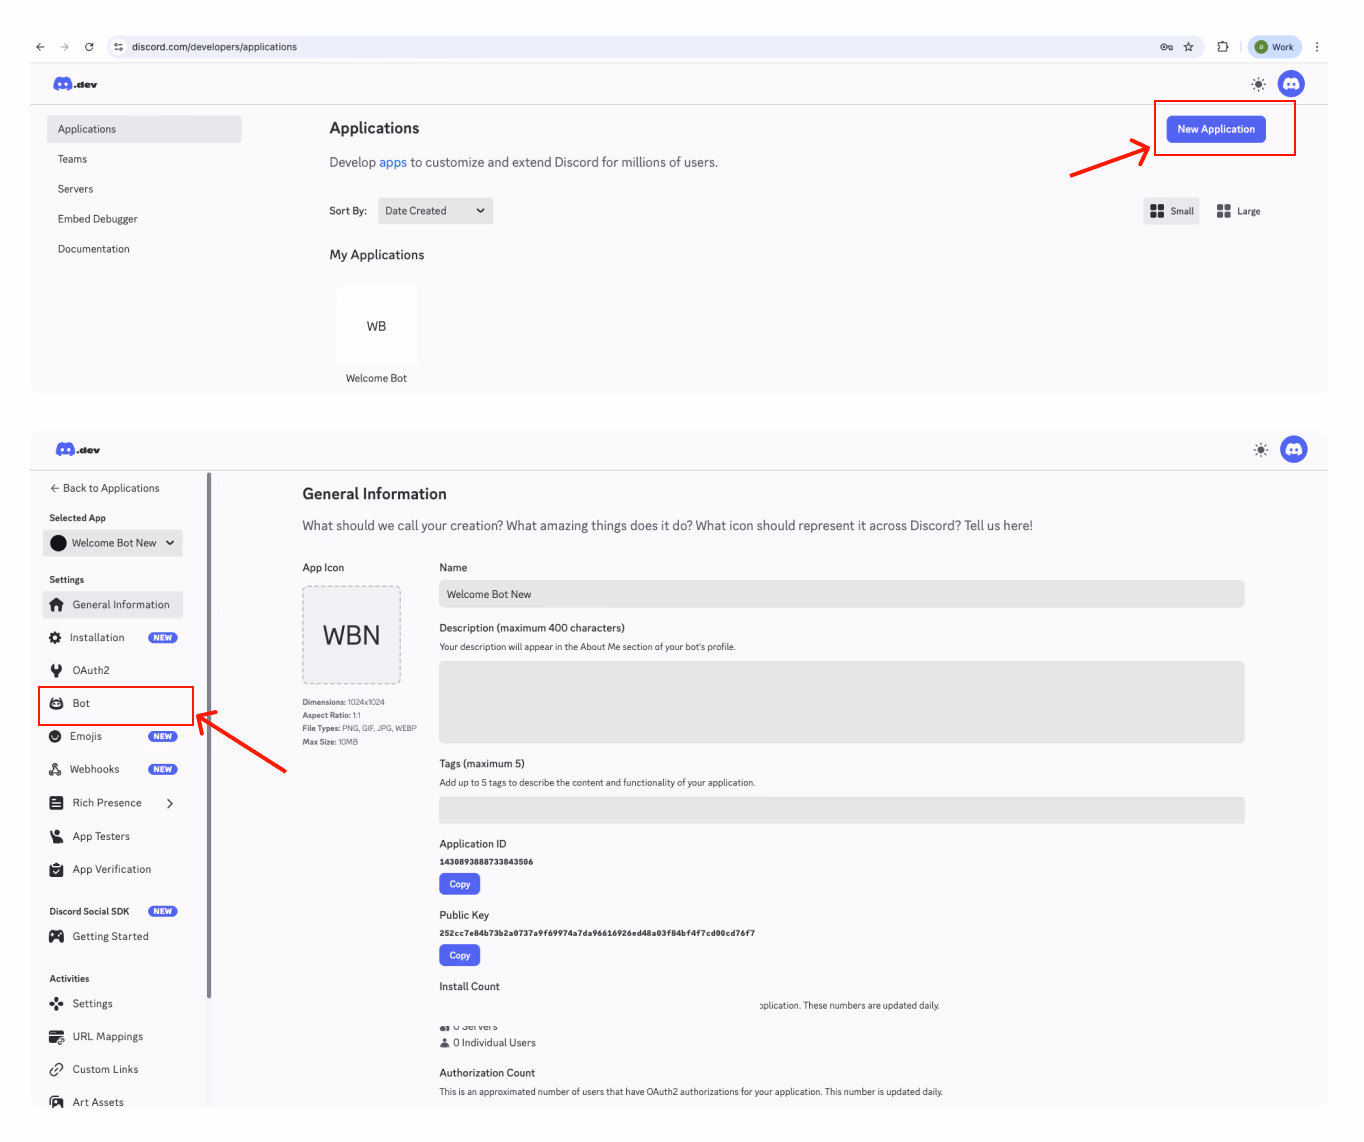
Step 1: Create a Discord Application and Bot
- Go to the Discord Developer Portal.
- Click New Application in the top-right corner.
- Give your app a name, such as WelcomeBot, and click Create.
- From the left-hand menu, go to Bot and click Add Bot. Confirm by selecting Yes, do it!
- You’ll now see your bot’s profile. Here, you can set a name and upload a profile picture if you like.
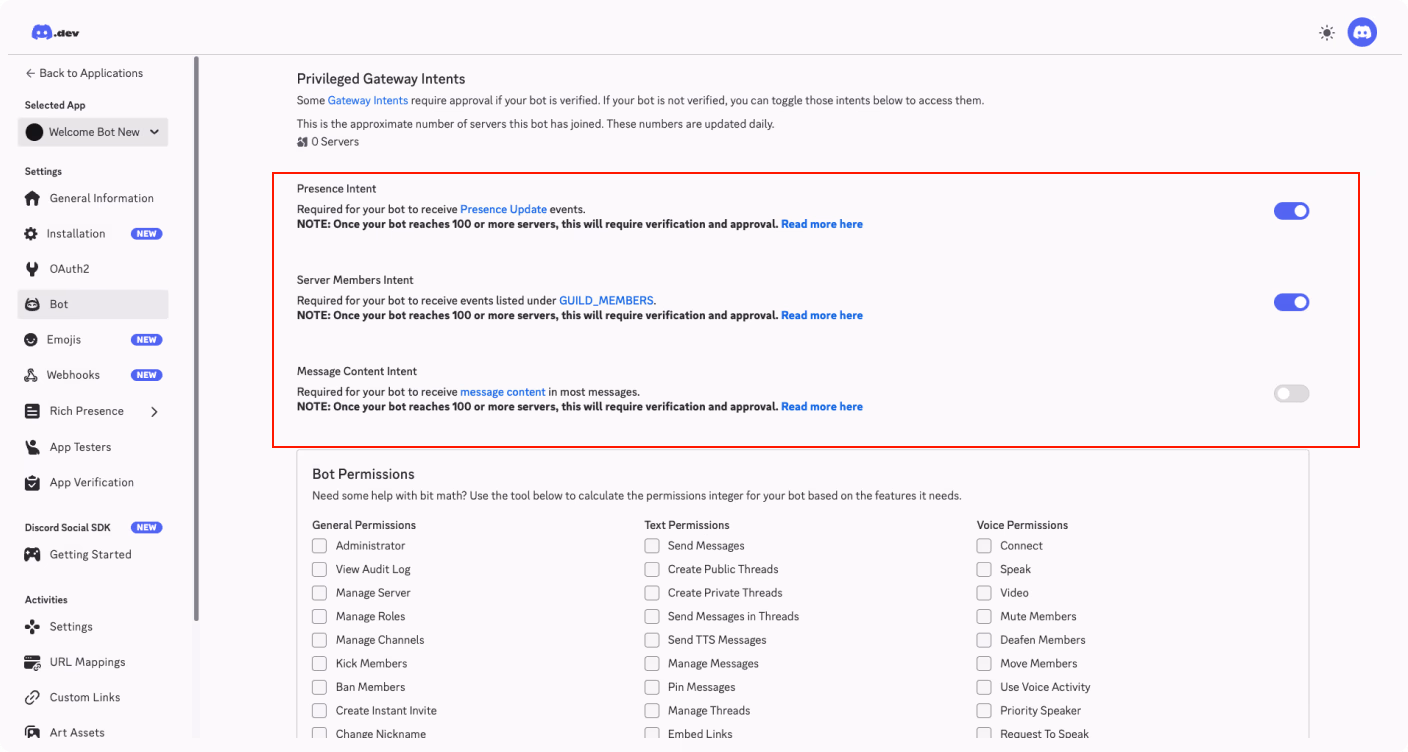
Enable Required Intents
Scroll down to Privileged Gateway Intents and enable the following options:
- Server Members Intent
- Presence Intent
Click Save Changes at the bottom.
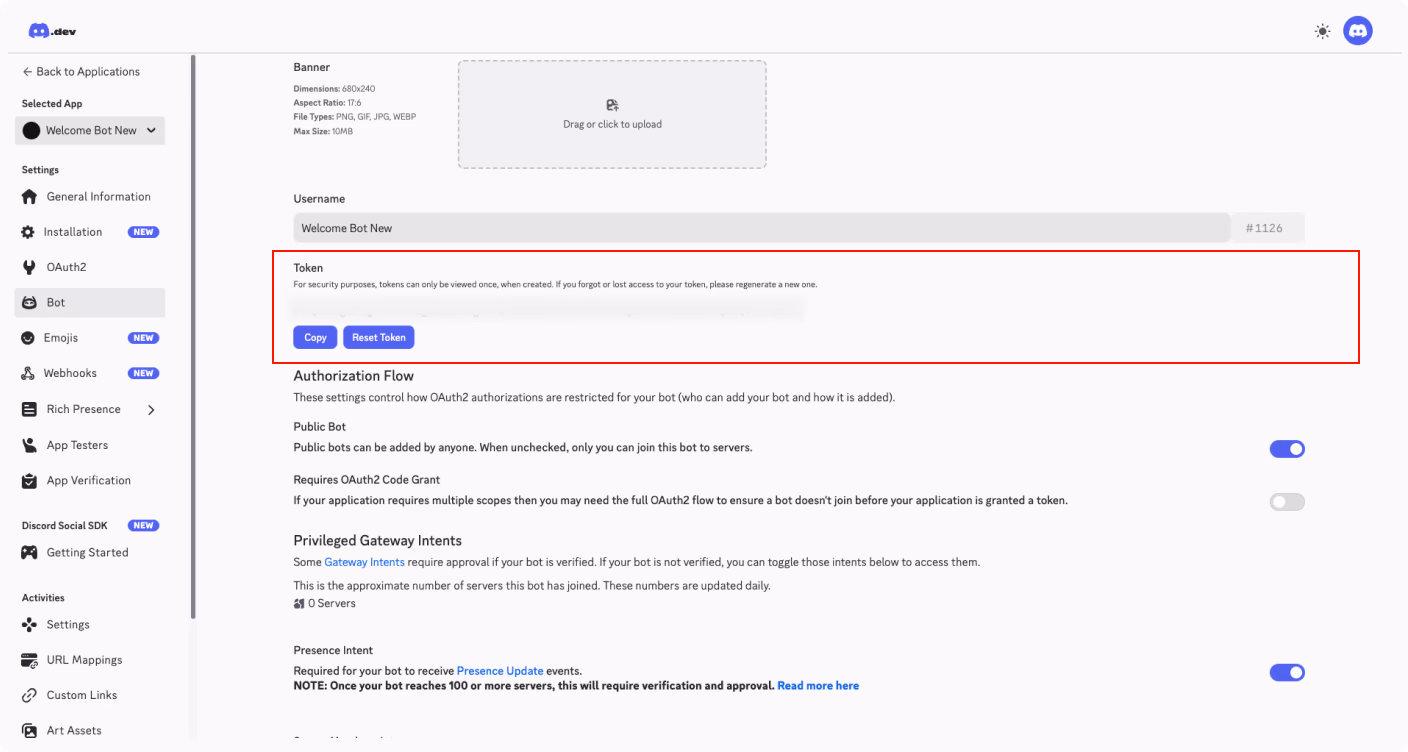
Copy Your Bot Token
Under the Token section, click Reset Token, then Copy.
This token is like your bot’s password. You’ll paste it into your .env file later.
Important: Never share your token publicly or upload it to GitHub. Anyone with it can control your bot.
Step 2: Invite the Bot to Your Server
Now that your bot exists, you need to add it to your server.
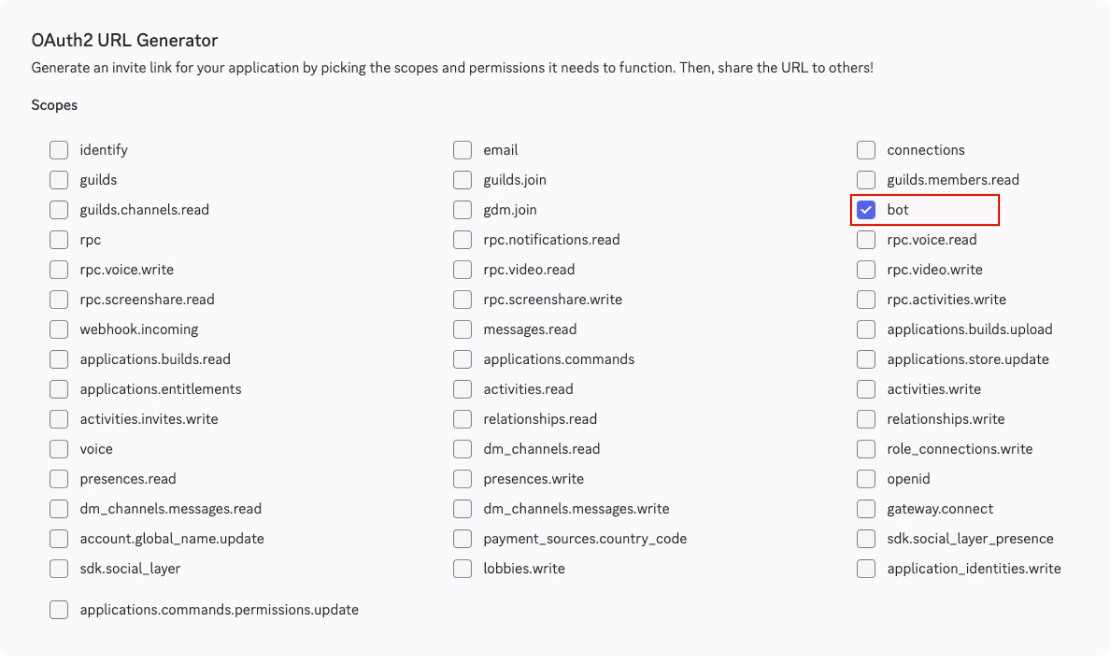
- In the left sidebar, open OAuth2 → URL Generator.
- Under Scopes, check bot.
- Under Bot Permissions, check the following:
- Send Messages
- Embed Links
- Read Message History
- View Channels
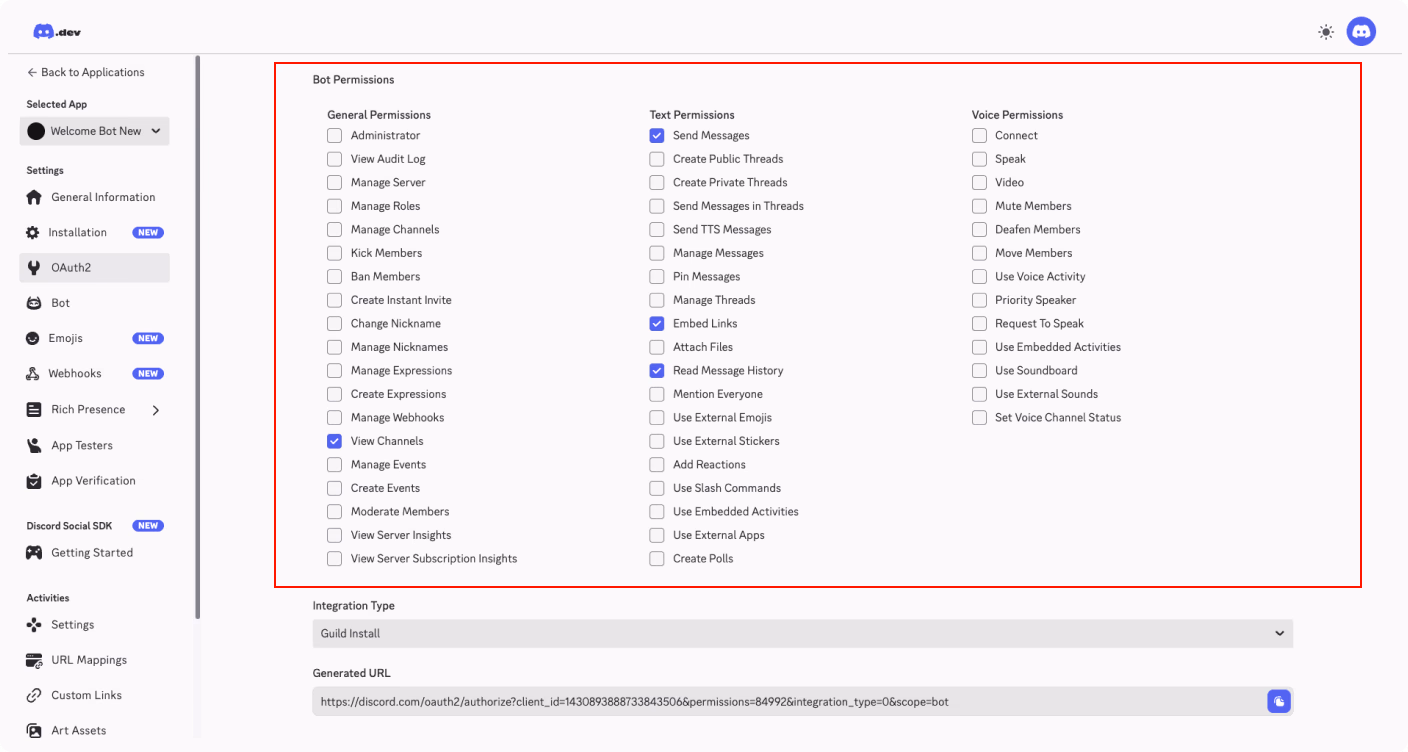
- Copy the generated link, paste it into your browser, and select your Discord server.
- Click Authorize to invite the bot.
You should now see your bot listed in your server’s member list. It will appear offline for now, which is expected. Once we run the bot locally, it will come online.
Next, we’ll set up your local environment, configure your bot token, and bring your Welcome Bot to life.
Prompting Emergent to Build the Discord Bot
Now that your Discord application is ready, it’s time to move into the fun part - building the bot using Emergent.
Emergent is not just a code generator. It’s an agentic AI product builder that uses multiple specialized agents to create full applications from natural language prompts. When you give it a task, such as “Build a Discord Welcome Bot,” different agents handle different parts of the work: one creates the backend logic, another designs the front-end landing page, and others handle testing and packaging.
Here’s how the process works.
Step 1: Enter Your Prompt in Emergent
Open Emergent and type your main prompt. For this tutorial, use:
Create a Discord bot using Node.js and discord.js v14 that sends a welcome message when a new user joins the server. The message should include two interactive buttons:
📊 Server Stats - shows the number of total members, online members, and bots.
📜 Server Rules - displays the list of server rules in an embedded message.
Detailed Instructions:
When a new member joins, the bot should send a welcome message in a specific channel (e.g., #welcome).
The welcome message should include two buttons side by side:
“📊 View Server Stats”
“📜 View Server Rules”
When the user clicks:
The Server Stats button → the bot responds with an embed showing:
Total members count
Number of online members
Number of bots
The Server Rules button -> the bot responds with an embed containing at least 5 custom rules.
Use discord.js’s ButtonBuilder and ActionRowBuilder for button creation.
The embeds should look polished, with a title, color, description, and footer.
Make sure to handle interaction events properly using interaction.isButton().
Include all required intents and permissions for member and presence tracking.
After submitting the prompt, Emergent will start analyzing it and the agents will begin collaborating.
Step 2: Answer Emergent’s Clarifying Questions
Before writing the code, Emergent will ask you a few clarifying questions to better understand your preferences. These questions help it tailor both the bot and the landing page to your style.
These are the questions that I got - the questions might be different for you:
- Download Method:
How should users get the bot code?- a. Direct download as a ZIP file
- b. Copy code snippets from the page
- c. GitHub repository link
- Landing Page Sections:
What should I include on the landing page?- a. Hero section + Features + Setup Instructions + Download
- b. Simple one-page with instructions and download button
- c. Multi-section with FAQ, troubleshooting, and examples
- Design Style:
What vibe should the landing page have?- a. Modern tech/developer-focused (dark theme, code aesthetics)
- b. Clean and minimal (light, professional)
- c. Fun and colorful (Discord-themed with blues and purples)
- Additional Features:
Any extras needed?- a. Just static landing page
- b. Track download counts
- c. Contact/support form
Once you answer these, the agents will begin working together. The backend agent writes the bot code, the frontend agent designs the landing page, and the testing agent verifies that the code runs correctly.
Step 3: Review and Generate the Project
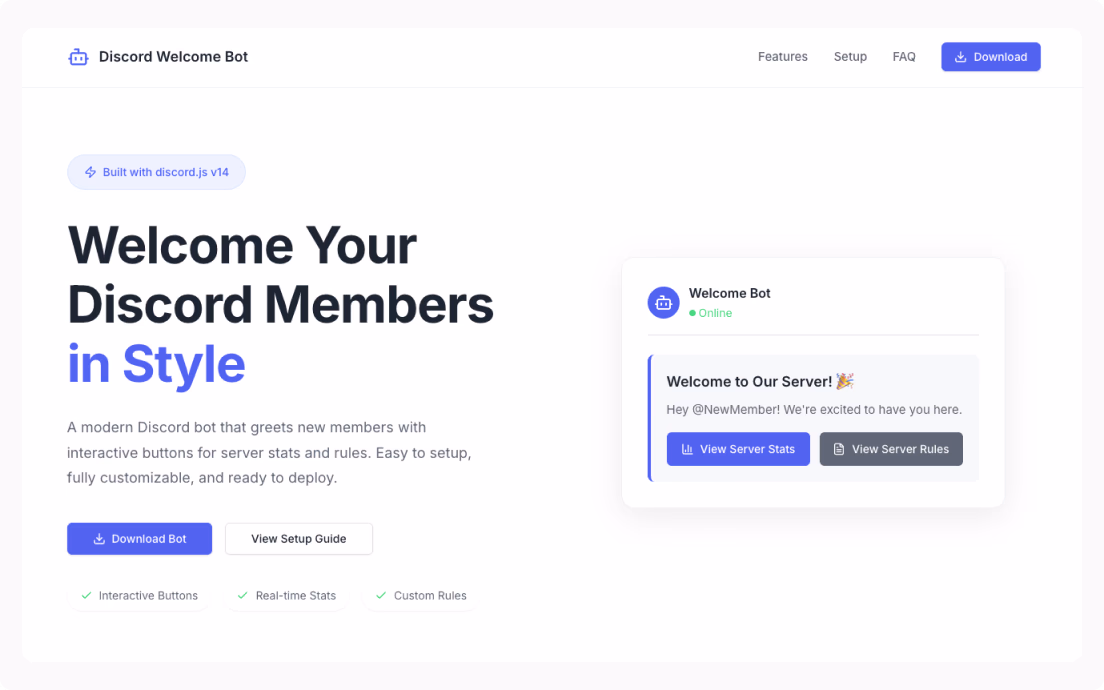
After a few minutes, Emergent will show you a preview of the landing page it has built. The page usually includes:
- A short description of the bot
- Clear setup instructions
- A download button for the ZIP file
Here’s how my landing page looks like:
You now have your project ready to download and run.
Next, we’ll go through how to set up your local environment and run the bot on your computer.
Setting Up Your Local Environment
Now that your bot has been created in the Discord Developer Portal and invited to your server, it’s time to set up your local environment so you can run it on your computer.
This is where we connect the pieces together. You’ll download the bot files that Emergent generated, install all the required packages, and then start your bot for the first time.
Step 1: Download the Bot Files
Once you ask Emergent to build the “Discord Welcome Bot,” it will create a project page for you.
On that page, you’ll see an option to Download Code. Click it to download a ZIP file containing your bot’s source code.
Extract the ZIP file to a location of your choice, such as your Desktop or a folder named discord-welcome-bot.
Step 2: Install Node.js
If you haven’t installed Node.js yet, go to https://nodejs.org and download the LTS (Long-Term Support) version for your operating system.
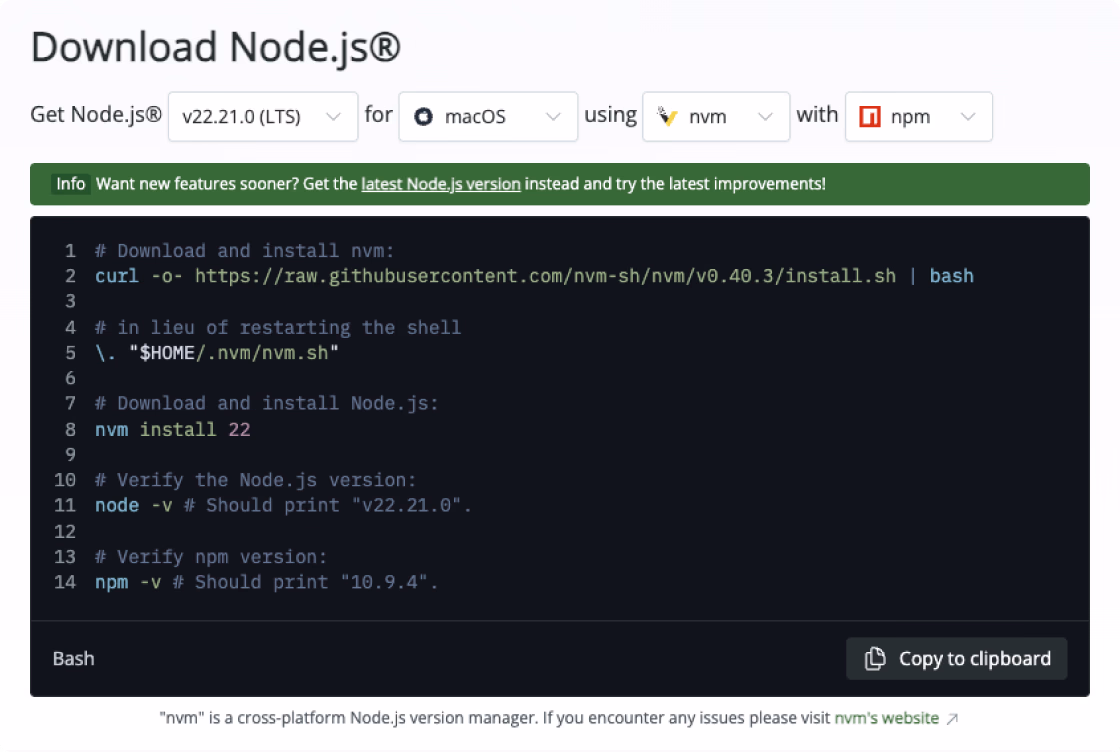
Once installed, open your terminal (Command Prompt on Windows or Terminal on macOS) and check that Node.js and npm are working:
node -v
npm -v
If both commands return version numbers, you’re good to go. This is how the response should look like:

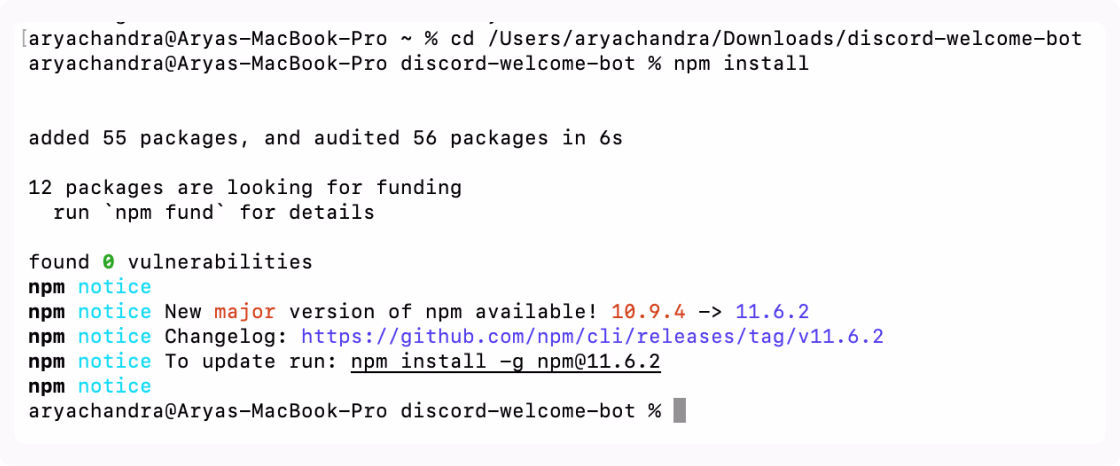
Step 3: Install Dependencies
Navigate to your bot’s folder using the terminal. For example:
cd ~/Desktop/discord-welcome-bot
Then install the required dependencies by running:
npm install
This will download and set up all the packages listed in your package.json, including discord.js.
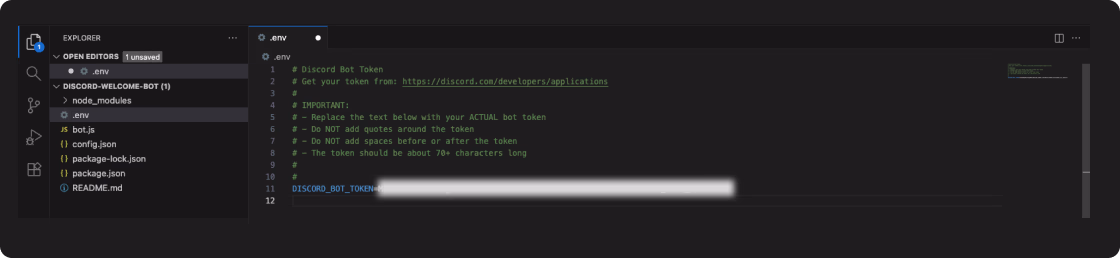
Step 4: Configure the Bot Token
Inside your project folder, you’ll find a file named .env.example.
Rename it to .env and open it in a text editor like Visual Studio Code
Paste your Discord bot token into the file like this:
DISCORD_BOT_TOKEN=your_bot_token_here
Save and close the file. This step is very important, as the bot uses this token to log in to Discord securely.
Step 5: Create a Welcome Channel
Before running the bot, make sure your Discord server has a text channel named welcome.
If you prefer a different name, you can open the config.json file inside your project and change the channel name there.
Step 6: Run the Bot
Now you’re ready to bring your bot to life. In your terminal, run:
node bot.js
You should see a message like “Bot is online” in your terminal, and your bot’s status in Discord will turn green.
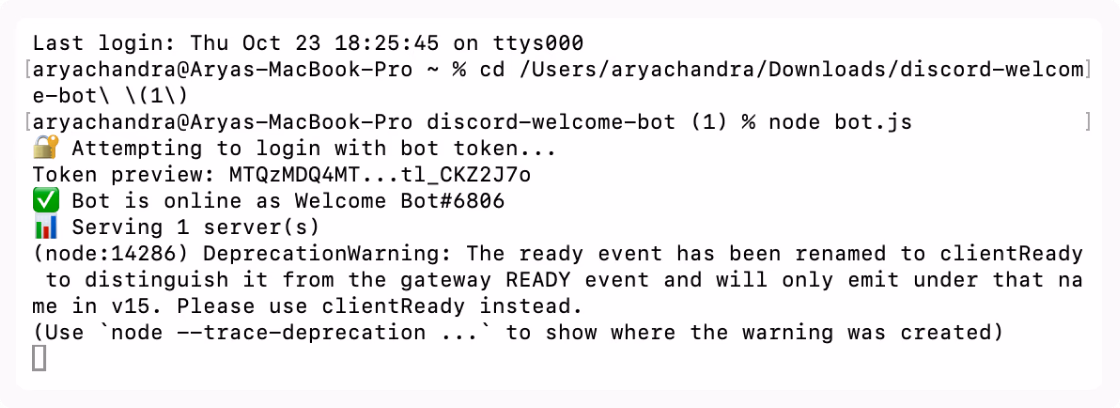
If you’ve followed everything correctly, your bot is now live and ready to greet new members in your server’s welcome channel.
Next, we’ll take a closer look at how the bot’s code works and understand how it handles new members, buttons, and interactions.
Understanding the Bot Code (For all the geeks out there)
Now that your bot is live, let’s go through how it actually works behind the scenes.
This will help you understand how Discord bots handle events, respond to user interactions, and maintain a smooth experience inside your server.
Step 1: The Entry Point - bot.js
This is where everything starts.
When you run node bot.js, your bot initializes by connecting to Discord using your token from the .env file.
The first few lines usually look something like this:
require("dotenv").config();
const { Client, GatewayIntentBits } = require("discord.js");

const client = new Client({
  intents: [
    GatewayIntentBits.Guilds,
    GatewayIntentBits.GuildMembers,
    GatewayIntentBits.GuildMessages,
    GatewayIntentBits.MessageContent
  ]
});

client.login(process.env.DISCORD_BOT_TOKEN);
Here’s what’s happening:
dotenvloads your token securely from the.envfile.Clientis your bot’s main connection to Discord.intentstell Discord what types of data your bot needs access to (for example, new members joining or messages being sent).client.login()connects your bot to the Discord API.
Step 2: Handling New Members
Next, your bot listens for new members joining the server.
This is where the welcome message is sent.
client.on("guildMemberAdd", member => {
  const channel = member.guild.channels.cache.find(ch => ch.name === "welcome");
  if (!channel) return;

  channel.send(`Welcome to the server, ${member}! 🎉`);
});
When a new member joins:
- The bot looks for a text channel named
welcome. - If it exists, it sends a personalized welcome message.
- If it doesn’t, nothing happens (which avoids errors).
Step 3: Sending Embeds and Buttons
Instead of just plain text, the bot can send rich messages using embeds and buttons.
const { EmbedBuilder, ActionRowBuilder, ButtonBuilder, ButtonStyle } = require("discord.js");

const embed = new EmbedBuilder()
  .setColor(0x5865f2)
  .setTitle("Welcome!")
  .setDescription("Glad to have you here. You can check out the server rules or view stats using the buttons below.");

const buttons = new ActionRowBuilder().addComponents(
  new ButtonBuilder().setCustomId("rules").setLabel("View Server Rules").setStyle(ButtonStyle.Primary),
  new ButtonBuilder().setCustomId("stats").setLabel("View Server Stats").setStyle(ButtonStyle.Secondary)
);

channel.send({ embeds: [embed], components: [buttons] });
This message gives users a cleaner, more interactive experience.
Step 4: Responding to Button Clicks
Your bot also needs to listen for button interactions.
client.on("interactionCreate", async interaction => {
  if (!interaction.isButton()) return;

  if (interaction.customId === "rules") {
    await interaction.reply("Here are the server rules: Be kind, stay respectful, and have fun!");
  }

  if (interaction.customId === "stats") {
    const totalMembers = interaction.guild.memberCount;
    await interaction.reply(`There are currently ${totalMembers} members in this server.`);
  }
});
Here’s what happens:
- Every time a button is clicked, the bot checks what the button’s ID (
customId) is. - Depending on the ID, it sends a different response (either the rules or stats).
Step 5: Keeping the Bot Running Smoothly
Finally, your bot listens for when it connects successfully to Discord.
client.once("ready", () => {
  console.log(`Logged in as ${client.user.tag}!`);
});
This helps confirm that your bot is live and ready to respond.
With your Discord Welcome Bot fully built, tested, and understood, you now have the skills to create interactive bots and leverage Emergent to bring your ideas to life. Keep experimenting, customizing, and exploring - the possibilities for your Discord server are endless.
Emergent turns your idea into a full-stack web or mobile app, no coding required.
 No coding required
- Web & mobile apps
- Deploys instantly


on emergent today