



TL;DR
- What you're building: A personal website with four public pages (home, work, about, contact) plus a private dashboard that stores every inquiry behind a login. The contact page takes 30-minute bookings.
- How you build it: One prompt to Emergent, five clarifying questions, then a page-by-page review before you click Deploy.
- How long it takes: Two to three hours end to end, most of it your own writing. The build itself ran 12 minutes, and deployment adds around 15 minutes.
- What it costs: A straightforward brochure site fits the Free plan's 10 monthly credits. This build used 21.36 credits, which puts it on the Standard plan at $20/month.
- When to skip it: If your site is a gallery or a brochure with nothing behind it, a template builder is faster and more polished.
Someone lands on your personal website, reads your about page, decides they want to work with you, and sends a message. Then it sits in your inbox until you dig it out three days later. That's where most guides on how to build a personal website stop.
So I built one as a small piece of software instead. It runs on a stand-in profile, a web developer named John Doe, so the screenshots below don't leak anyone's client list.
It has the four public pages any portfolio has, plus a private dashboard where every inquiry arrives with a status I can change and a note I can leave, and a booking section that hands out 30-minute slots. The whole thing came out of one prompt and five answers.
Below are the eight steps I followed, the prompt I used, what the Emergent route costs and how the others compare, and the point where I'd tell you to use something else.
What Your Personal Website Has to Do
A personal website has four jobs, and only the first one is design. It has to say what you do in the first three seconds, show proof that you do it, give a visitor one obvious next move, and then hold onto whatever that visitor sends you.
The fourth job is the one that gets skipped. Most template builders hand you a contact form that emails you and then forgets the whole thing happened. Six months later, you have a folder of half-answered messages and no way to tell which ones you replied to.
The fork is whether your site has to remember anything, and it decides everything downstream. If your site's only job is to look like a business card, a template is genuinely the right call, and you'll be done in an afternoon. If you want your site to keep a record, take bookings, or add a login to a page, you need something that can store and manage information.
Pick Your Build Route Before You Pick a Template
There are five realistic ways to make a personal website in 2026, and they differ mostly in how far they let you go before you have to start over.
Template platforms like Wix get you live fastest and are the hardest to extend. Design-first tools like Webflow trade some of that speed for control over every pixel. Writing the code yourself gives you everything and asks for your evenings.
If you want the tool-by-tool breakdown inside each route, the roundups of personal website builders and online website builders go through them individually. The table below compares the routes on the thing that matters most: where each one hits a wall.
| Route | Best for | Where it stops |
|---|---|---|
| Template builders (Wix,Squarespace) | A polished page this weekend | Custom logic, stored submissions |
| Design-first builders (Webflow,Framer) | Designers who want pixel control | Logins, dashboards, bookings |
| WordPress | Long-term blogging and SEO | Plugin upkeep, hosting admin |
| Hand-coded static site | Developers who enjoy it | Anything needing stored information |
| AI app builders (Emergent) | Sites with logic behind them | Purely visual, brochure-only work |
Emergent is the route I took. It's an AI app-building platform for vibe coding, where you describe the site you want in plain English, and a coordinated set of specialized agents builds it out.
Some shape the screens people see, others wire up the logic and the sign-in, and testing agents check the result before anything ships. What comes back is a complete, working site, and you own the code.
It won't suit every project. If you write code for a living and want a faster way to write it, Cursor and Claude Code fit better. If your site is a marketing page with nothing behind it, Webflow gets you a more designed result. And if you need something to survive one pitch meeting and then quietly retire, almost anything on the list works.
Also read our cost to build a website guide, which prices six routes individually.
What You'll Need Before You Start
Four things, and none of them are technical:
- Your content: A short bio, three to six projects with a sentence each, and a photo. This is the part that stalls people, so write it in a plain document first.
- A domain name idea: Two or three options in case your first choice is taken.
- An Emergent account: The Free plan's 10 monthly credits are enough to build and preview a site. Publishing it to a live address with a custom domain starts on the Standard plan, and this build needs that anyway.
- A Google account: Sign in to your private dashboard through Google, so use the address you check every day.
Time required: Two to three hours from the first prompt to a live site. The build itself took 12 minutes, so nearly all of that is you writing your own copy and reviewing what comes back.
How to Build a Personal Website in 8 Steps
Each step builds on the one before it. Steps 1 through 3 happen in a notes app, and Steps 4 through 8 happen inside Emergent.
Step 1: Write the One Sentence Your Site Has to Earn
Before any tool, write one sentence naming who you are, who you help, and what you want a visitor to do. The one behind the build in this guide reads, "I'm a web developer, and I want hiring managers and prospective clients to see my projects and book a call."
That sentence decides your headline, your navigation order, and which project you feature first. Sites without it drift into "Welcome to my website," which tells a visitor nothing and gives a search engine nothing to rank you for.
Pro Tip
Pro tip: Write the sentence for one specific person you'd like to hear from. A named audience produces sharper copy than a general one every time.
Step 2: Map Your Pages and What Each One Remembers
List your pages, then list what each one has to remember. The build in this guide uses five pages, and only three of them store anything:
- Home: Short intro, three featured projects, one call to action. Stores nothing.
- Work: Every project, filterable by type and year. Stores your project list.
- About: Longer bio, photo, downloadable resume. Stores nothing.
- Contact: Inquiry form and a booking section. Stores every submission.
- Dashboard: Private, sign-in only, where inquiries land. Stores statuses and notes.
Writing the second half of each line is what separates a five-minute build from a rebuild next year. Pages are easy to add later, but what your site remembers is much harder to change once it's built.
Step 3: Pick Your Domain Name Before You Build
Your first name plus last name plus .com is still the best domain for a personal site, because it's what people type when they half-remember who you are. If it's taken, add a middle initial or your profession rather than a number.
You don't have to buy it yet. Emergent can search for availability and register it for you later, and it can also connect a domain you already own. Deciding the name now matters because it shapes your page titles and your email address, and Step 6 asks you for the email.
Step 4: Open Emergent and Choose the Web App Tab
Sign in at Emergent, and you'll land on a large prompt box with build types across the top. Choose the Web app tab. The website option is tuned for pages, while the web app option is what you want when your site has to store submissions and put a login on a dashboard.
One more thing to set above the prompt box: in the model selector, pick Claude Opus 5, which handles long, multi-page instructions better than the faster models.
Note: Set the model and the tab before you type. Changing either one after a build has started will restart the build.
Step 5: Write the Prompt, or Have Emmy Write It for You
Your build is only as good as the paragraph you feed it. A vague prompt is what produces a disappointing first build, and the fix is to be specific up front. You have two ways to get there.
The first is to describe the site badly and let Emergent's assistant tidy it up. Emmy is a chat assistant built into the platform, and her icon sits in the bottom right corner of every page. She's free, and talking to her costs no credits, so there's no reason to ration questions.
Open the chat and type something as loose as "I want a personal site that collects client inquiries somewhere I'll actually see them."
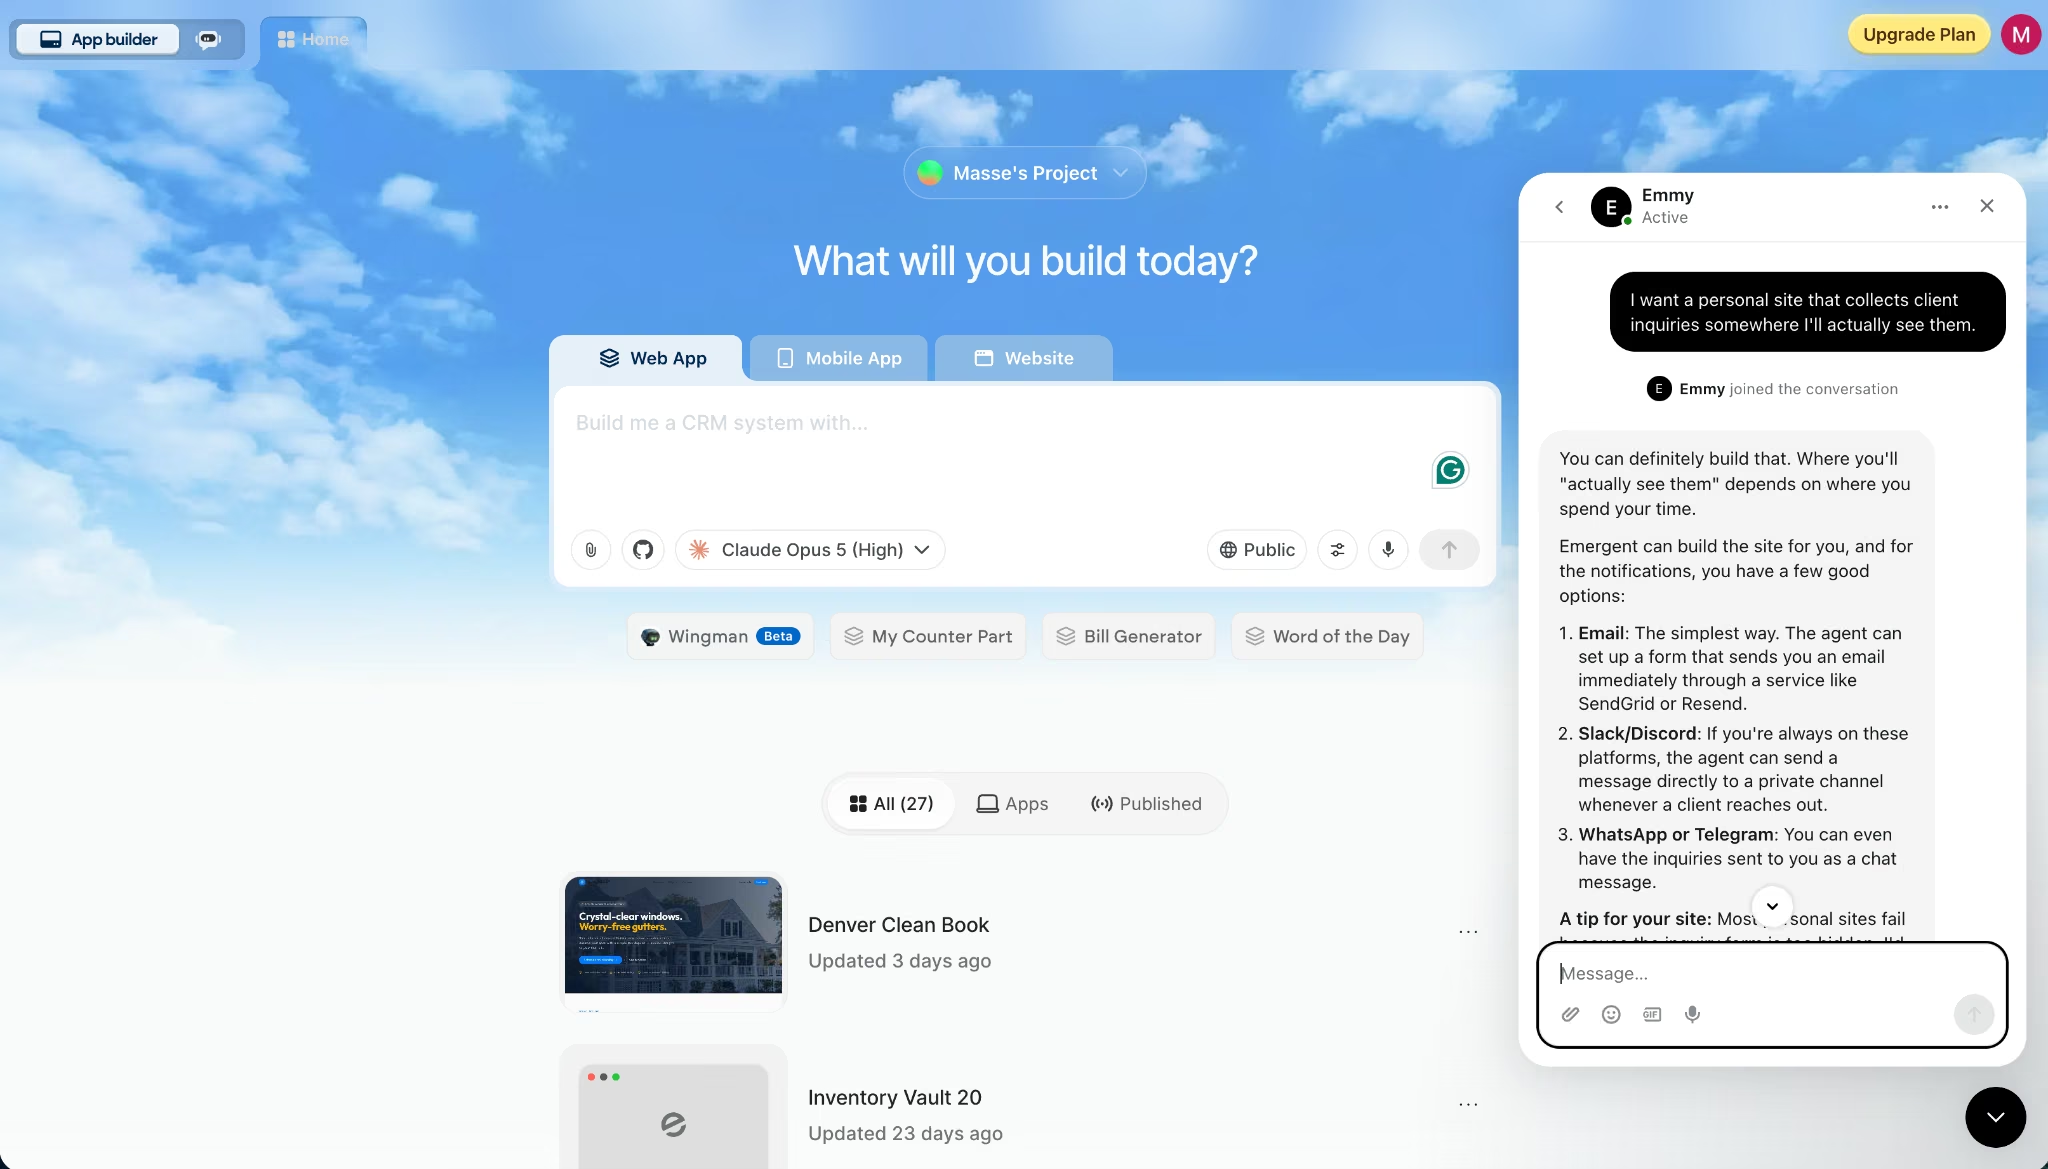
Emmy asks follow-ups from there, mostly about what the site has to do, who's using it, and what has to exist on day one versus what can wait. Those are the same questions that otherwise surface halfway through a build and cause it to stall.
Then ask her to write the prompt. She turns the conversation into a build-ready paragraph you can paste straight into the prompt box, edit first, or throw out and ask for a different version.
She's also the fastest way to settle the choices in Step 4, since asking which build type and model suit your project gets you the tradeoffs in context rather than a second tab of documentation.
“Build a personal website for John Doe, a web developer based in the US. It needs five pages: a home page with a short intro and three featured projects, a work page listing every project with filters for type and year, an about page with a bio and a downloadable resume, a contact page, and a private dashboard I log into with Google sign-in. The contact page has a form collecting name, email, project type, budget range, and message, and every submission is saved and shown in my dashboard with a status of new, replied, or archived, plus a note field and a filter by status. Email me when a new inquiry arrives. Add a Book a Call section on the contact page where visitors pick a 30-minute slot from my available weekday hours and get a confirmation email. Keep the design clean and text-first with generous white space and one accent color, and make every page fast and readable on a phone first.”
Swap the name, the role, and the location for your own, and the rest carries over to any personal site.
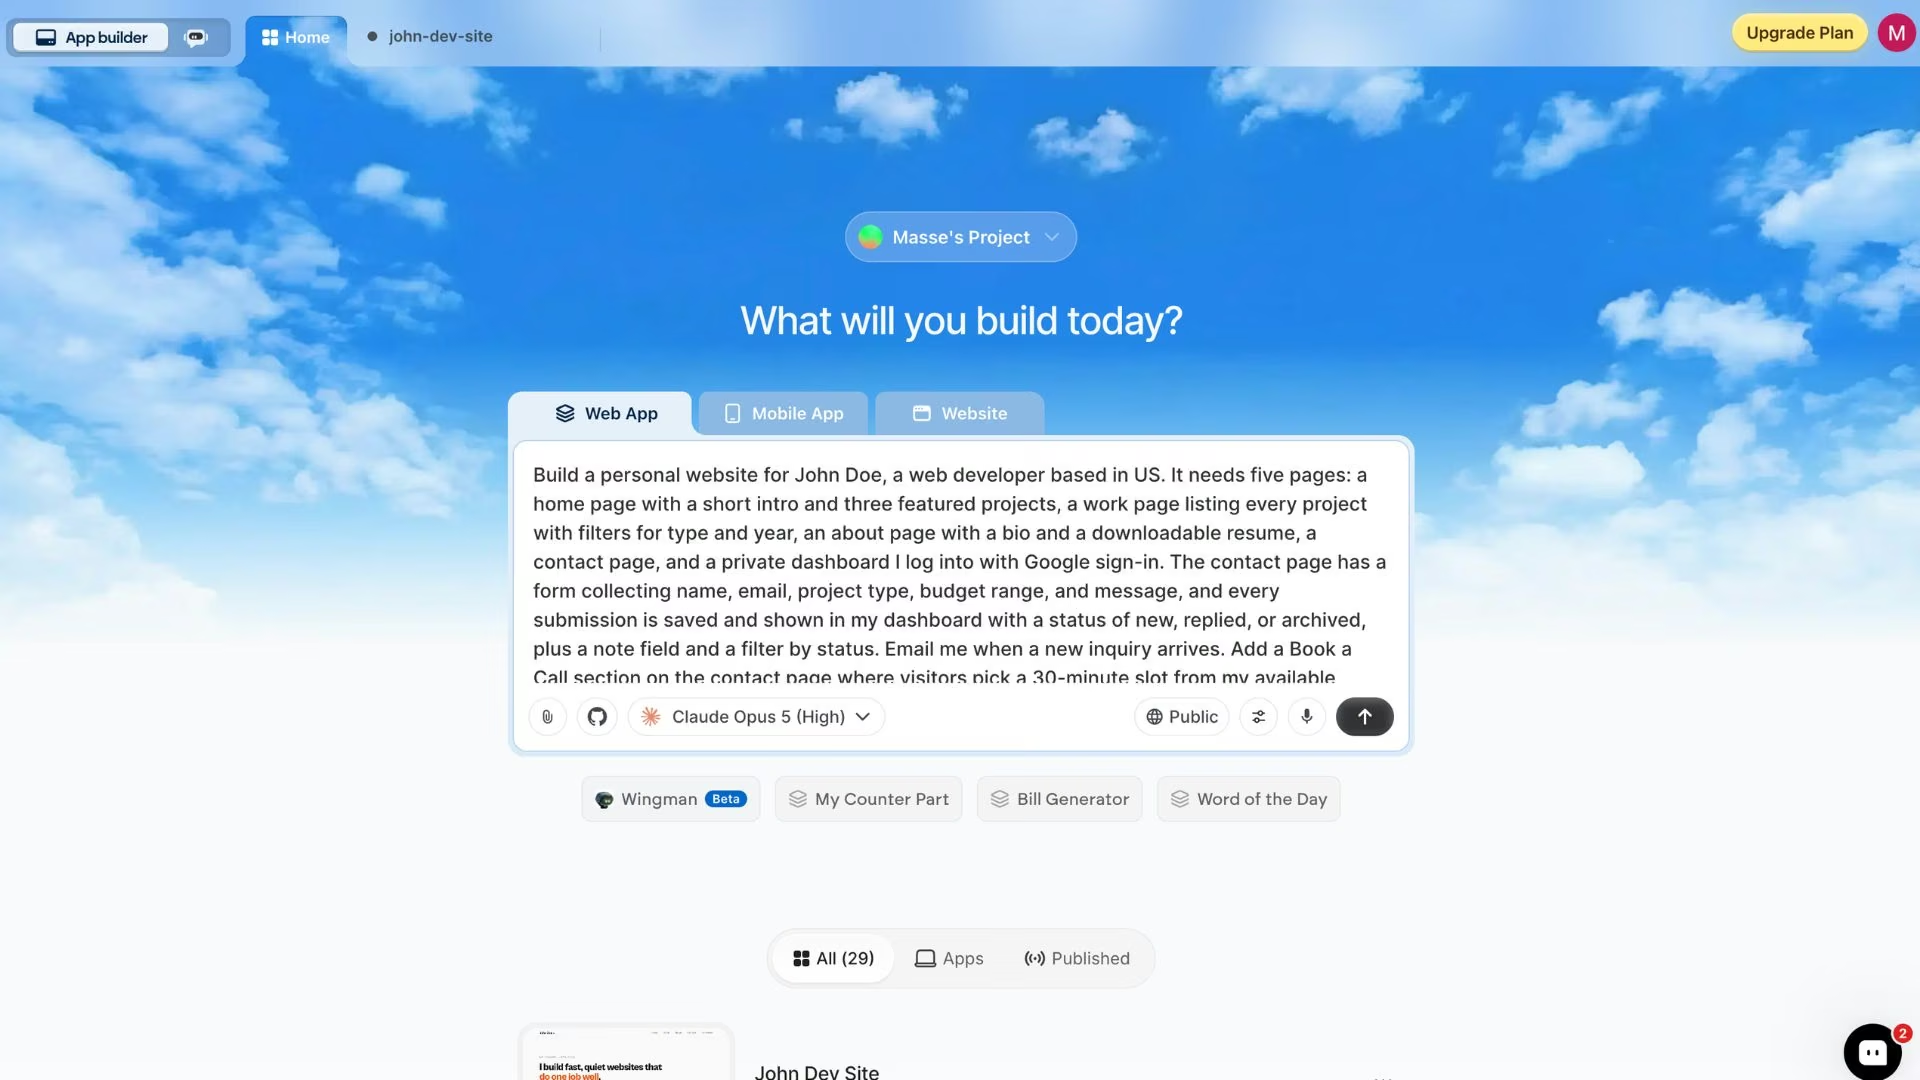
Three things make that prompt work, and they're the same three to check on anything Emmy hands you. It names every page, so the agents never have to invent one. It names every form field, so what you collect matches what you'd ask a client anyway. And it puts the design direction last, so the look serves the content.
Note: Ask for mobile-first explicitly. StatCounter put phones at 52.57% of worldwide page views in July 2026, and a personal site shared over text or LinkedIn skews further that way.
Step 6: Answer the Clarifying Questions
Emergent asks clarifying questions before it starts building. They cover the parts of your description that could be read two ways, and your answers become the spec it builds against.
The five questions it asked me:
- Google sign-in for the dashboard: use Emergent-managed Google sign-in (no keys needed, fastest)? Yes, Emergent-managed sign-in.
- Email notifications for new inquiries and booking confirmations: which provider? Emergent-managed Resend.
- Which email address should receive inquiry notifications? Add your own email here.
- Resume download: Do you have a PDF to upload, or should I generate a placeholder? Generate a placeholder.
- Accent color preference? You choose.
One of those answers is worth copying, and one comes with a catch. Emergent-managed sign-in worked with no setup at all. Emergent-managed email still needed a key before anything actually sent, which I only found in the handover notes, so budget five minutes for it rather than assuming managed means done.
Answer all of them before you let it start. Skipping a question means the agents pick a default anyway, and you end up rewriting those defaults in Step 7.
Note: When a question offers a choice you don't recognize, take the managed or simpler option and note it. You can swap in your own provider later in a one-line follow-up.
Step 7: Review the First Build Page by Page
When the build finishes, you'll get a live preview on the right side of the screen that you can click through.
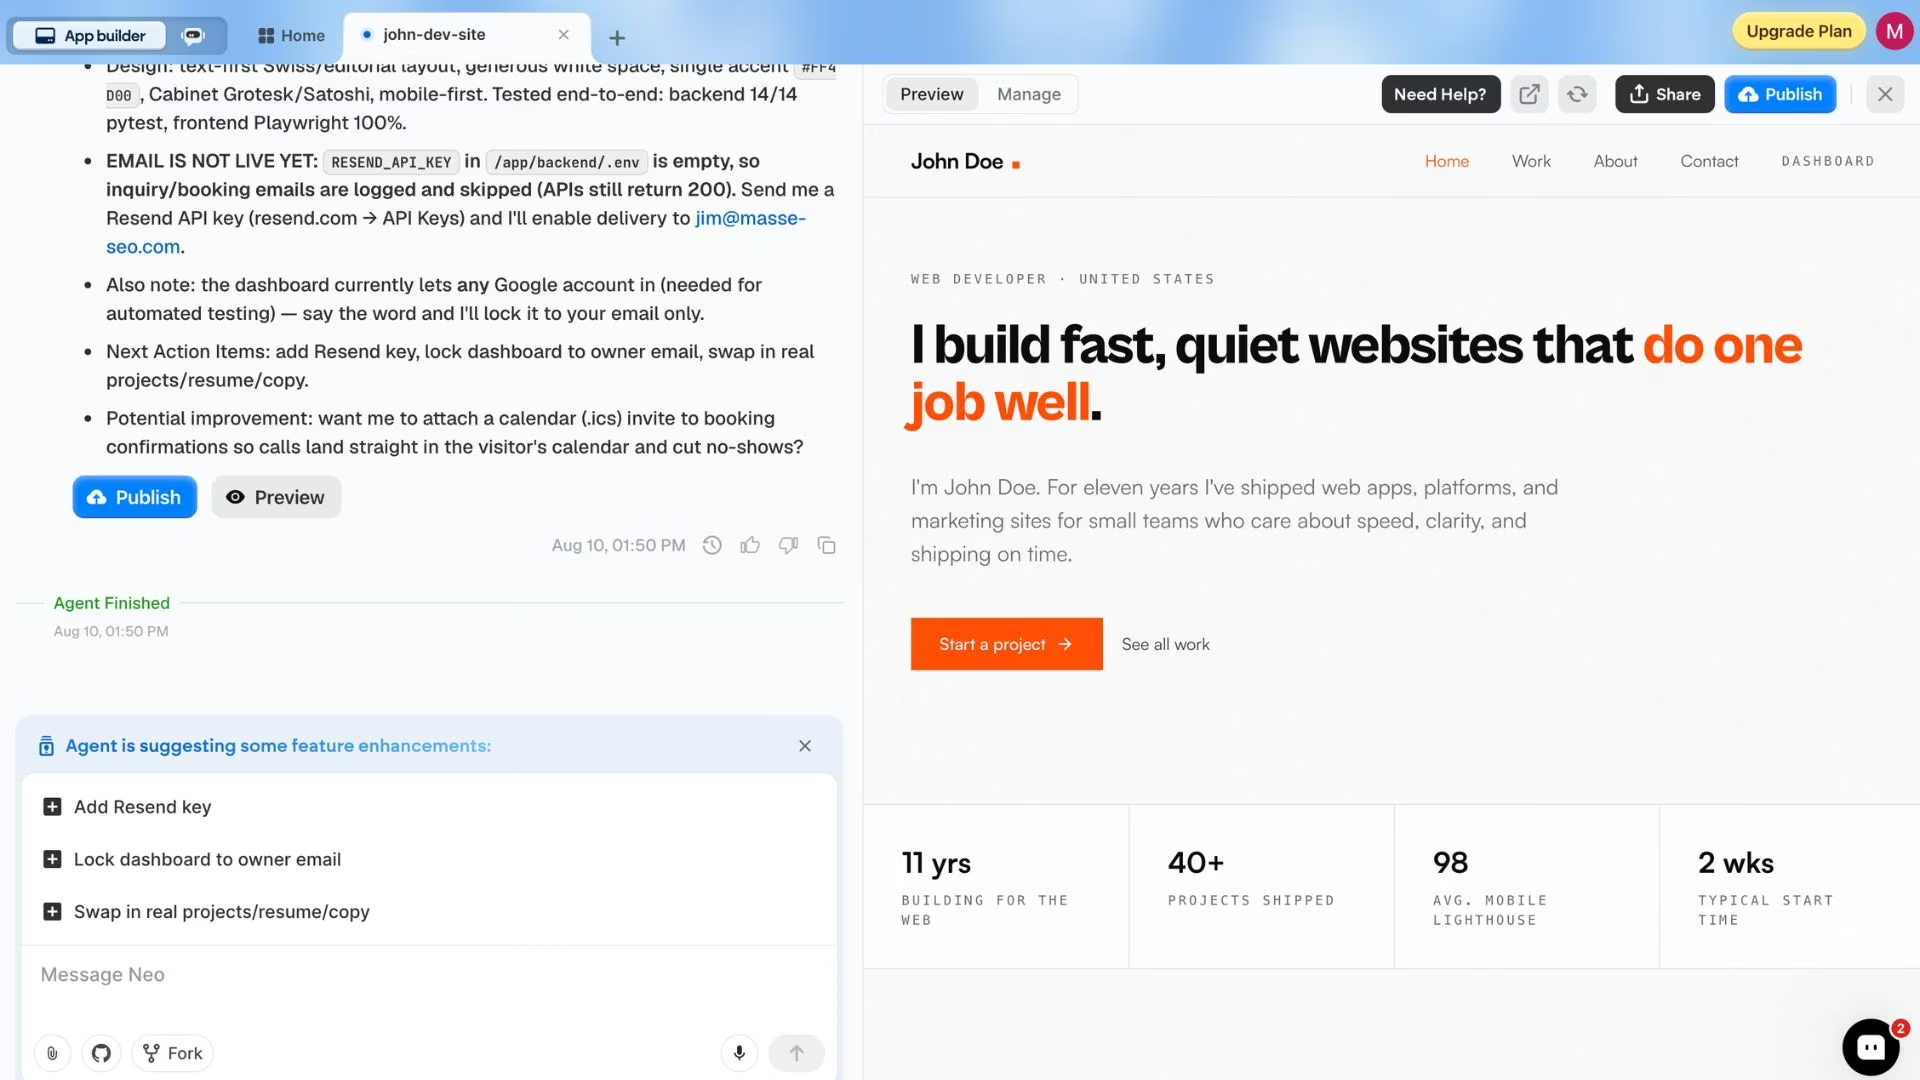
Go page by page against your Step 2 list and check behavior before appearance. Here's what came back, in the order I clicked it.
Home page. The hero is the part that sells, and this one landed. Under it, the build laid out the three featured projects I asked for and then added an experience section I hadn't specified, which turned out to be the better call. A visitor gets the standard of the work and the shape of the career in one scroll.
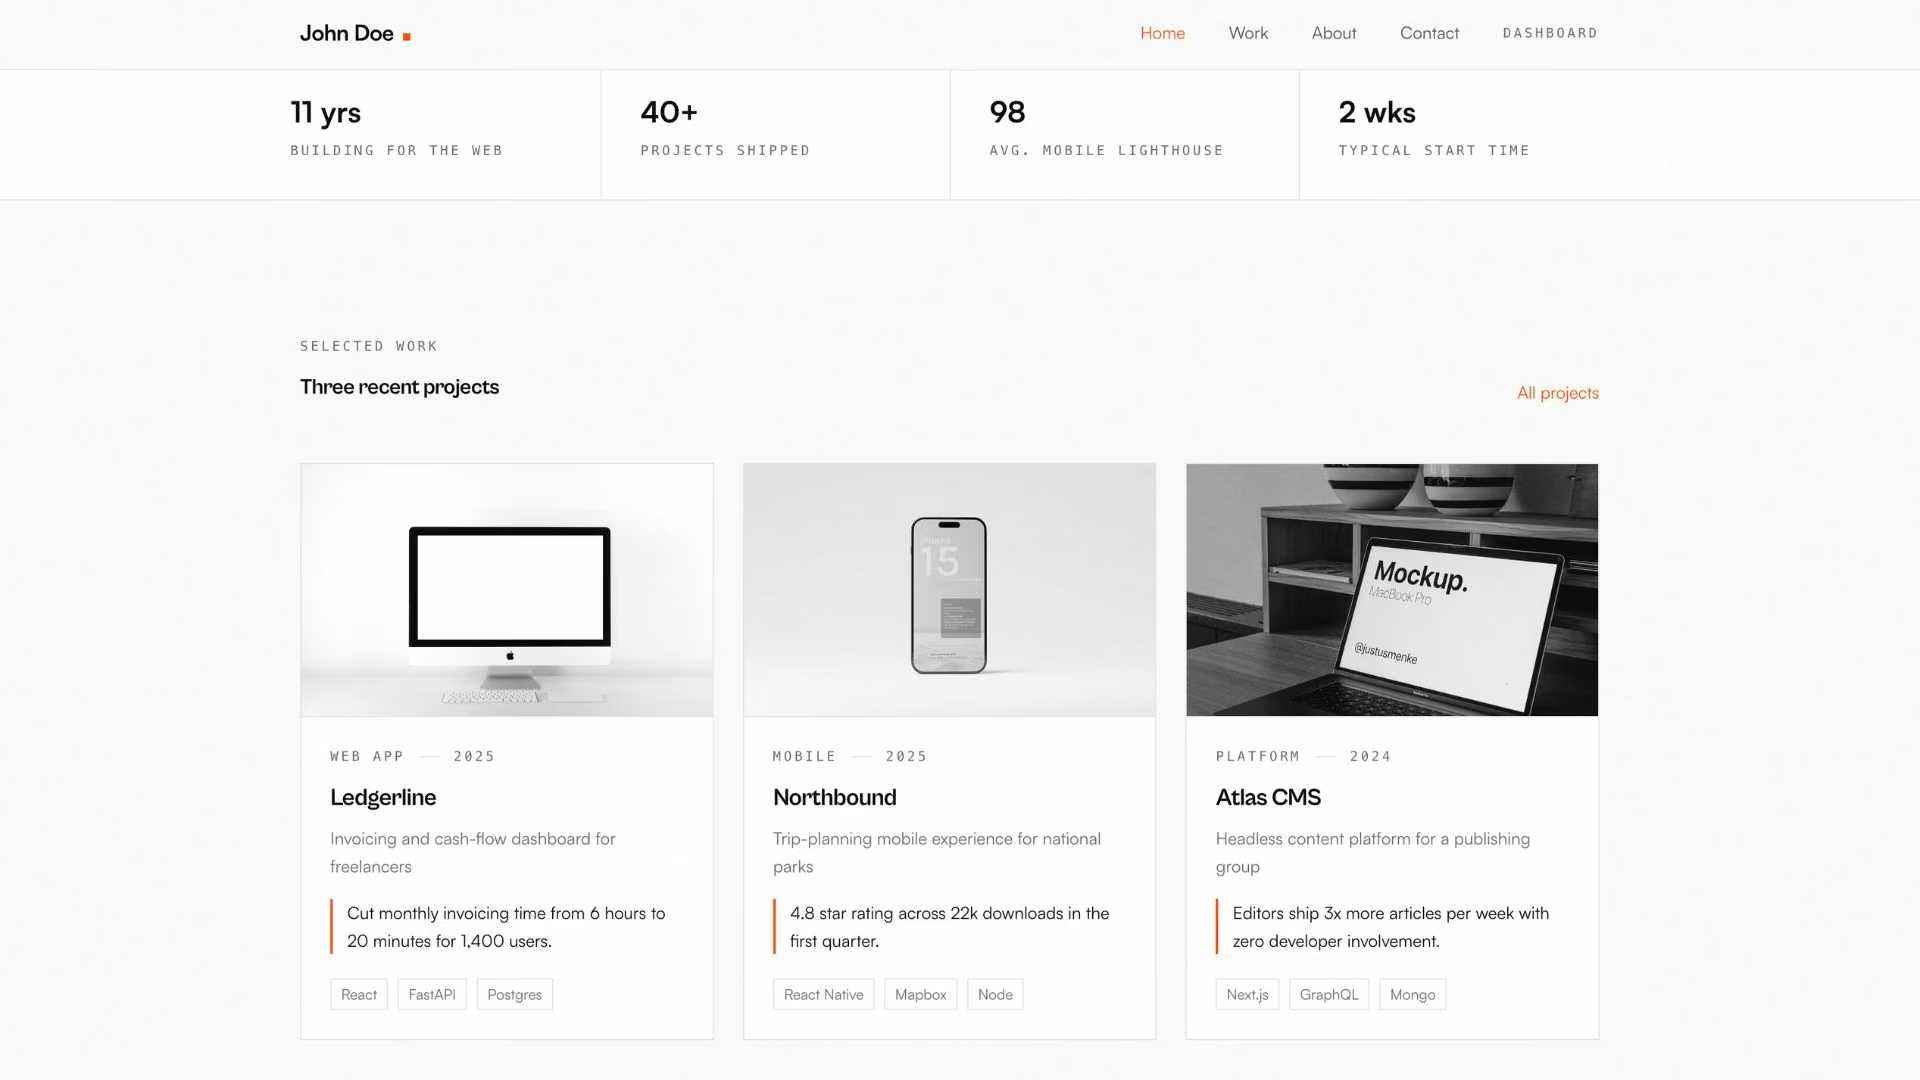
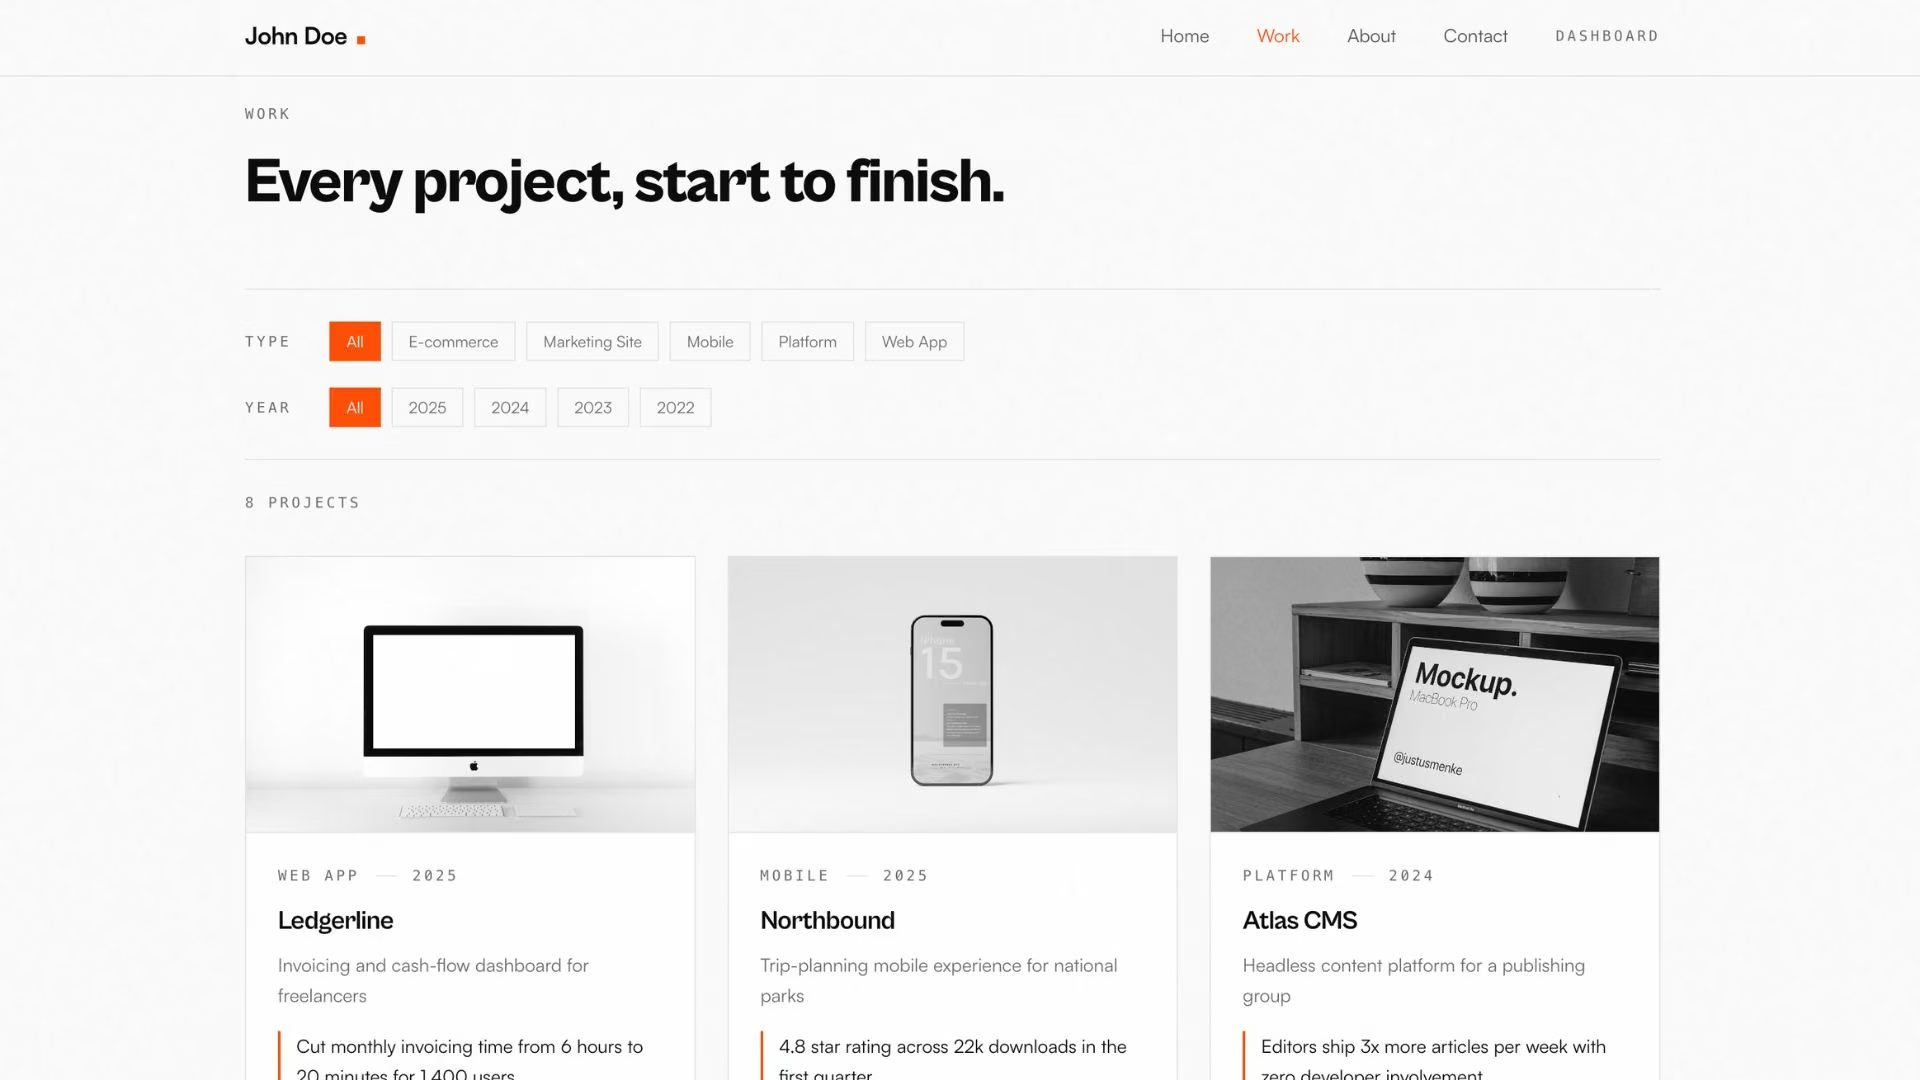
Work page. Every past project sits here, and the type and year filters both worked on the first pass. This is the page that separates a portfolio from a list, because it lets a visitor who only cares about one kind of work find it without scrolling past four years of everything else.
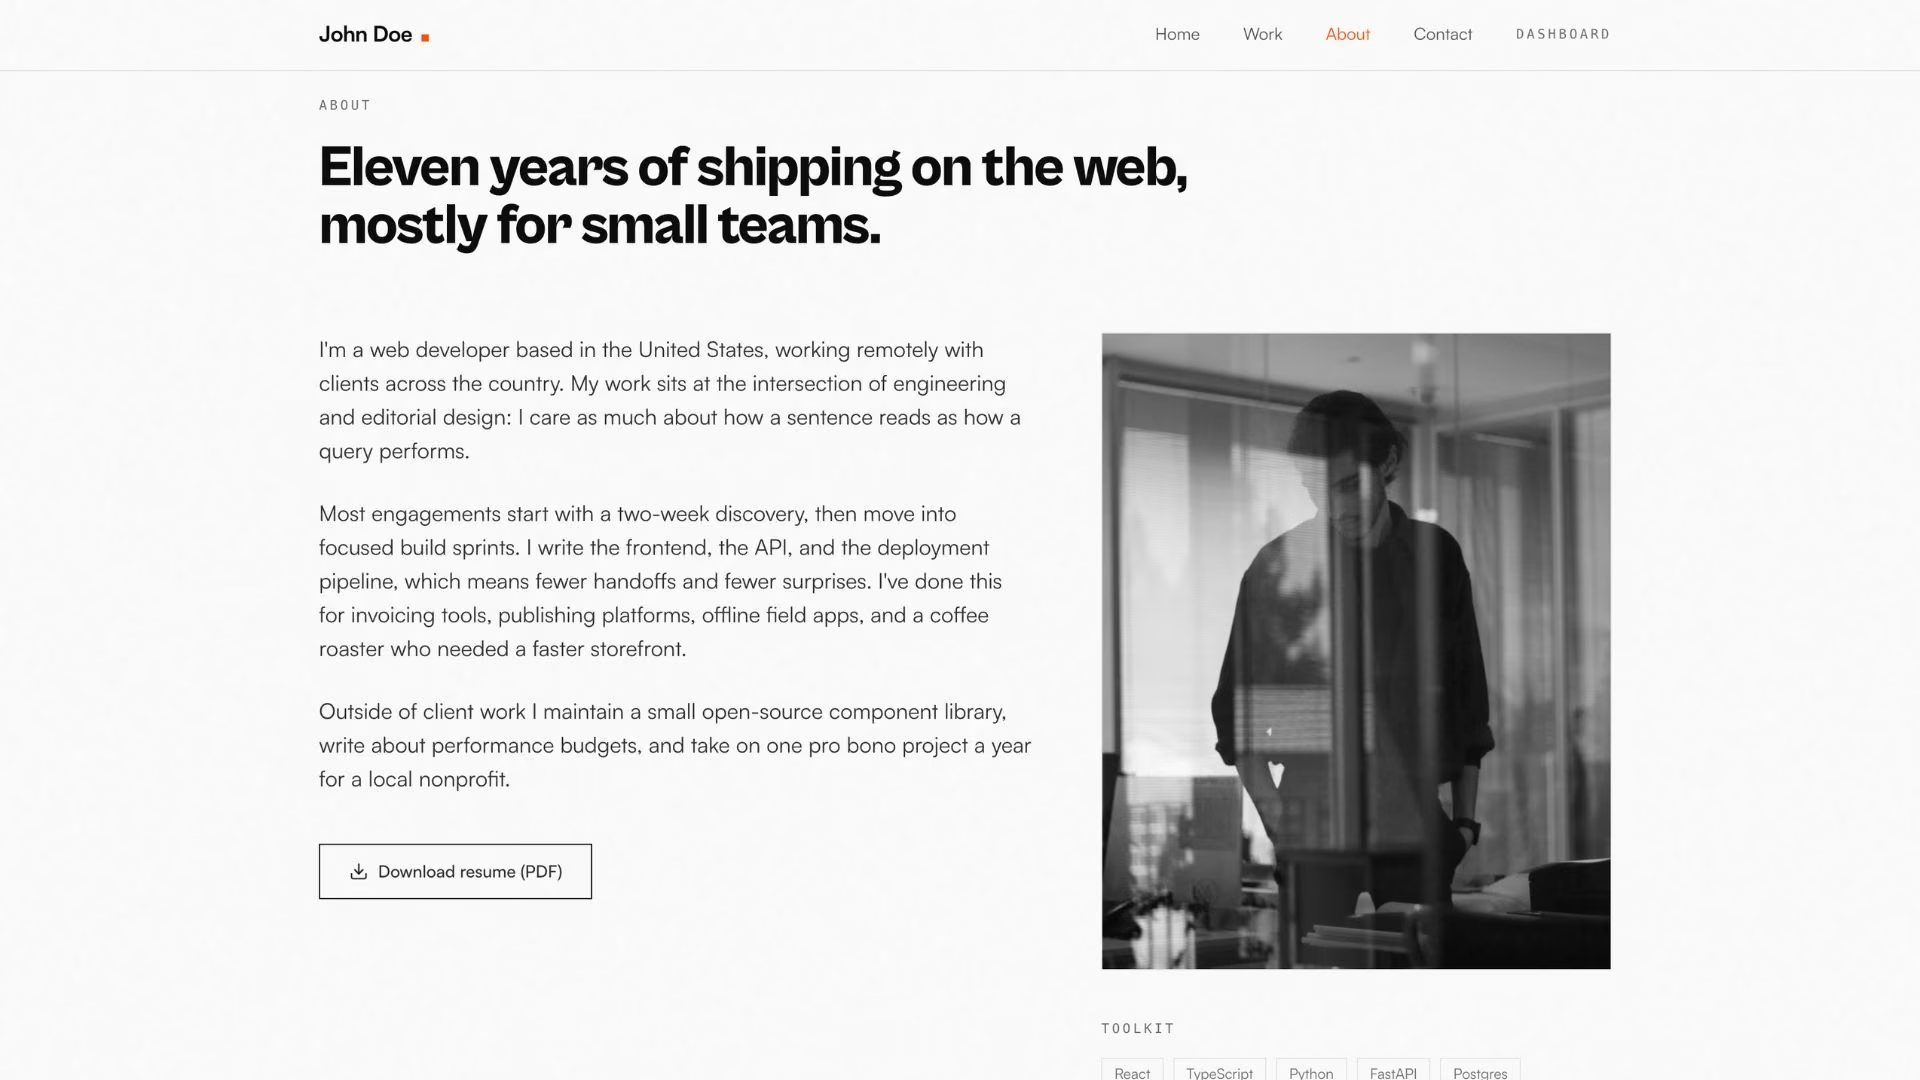
About page. A bio, a portrait, and the resume download are sitting right where someone would look for them. The generated placeholder PDF is there to be replaced with your own, and it's the first thing I'd swap before sharing the site.
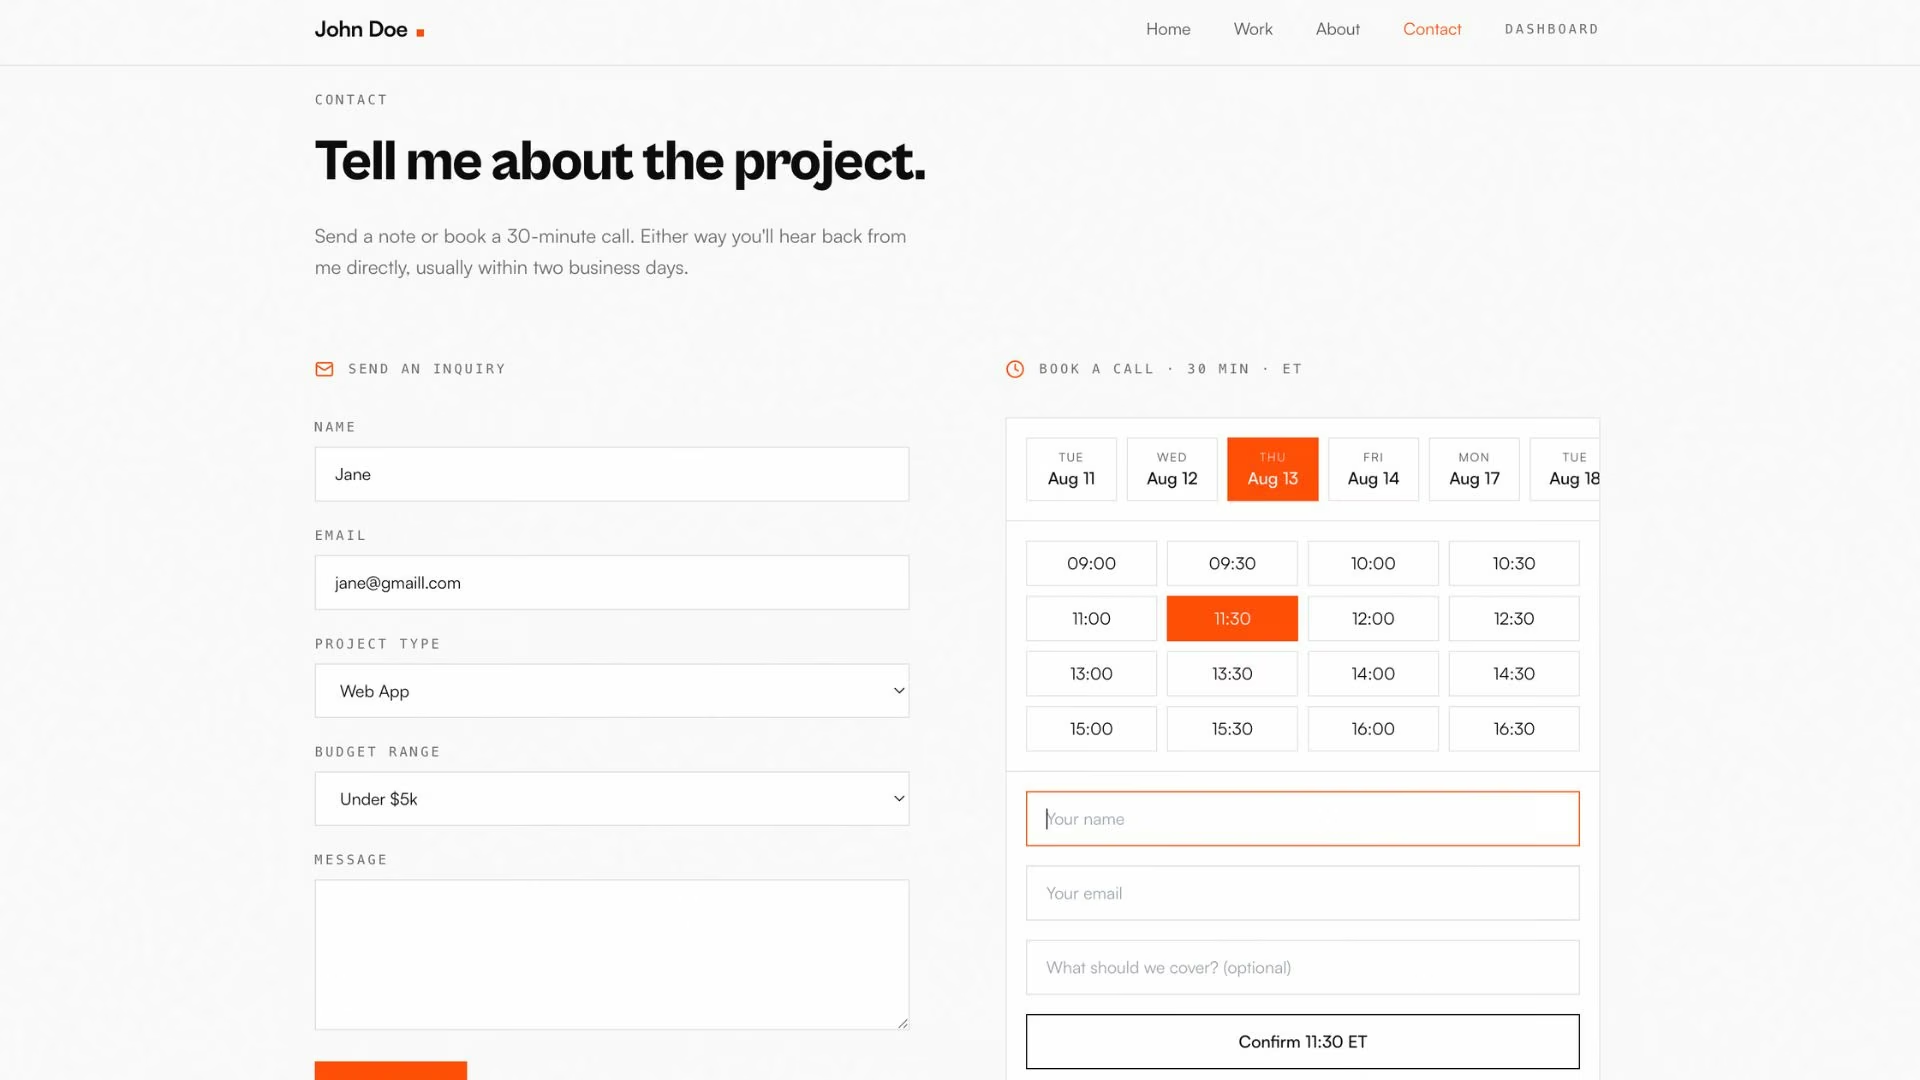
Contact page. Both paths live here. A visitor can send a note through the form or book a 30-minute call, and neither one asks them to leave the page. That's the whole point of the build, so this is the page I tested hardest.
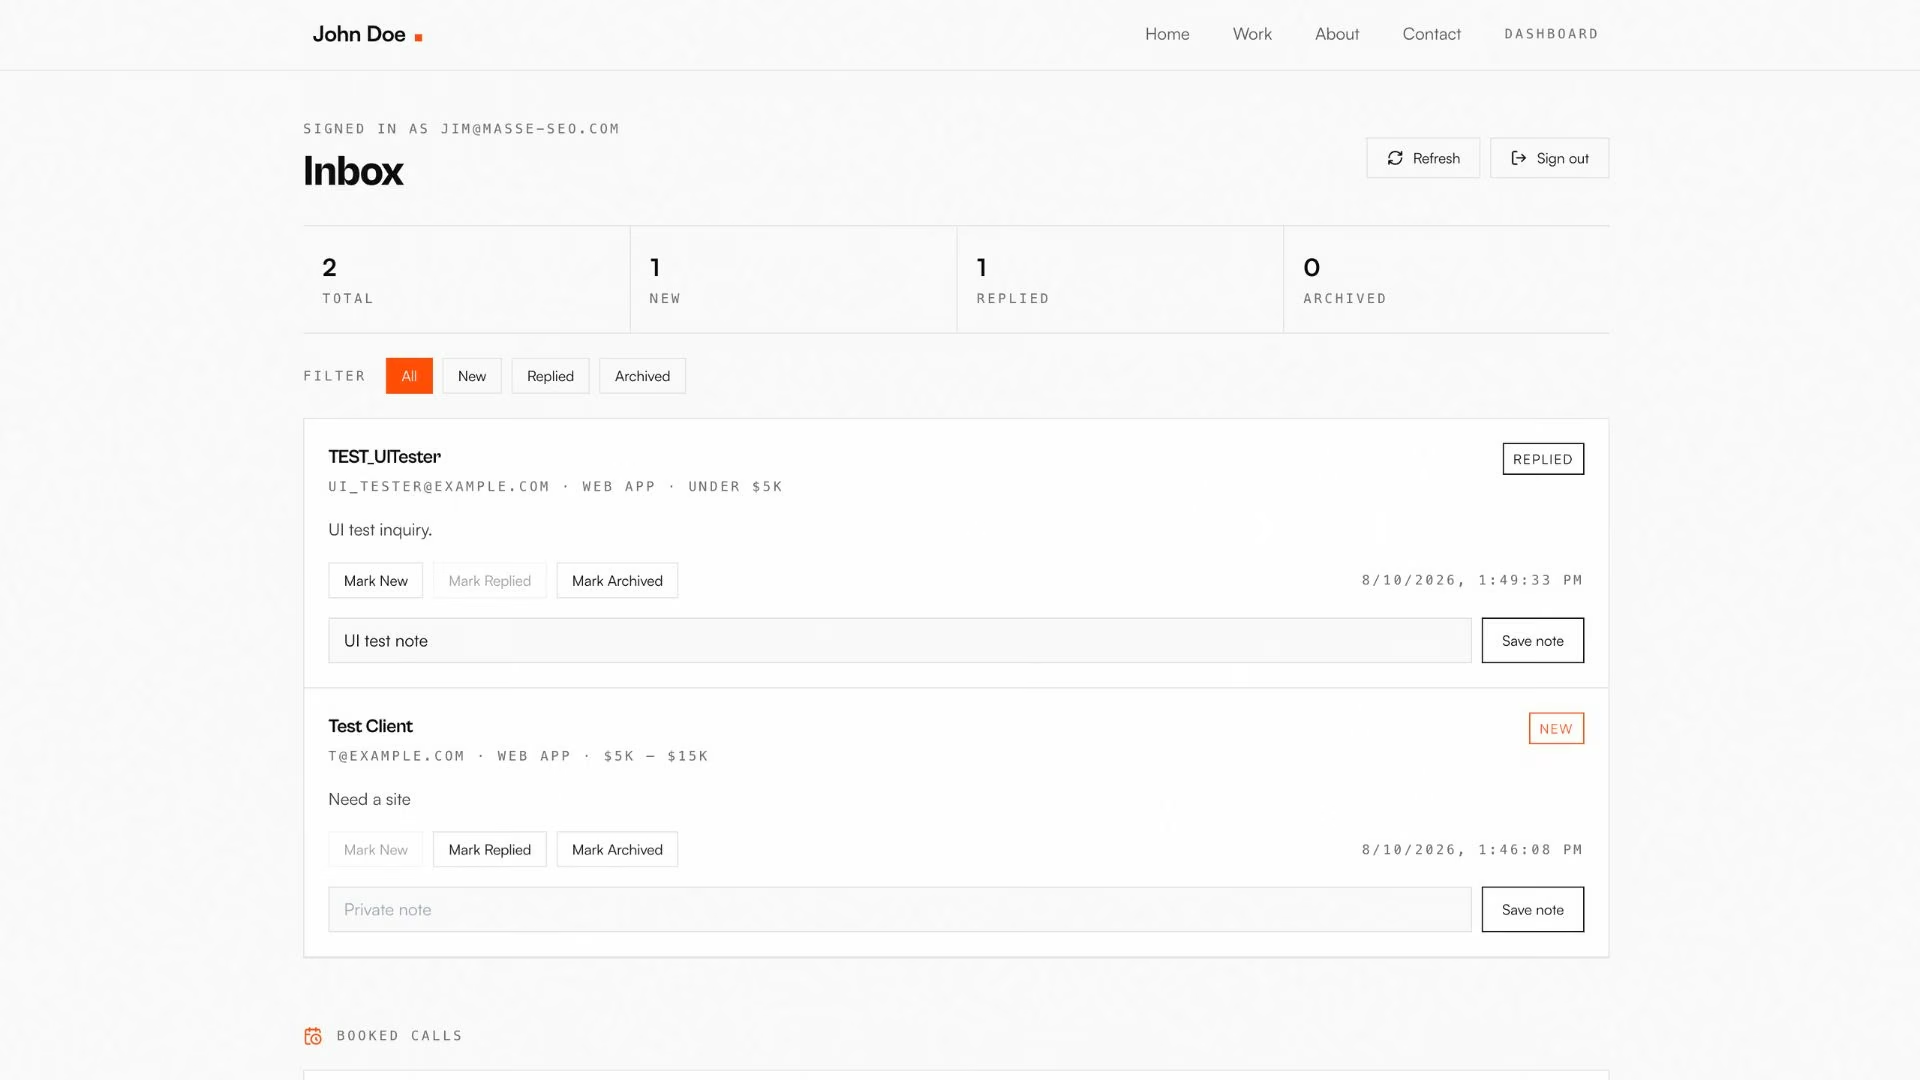
Dashboard. Sign-in-gated, so only I can get in. Inside is every note and every call request in one list, the piece a template builder can't give you. Submit a test inquiry from the contact page and watch it show up here before you call the build finished.
Read the handover notes before you celebrate. The agents tell you what they decided and what they couldn't finish. Mine picked #FF4D00 as the accent color I'd handed back to it in Step 6, ran 14 checks against the page logic plus a pass across the screens, and then flagged the thing I would have shipped blind.
Email delivery wasn't live. Both the form and the booking flow saved submissions and reported success, so nothing looked wrong from the outside, but notifications were being logged and skipped because the Resend key was empty.
Every inquiry would reach the dashboard, and none would reach my inbox. Adding a Resend key through Emergent's integrations turns delivery on.
A form that returns success is not the same as a form that reached you. Submit a test inquiry, then go looking for the email.
It also included a calendar invite in the booking confirmations, which I hadn't asked for. Suggestions are yours to take, skip, or reword. Then work through what's left one change at a time, since a follow-up naming one page and one change lands cleanly where a list of 10 tends to break something else.
Note: Fix behavior first and styling last. Colors and spacing are one-line changes, while a form that saves but never notifies you is the kind of thing you find out about from the client who gave up waiting.
Step 8: Deploy, Connect Your Domain, and Get Indexed
Nothing goes live until you say so. Click Deploy in your project, and after around 15 minutes, your site will be live at a .emergent.host address you can share immediately.
To put it in your own name, open the Deployments panel, find the Custom Domain section, and click Link Domain.
From there, you have two paths. You can search for a new domain within Emergent and register it through the built-in IONOS integration, which is free for the first year before standard IONOS renewal pricing applies.
Or you can connect a domain you already own from GoDaddy, Namecheap, or anywhere else. Emergent gives you one line of settings to copy. Sign in where you bought the domain, paste it in, then come back and click Check Status. Emergent usually confirms it in five to 15 minutes, and the new address can take up to 24 hours to start working everywhere.
The last piece is being found. Google picks up most new sites on its own without you submitting anything, though adding your site to Search Console flags anything that might be stopping Google from understanding your site. To check whether a page is in yet, search site:yourdomain.com. Expect that to take anywhere from a few days to a few weeks.
Pro Tip
Pro tip: Link your new domain from your LinkedIn, GitHub, and any bio you control on launch day. Those links are how crawlers find you first.
Here’s the link to the deployed app: john-dev-site.emergent.host
Common Mistakes to Avoid
Five patterns behind most sites that go quiet after launch:
- A homepage that doesn't say what you do: "Welcome to my website" wastes the only three seconds you're guaranteed. Lead with your Step 1 sentence.
- A contact form with no follow-up path: An inquiry that lands in a general inbox competes with newsletters and receipts. Give submissions somewhere to live and a status you can change.
- A design pass before a content pass: Picking fonts before writing your bio means designing around text you haven't written. Write first.
- A domain you don't control: A free subdomain reads as temporary, and moving off it later costs you every link you've shared.
- One giant prompt for every later change: Batching 10 edits into a single follow-up is how small fixes turn into new bugs. One change, one prompt.
What a Personal Website Costs in 2026
A personal website costs between $204 and a few hundred dollars a year, and the cost depends on whether you need to store information.
What you spend on Emergent tracks what your site has to do rather than how many pages it has. The Free plan's 10 monthly credits are for building and previewing something simple, which is enough to see whether this route suits you. If a plain brochure site is genuinely all you want, a template builder is the better call. This guide is for the version that has to remember things.
The build in this guide is a different animal, since it stores every submission, gates a dashboard behind a login, and runs a booking flow, and that came to 21.36 credits on the first pass.
So the Free plan gets you a finished draft, and the moment you put the site online or it needs to remember anything, you're on Standard. Standard runs $20/month ($17/month billed annually) for 100 monthly credits, private project hosting, and GitHub integration.
Budget for two things: the build itself (21.36 credits here) and 50 credits a month to keep the site live. That leaves about 30 credits a month for changes, and you can buy more if a big revision runs over.
Pro sits at $200/month ($167/month billed annually) for 750 monthly credits and a much larger context window, which is more than a personal site needs.
A detailed first prompt costs fewer credits than six rounds of corrections, so the time you spend on Step 5 pays for itself twice.
Outside the builder, your only fixed cost is the domain, which is free for its first year through the IONOS integration and renews at IONOS pricing thereafter. Template platforms land in a similar range once you add a custom domain, and WordPress trades subscription cost for hosting and upkeep. The roundup of AI website builders breaks down where each tool's pricing bites.
Final Thoughts
A personal website earns you work when something happens after someone reads it. Design gets a visitor to the contact form, and what sits behind it decides whether that visit turns into a conversation.
Describing this site in a paragraph took less time than picking a template would have, and what came back was a dashboard, a booking flow, and code I own. The trade-off is control over the fine details of the design, which, for a text-first personal site, I'd make again.
That said, building software when you just need a page is a mistake in itself. If you're a photographer who wants a gallery and nothing else, a template builder beats this route on both time and polish, and the guide to a photography website covers that path properly. The calculation changes the moment your site has to remember something.
Build the smallest version that can take an inquiry and route it to a place you'll look. Your work fills in the rest.
How to Build a Personal Website With Emergent
What Emergent handles for a site like this one:
- Your contact form gets a memory: Submissions are stored, tagged with a status, and shown in a private dashboard behind Google sign-in.
- Your work page filters itself: Describe the filters you want in the prompt, and the project list, filter logic, and layout come together.
- Changes take a sentence: Adding a testimonials section or a newsletter signup is a one-line follow-up on the site you already have.
- You don't have to know the right words: Emmy, the assistant built into every page, turns a rough description into a build-ready prompt and costs no credits to use.
- You keep the code: GitHub integration on the Standard plan and up means the site moves with you if you ever hire a developer or switch tools.
- Your domain, connected two ways: Register a new one inside Emergent through IONOS, or point one you already own at your deployment.
Emergent's Free plan includes 10 monthly credits, enough to build a site and see it before you pay anything. A version with stored inquiries and a private dashboard, like the one in this guide, runs past that and onto the Standard plan.
Try building your first app on Emergent.

Describe what you want and Emergent builds it. A real, production-ready app you can launch the same day.
- One prompt to build
- Zero code required
- Deploy in minutes