Beginner
•
How to Build and Integrate an Emergent App into ChatGPT
How to build an app that ChatGPT can actually control.
Written By :

Avilasha Chalki
Hey there!
In this tutorial, we're going to build an app that ChatGPT can actually control.
The idea is simple: instead of ChatGPT just answering questions, it can now create notes, manage your tasks, search your data, or do pretty much anything you want, all through natural conversation.
Basically, we'll build a system where you can:
Tell ChatGPT "Create a note about my meeting with John" and it actually does it
Ask "Show me all my notes from last week" and see real results
Say "Search for notes about project ideas" and get instant answers
Build any personal app (todo lists, journals, recipe keepers) that ChatGPT can manage
By the end of this guide, you'll have your own app running, connected to ChatGPT, and ready to use through simple conversation.
Let's get started!
What You're Building
So here's the thing: ChatGPT is powerful, but normally it can't actually do anything with your personal data. It can't save your notes, manage your tasks, or interact with apps you build.
This setup changes that completely.
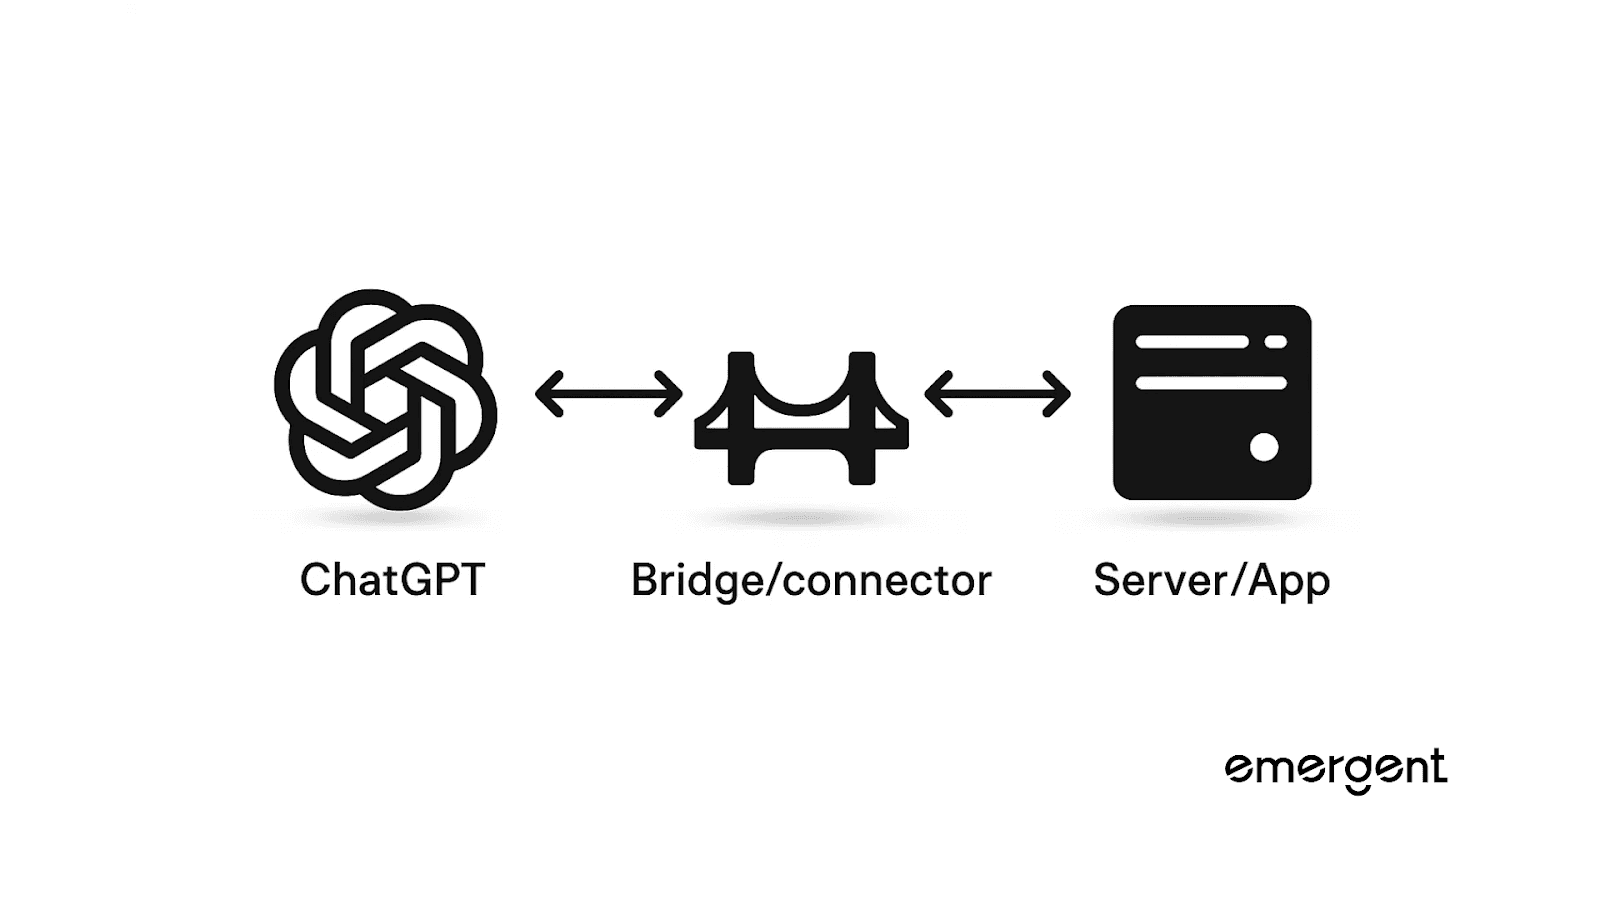
Think of it in three simple parts:
ChatGPT = where you talk naturally, like "add this to my todo list"
The Bridge (MCP) = the translator that understands what ChatGPT wants to do
Your App = where the real work happens, storing data and executing actions
Here's how they connect:
Real Example: Notes App
Let's use a Notes App as our example throughout this tutorial because it's simple, useful, and demonstrates all the core concepts.
Layer | What It Does |
Your App | Stores notes in a database, handles create/read/delete operations |
MCP Bridge | Translates "Create a note about the meeting" into |
ChatGPT | Understands your natural language and figures out which action you want |
This same pattern works for any app you can imagine: todo lists, expense trackers, habit journals, recipe collections, you name it.
What You'll Need
Before we start building, let's make sure you have everything ready. Don't worry, almost everything has a free tier.
An Emergent Account - This is where you’ll build your app without writing code. Emergent gives you your database, hosting, backend logic, and a full environment to run everything. (Cost: Free tier available) → Sign up at emergent.sh
A ChatGPT Account - This is the AI interface you’ll use to interact with your app. Works with Plus, Pro, Go (Business/Enterprise plans don’t support this yet). → Sign up at chatgpt.com
One Account for Public Access - You’ll need to expose your app to the internet so ChatGPT can reach it. You can choose either:
Cloudflare Tunnel (Recommended for beginners): No signup required, easiest setup, gives you a temporary URL that changes each session, and it’s completely free.
ngrok (Recommended for ongoing use): Requires signup but provides a stable URL with a static domain - great for apps you’ll use regularly. (Free tier available)
Phase 1: Build Your App
Now that you have everything ready, let's build the actual app.
For this tutorial, we're building the Notes App. Here's what it needs to do:
Feature | What It Does |
Create Note | Let users add a note with a title and content |
See All Notes | Display all saved notes in a clean grid layout |
Search Notes | Find notes by searching keywords in title or content |
Delete Note | Remove notes users don't need anymore |
That's it. Simple, functional, and useful.
Step 1: Tell Emergent What to Build
Here's where things get interesting.
Instead of coding, you just describe what you want in plain English.
Open Emergent and enter this prompt:
Build me a notes app where:
- Anyone can create notes with a title and content
- Users can see all their notes in a nice grid layout
- Users can search through notes by keywords
- Users can delete notes they don't want anymore
- No login system needed for now (we'll add that later if needed)
- Make it look modern and clean with soft shadows and good spacing
- Use a white background with subtle colors

Hit enter, and Emergent's agent gets to work.
In a few minutes, you should have the first version of the app created. For me it was this :
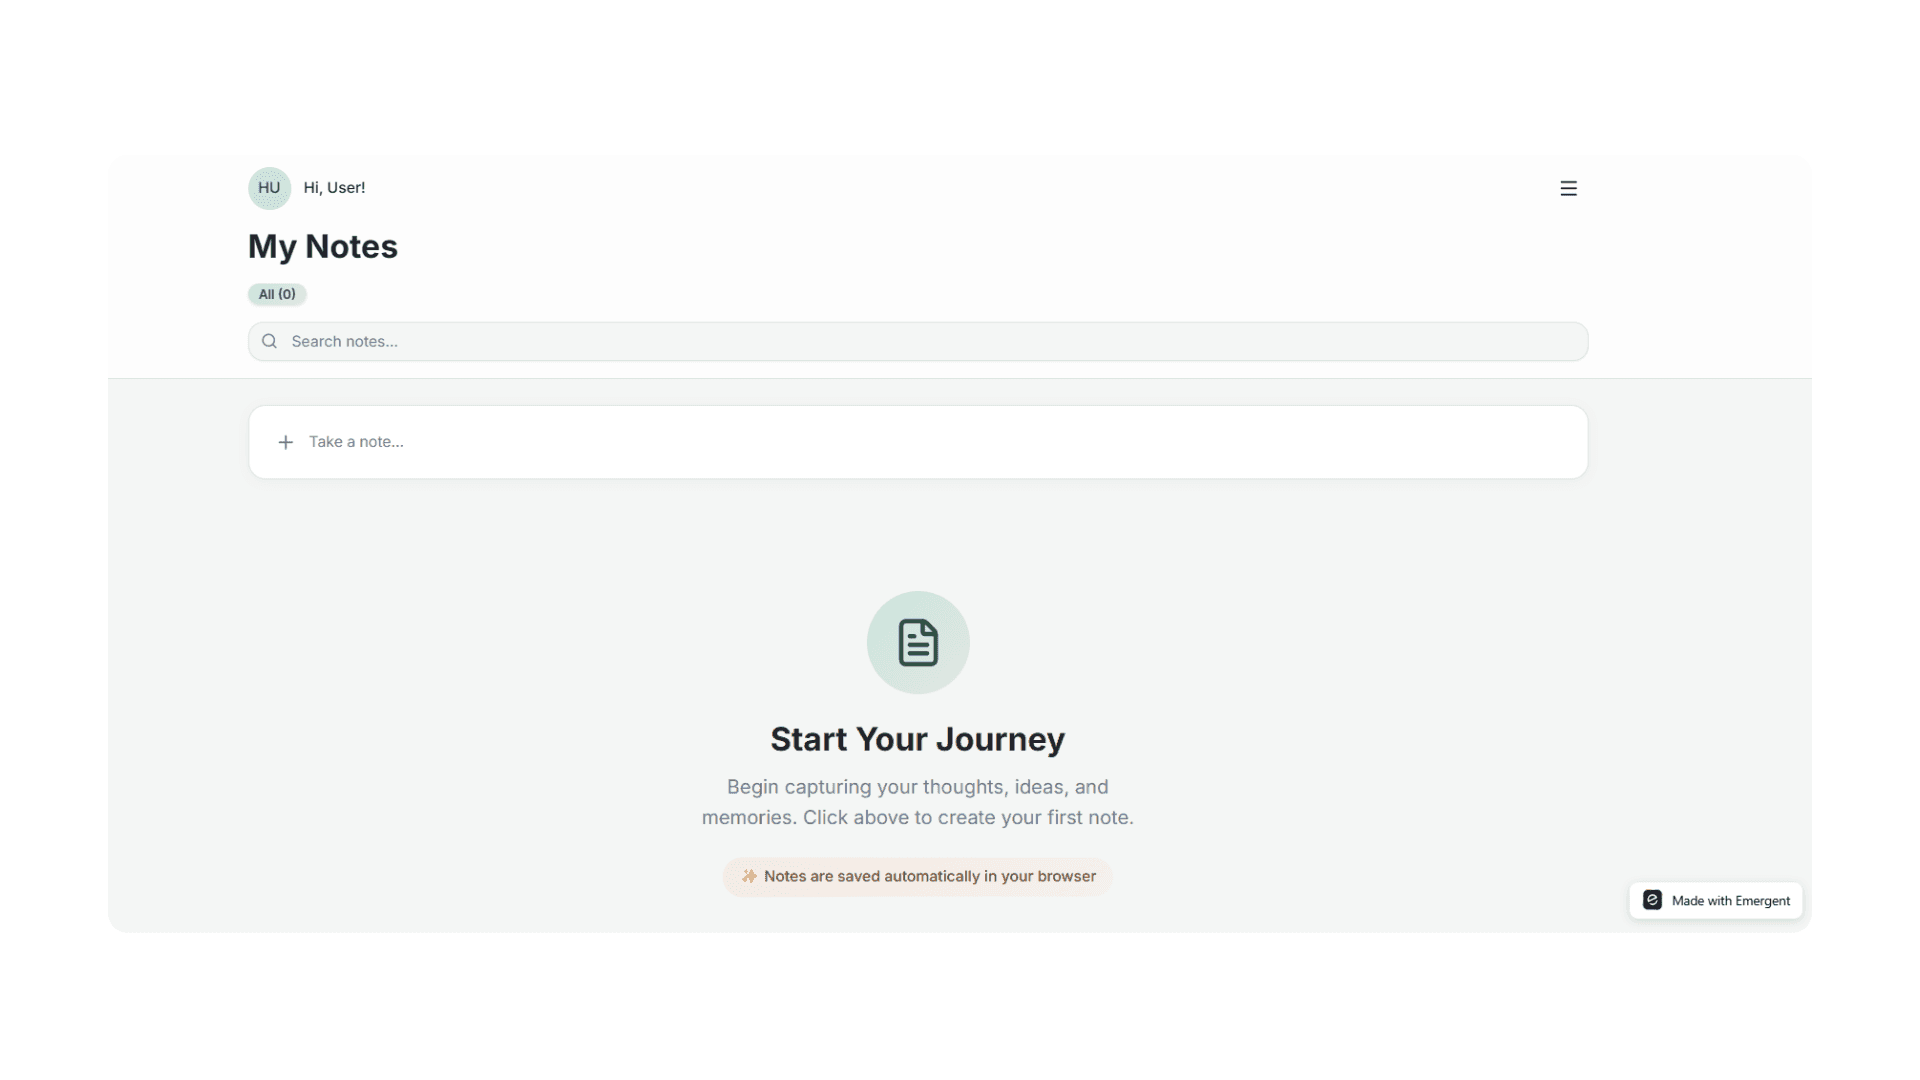
Step 2: Test Your App
Before moving on, make sure everything works:
Click the preview link Emergent gives you
Create a few test notes (try titles like "Shopping List" and "Project Ideas")
Search for one of them using the search box
Delete a note to make sure that works
✅ Checkpoint: If you can create, view, search, and delete notes, you're ready to move on.
I also wanted some UI changes - like different colors for different categories of notes, which the first version was not giving :
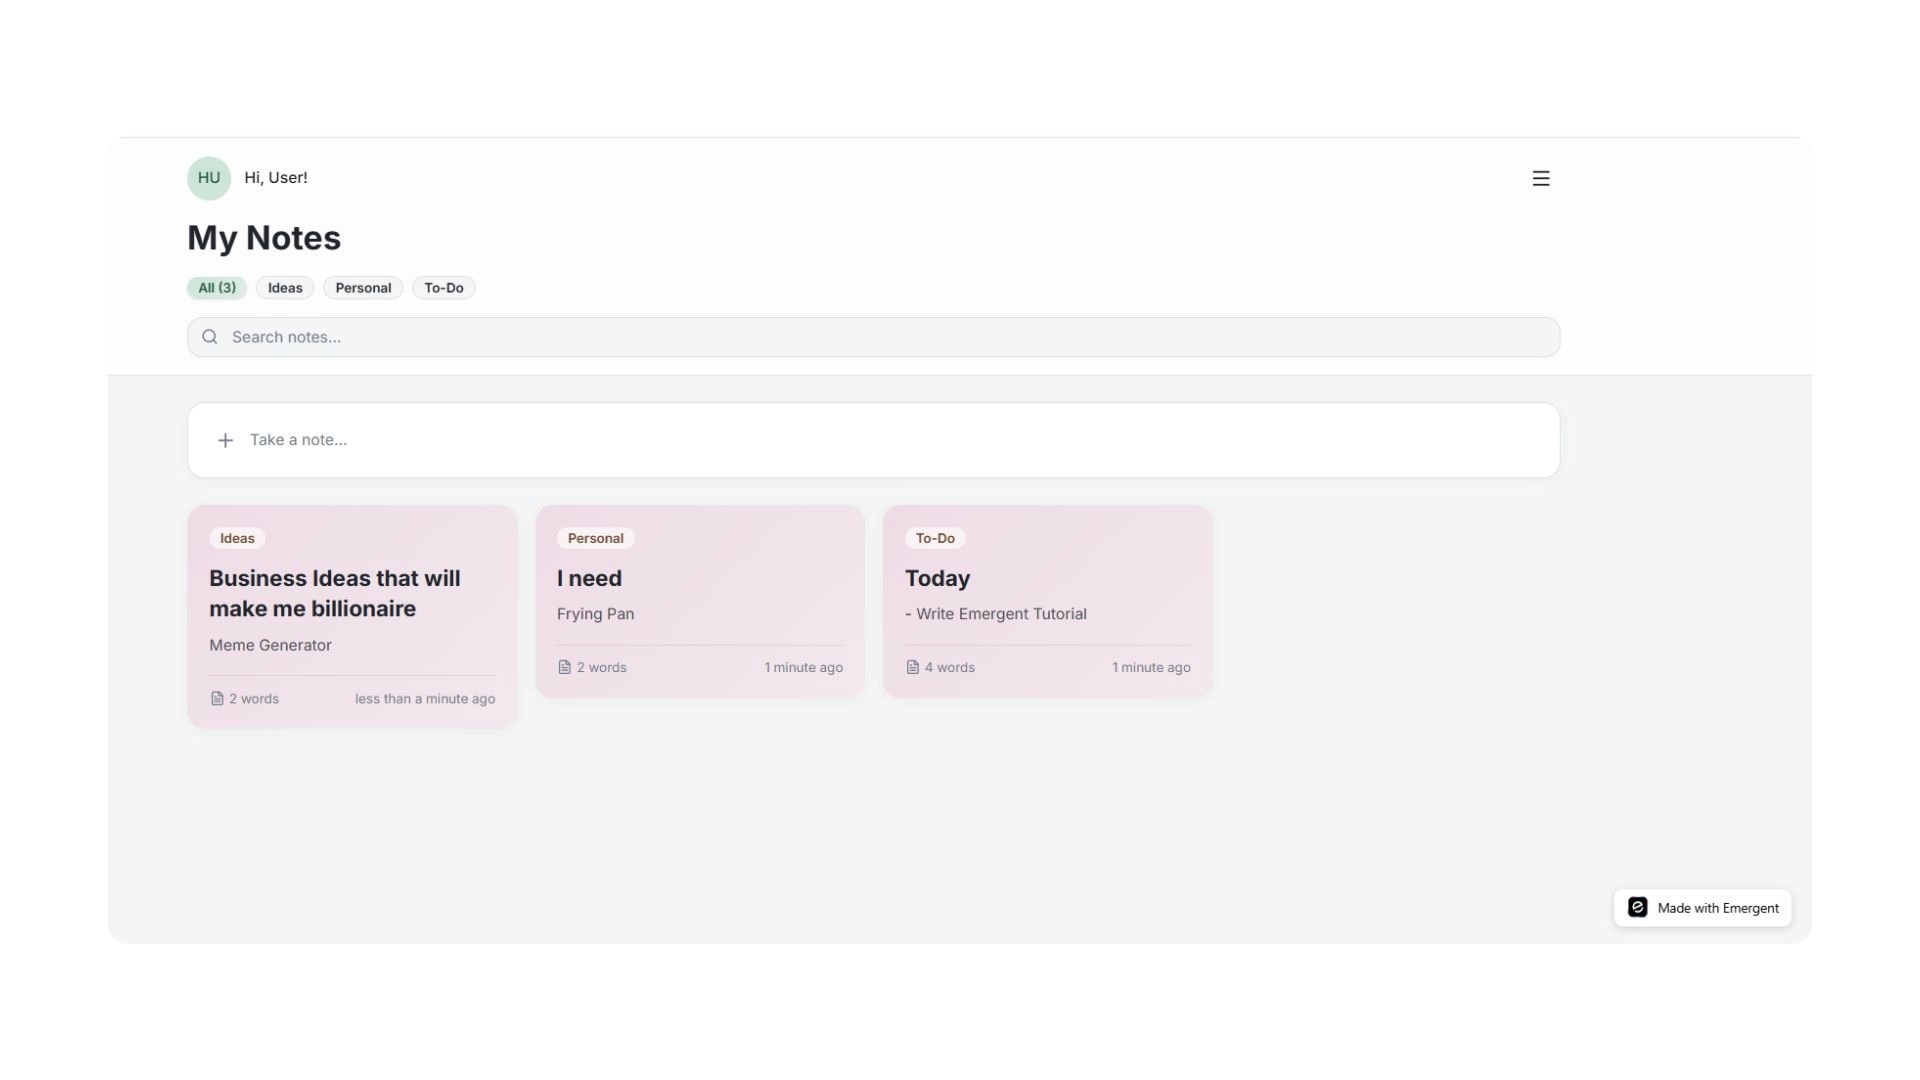
So, I simply asked the agent - “Can you give different colors for different categories of notes?”
The agent takes your feedback and proceeds to make changes to /app/frontend/src/App.js and gives you exactly what you want :
Phase 2: Add the Bridge (MCP)
Now comes the important part: connecting your app to ChatGPT.
Without MCP, ChatGPT has no way to interact with your notes app. It can talk about notes, but it can't actually create, read, or delete them.
With MCP, you define "tools" that ChatGPT can use. These are like buttons ChatGPT can press:
For the Notes App:
create_note- adds a new notelist_notes- shows all notessearch_notes- finds notes by keyworddelete_note- removes a note
When you tell ChatGPT "Create a note about my meeting," it knows to use the create_note tool and passes the right information to your app.
Ask Emergent to Add MCP
Go back to your Emergent chat and enter this prompt:
Set up MCP (Model Context Protocol) for this app using python SDK
What Emergent Creates
Emergent generates a new file called mcp_server_http.py in your backend folder.
Phase 3: Make It Accessible Online
Right now, your app and MCP server are running on Emergent's platform, but they're not publicly accessible.
ChatGPT needs to reach your MCP server over the internet, so we need to expose it.
For your first build, I recommend Cloudflare Tunnel because it's faster to set up ( but the link you get is temporary, which when expires needs to regenrated- you can ask the agent to give new link).
But if you want a permanent link, switch to ngrok.
Tell the Emergent agent:
“I would like to connect my app"S MCP to chatgpt so for that can you give me link connected to cloudfare/ngrok (this is upto the user requirements) ”
Emergent will:
Install Cloudflare's tunnel software
Start the tunnel pointing to your MCP server (port 8002)
Give you a public URL like
https://abc-def-123.trycloudflare.com
Your final URL must end with /mcp.
Ask the agent “Can you give me the connector url I can use to connect it to chatgpt?
The agent will give you an URL that looks like this :
https://abc-def-123.trycloudflare.com/mcphttps://my-notes-app.ngrok-free.app/mcp
ChatGPT specifically looks for the /mcp endpoint to connect to your bridge.
Phase 4: Connect to ChatGPT
Now comes the exciting part: telling ChatGPT about your app so you can start using it through conversation.
Step 1: Enable Developer Mode in ChatGPT
First, go to Settings and open your Personal Settings.
Then, navigate to Apps and Connectors.
Scroll down to the Advanced Settings section and turn on Developer Mode.
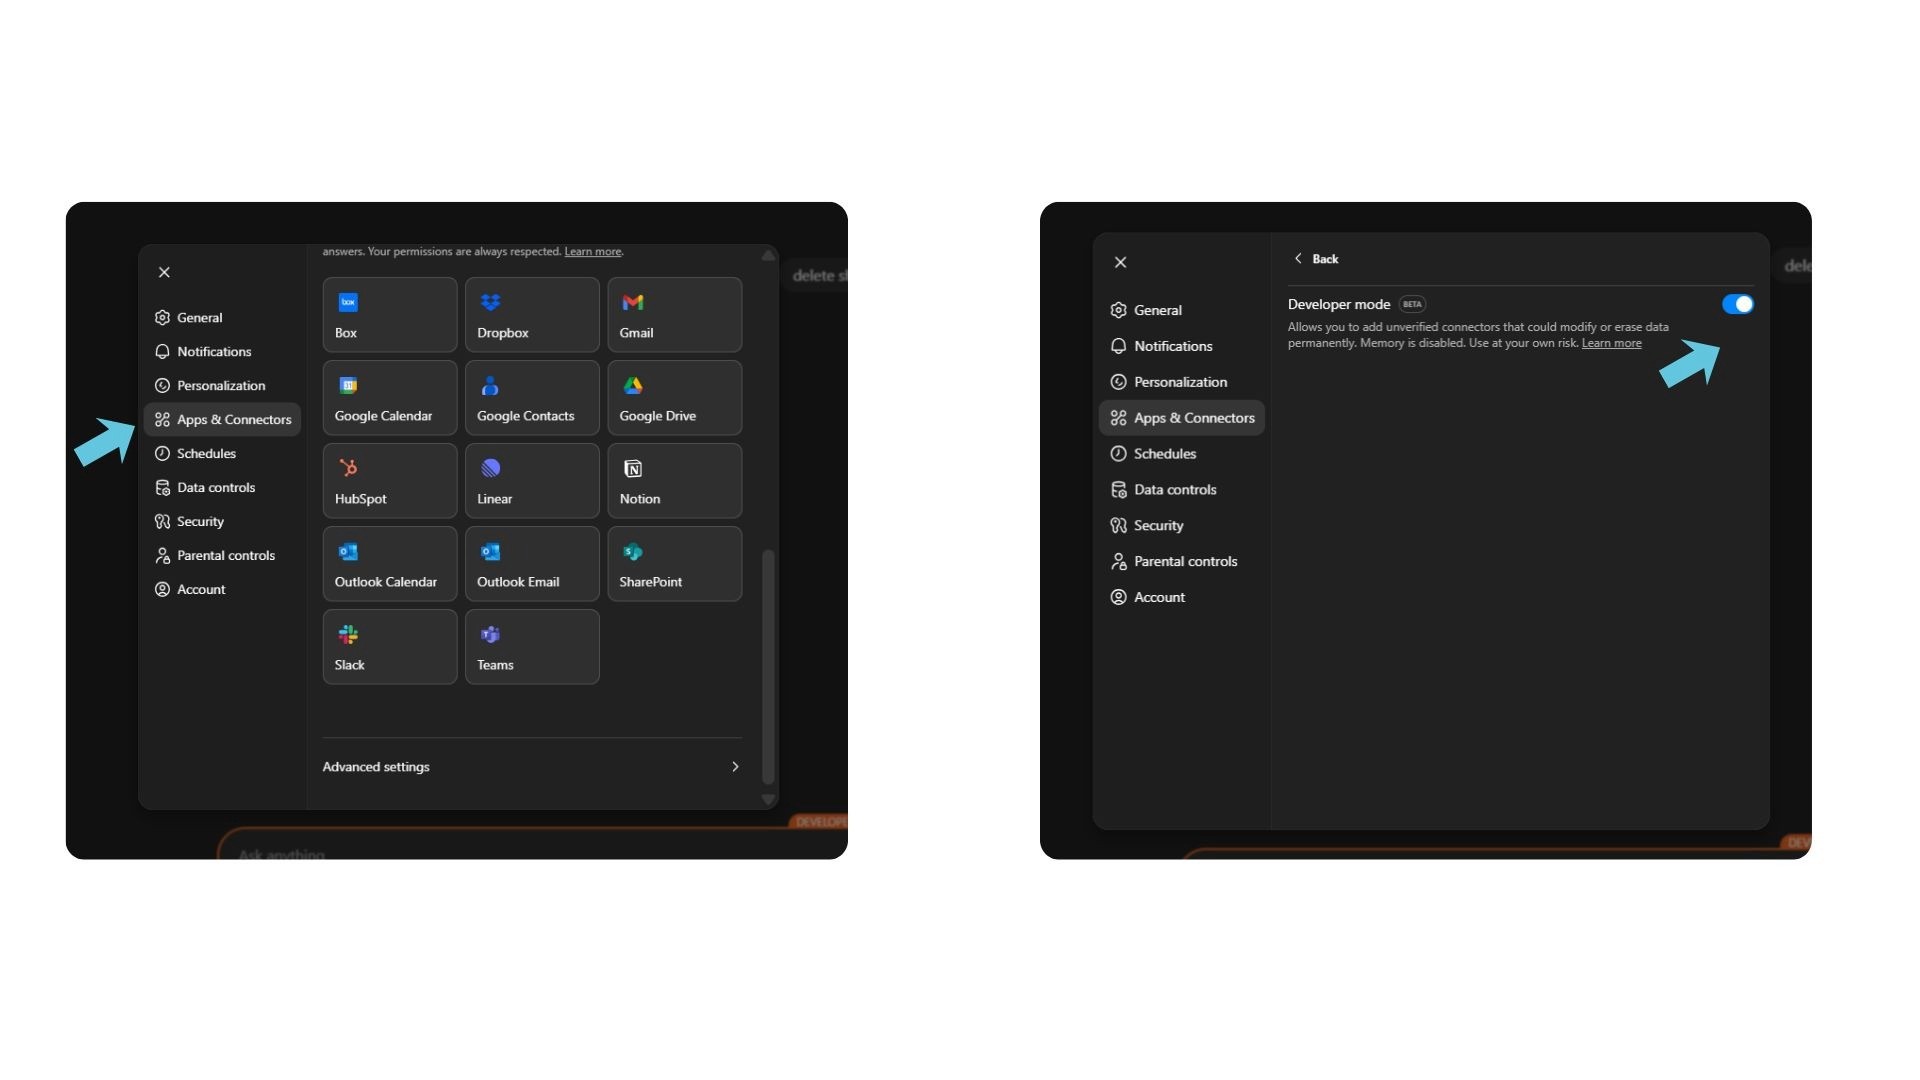
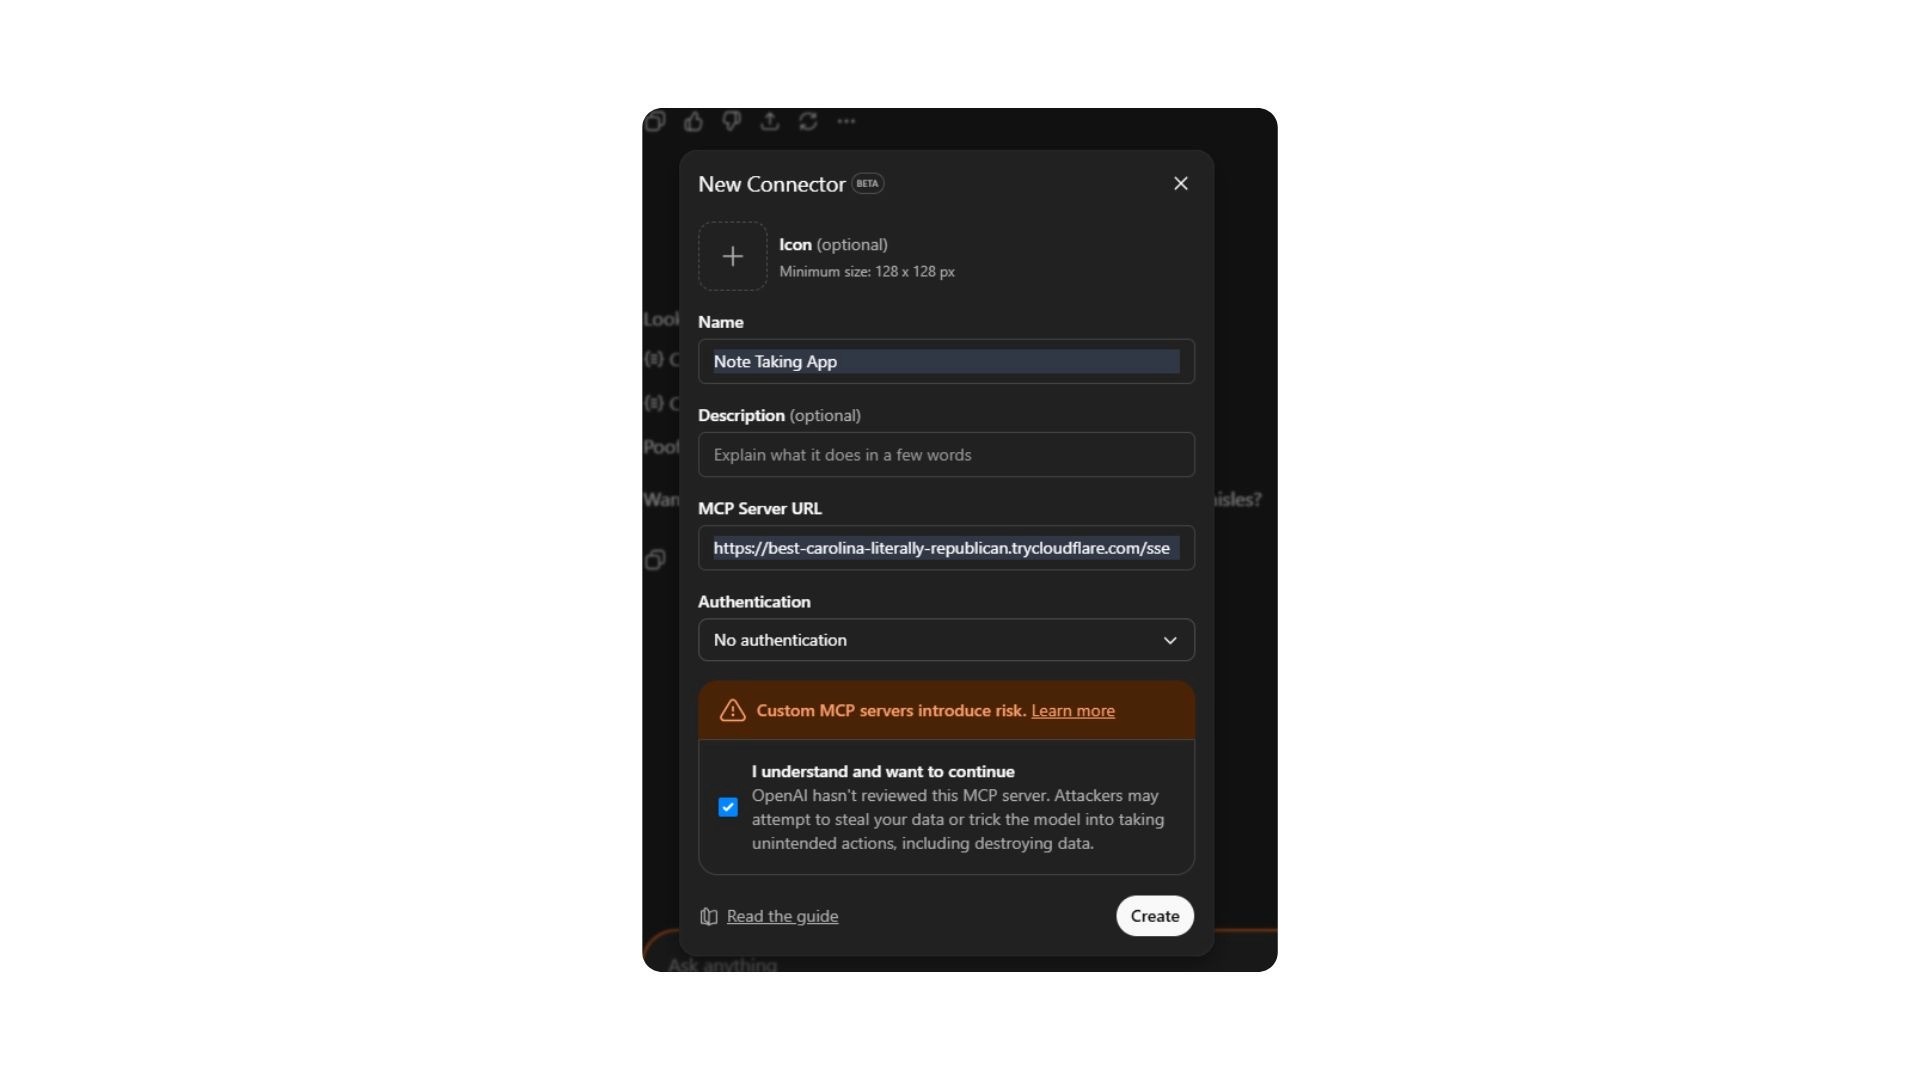
Step 2: Create Your Connector
Still in the Apps & Connectors section:
Click the Create button (usually says "Create new connector")
You'll see a form with three fields. Fill them in:
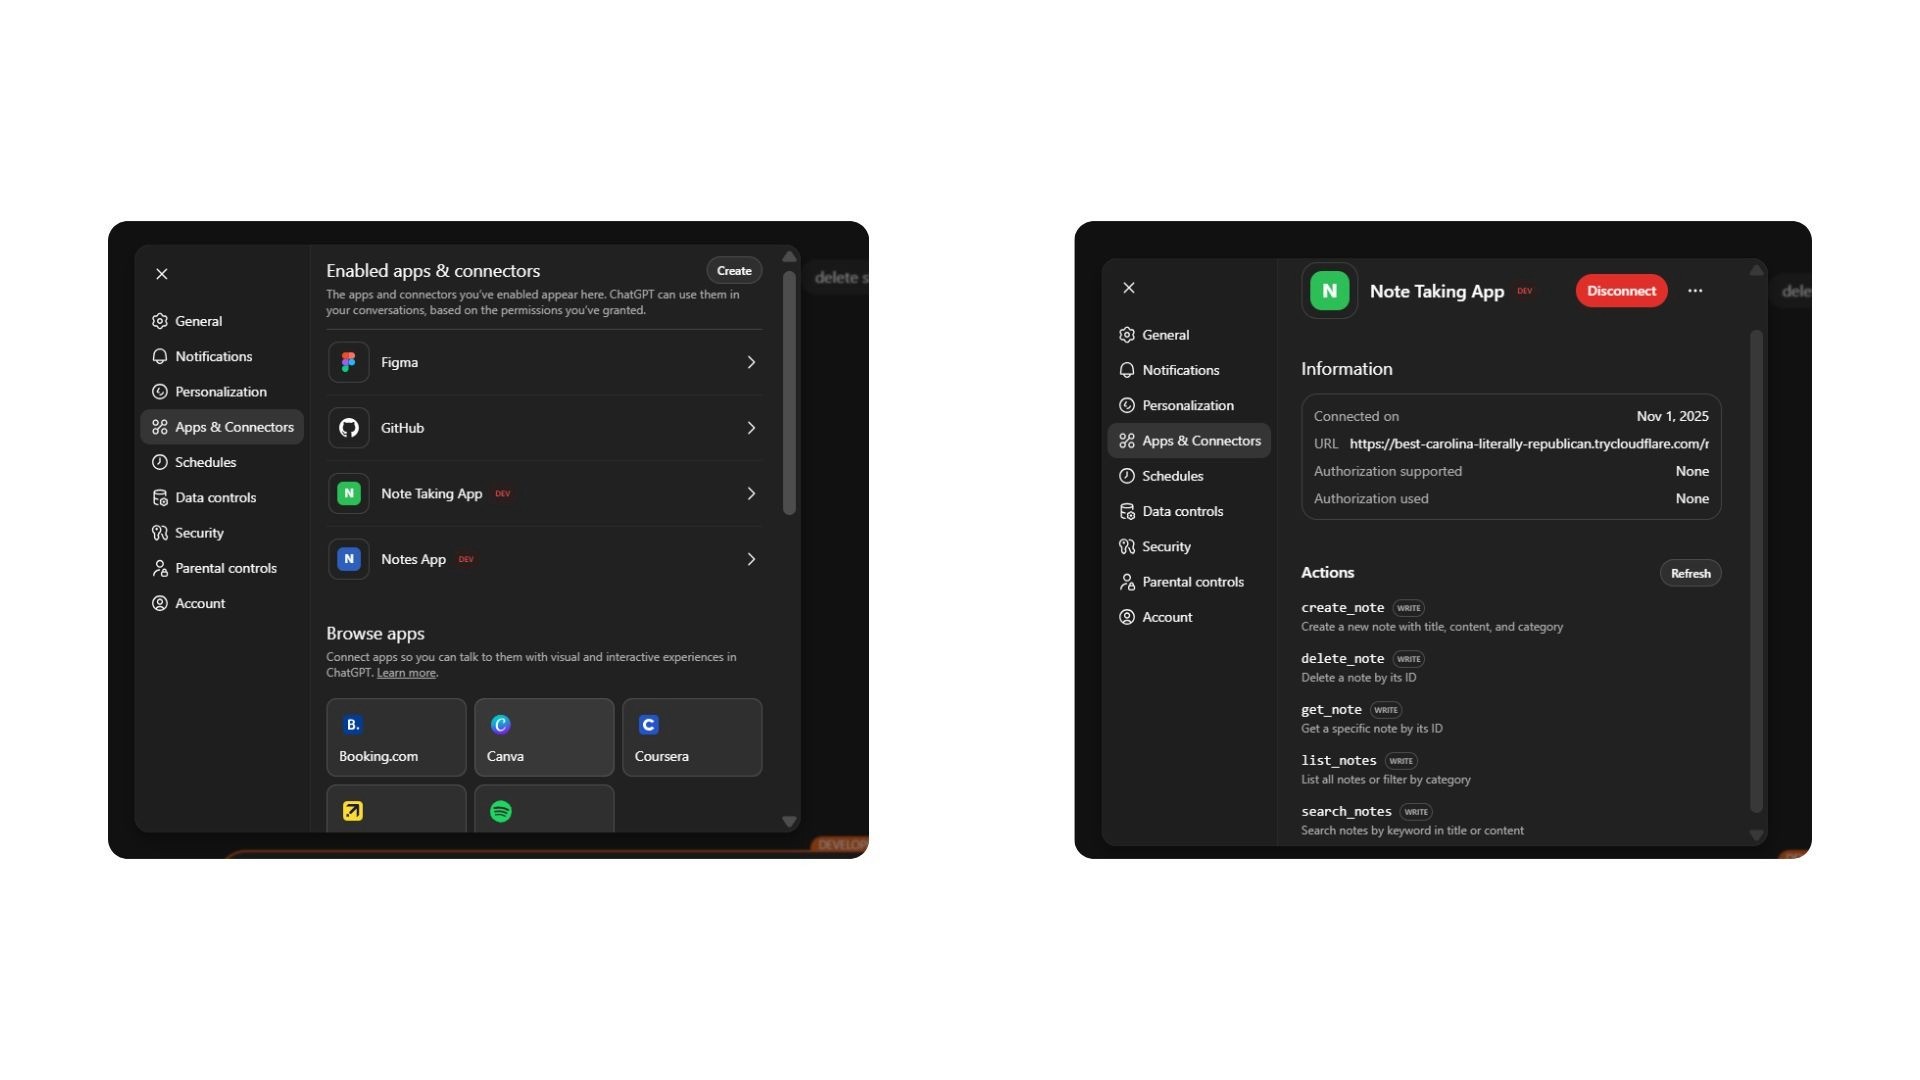
Once it is connected, you will see it in the Apps and Connectors tab :
To summarize what we have done so far -
You’ve just built an app on Emergent, which serves as both your notes database and interface.
Then, you added an MCP bridge that connects ChatGPT with your app, exposed that bridge to the internet using a public URL, and told ChatGPT where to find it.
Now, ChatGPT knows new actions it can take and exactly how to execute them through your app.
Testing & Using Your App
This is where everything comes together. Let's actually use your app through ChatGPT.
How to Activate Your App
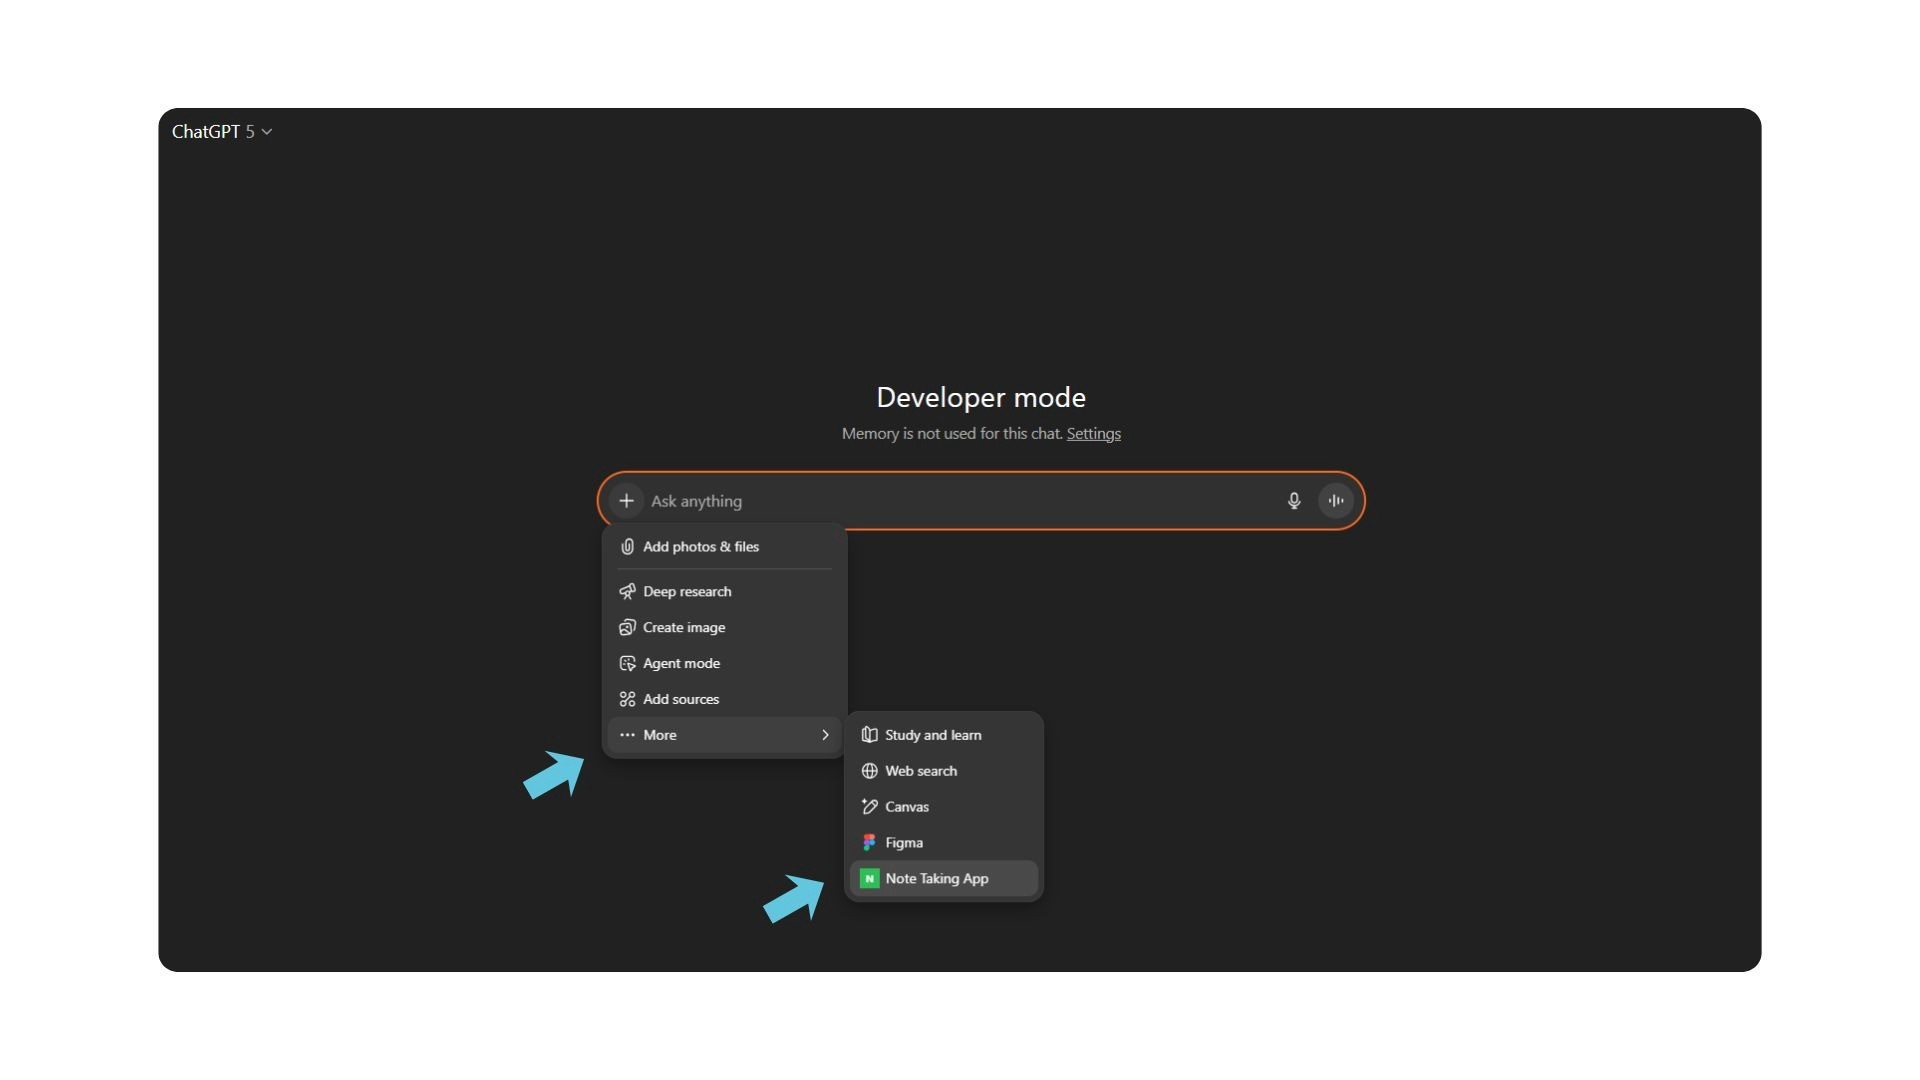
Start a new chat in ChatGPT (important: it must be a fresh conversation)
Click the "+" button above the input box
Select More → Note Taking App (or whatever you named your connector)
You'll see the app name appear above the input box, confirming it's active
Now you can talk to ChatGPT naturally, and it will interact with your notes app.
Example Conversation
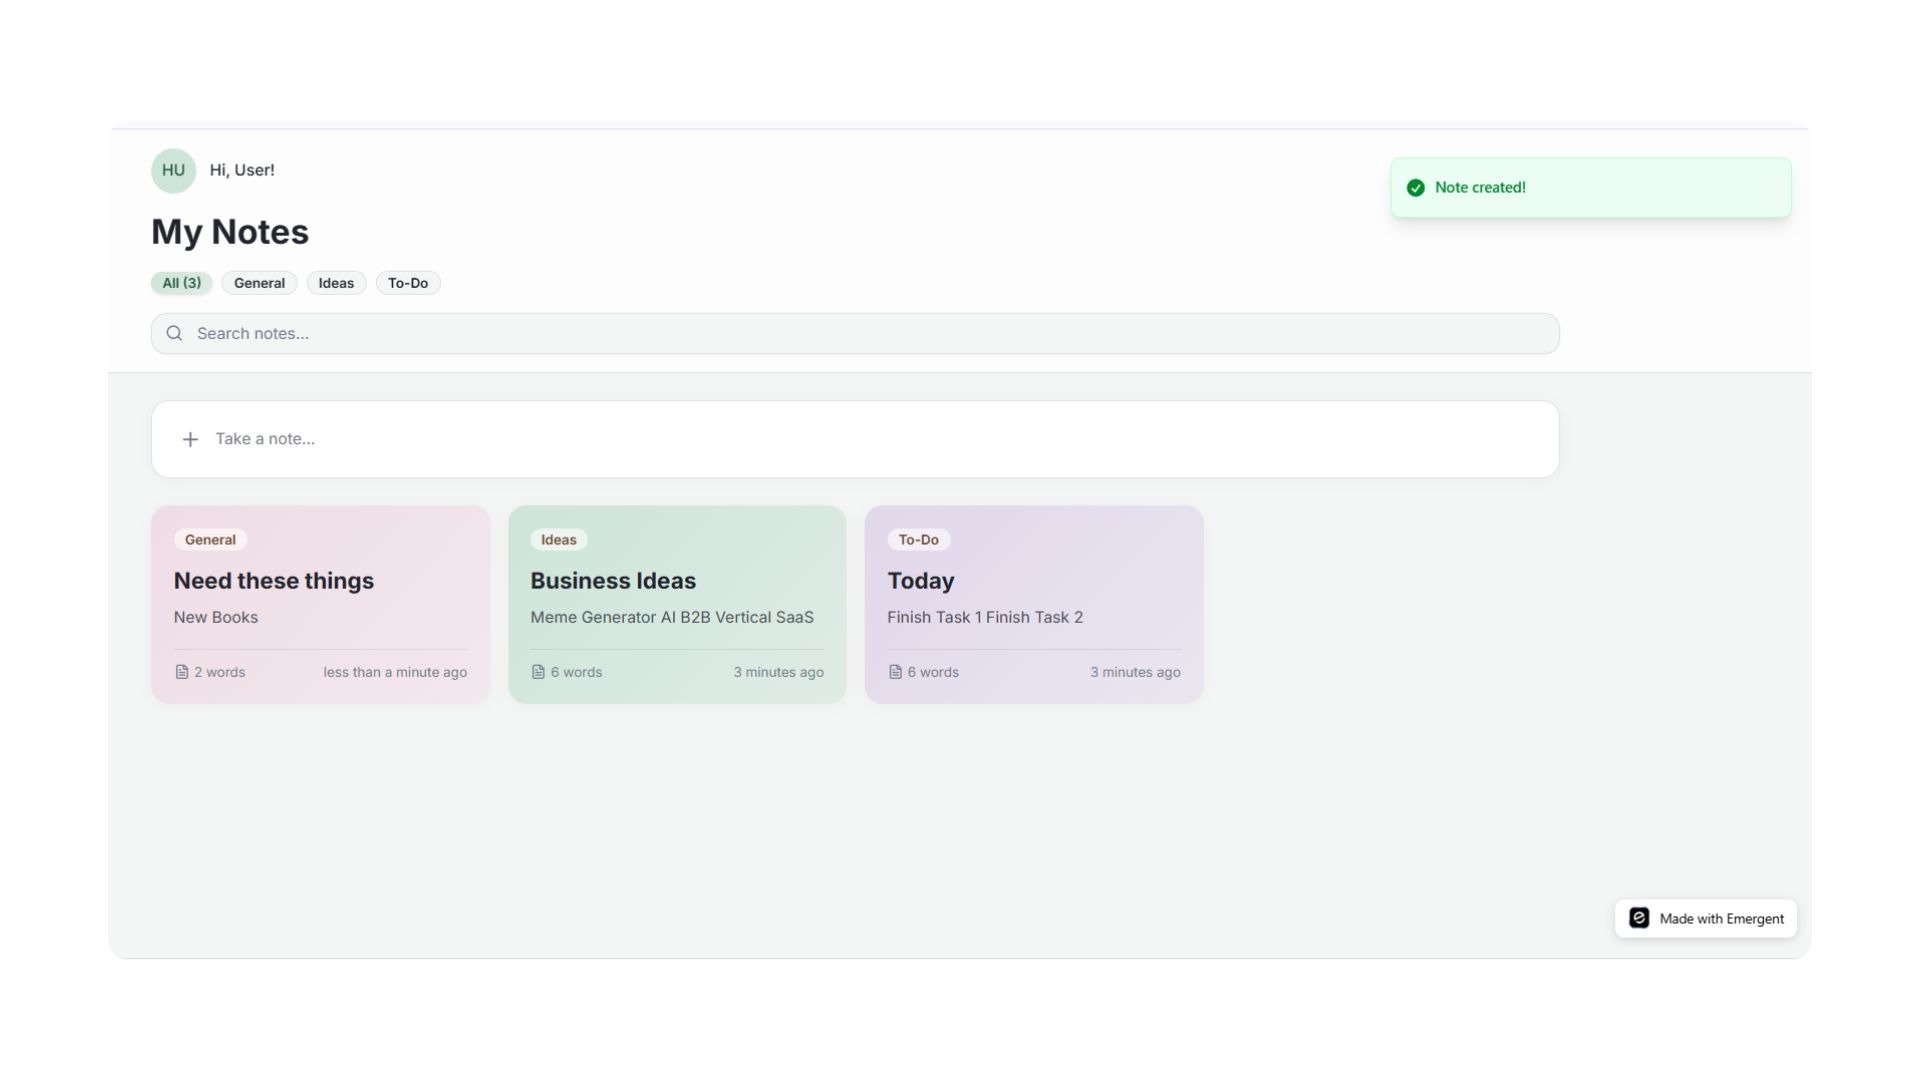
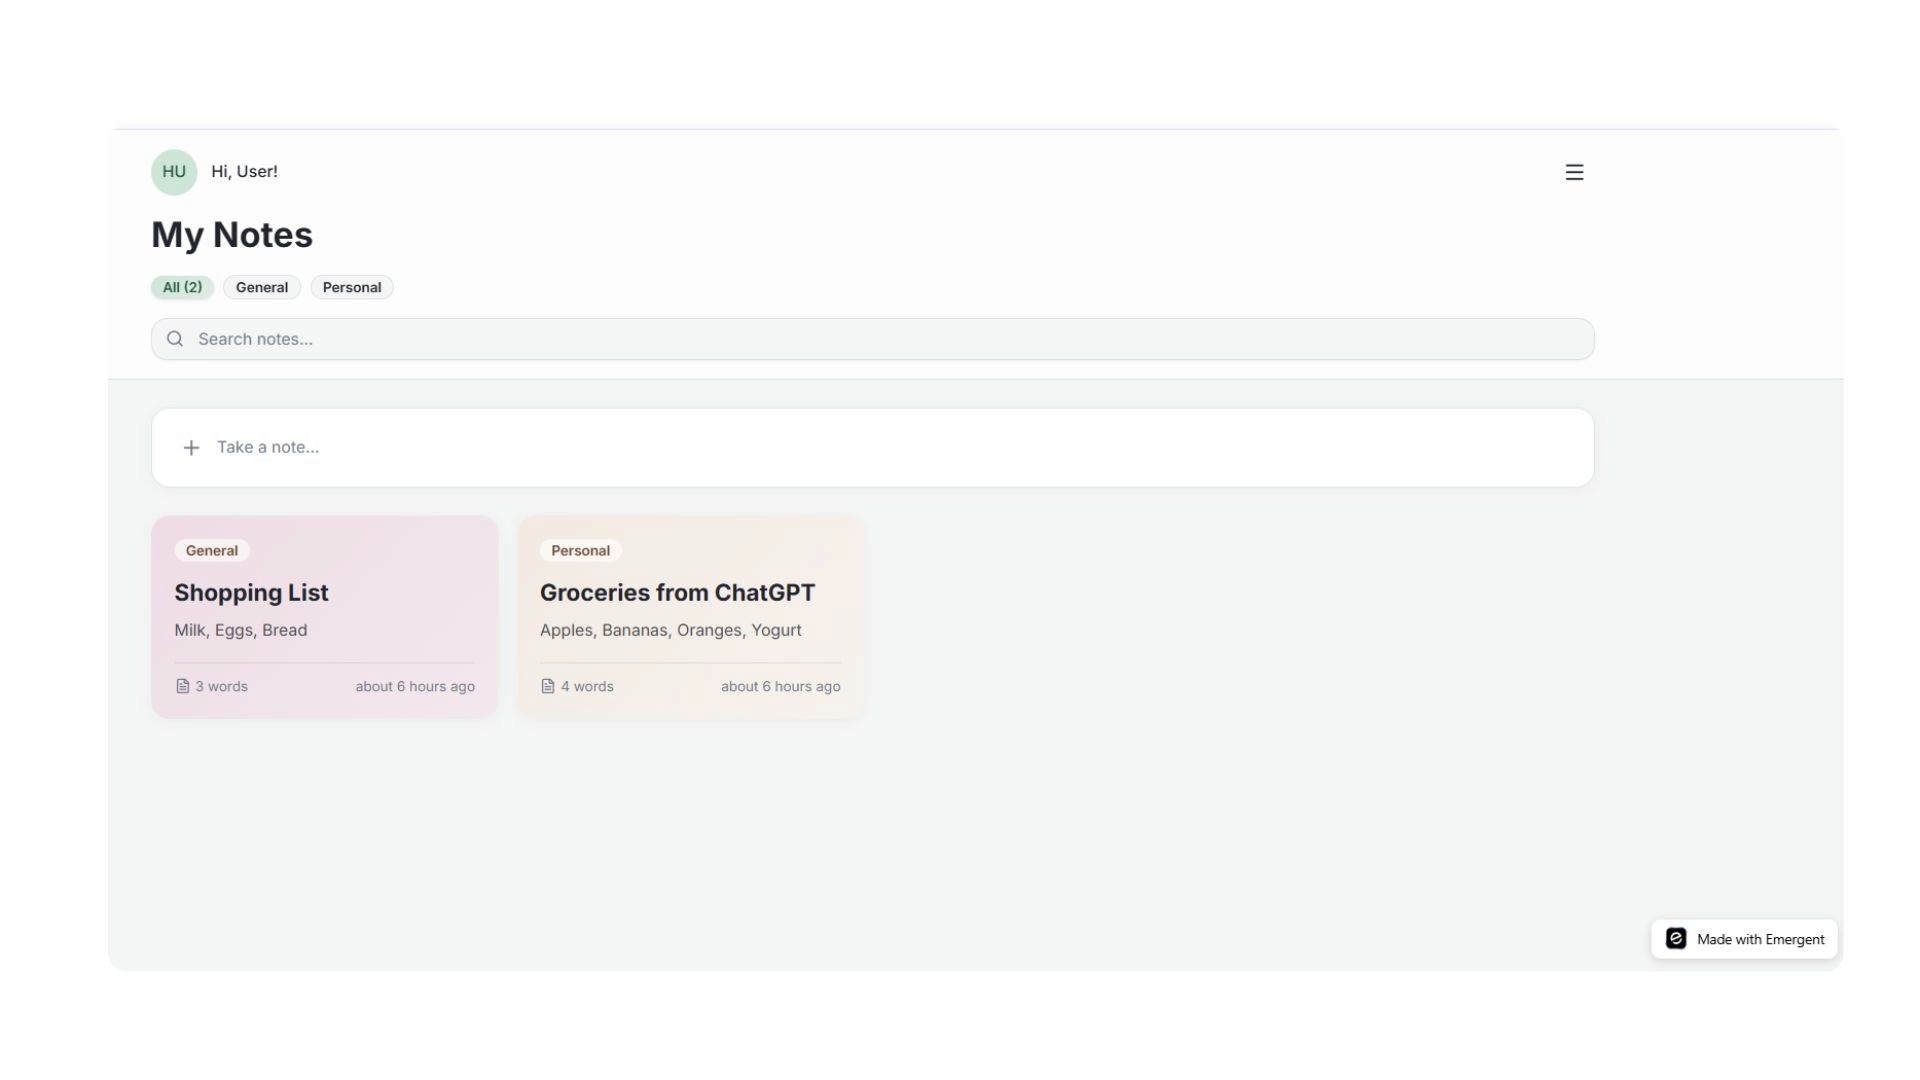
Create Note :
Type in Chatgpt : “Create a note called Shopping List with: Milk, Eggs, Bread. Category: General”
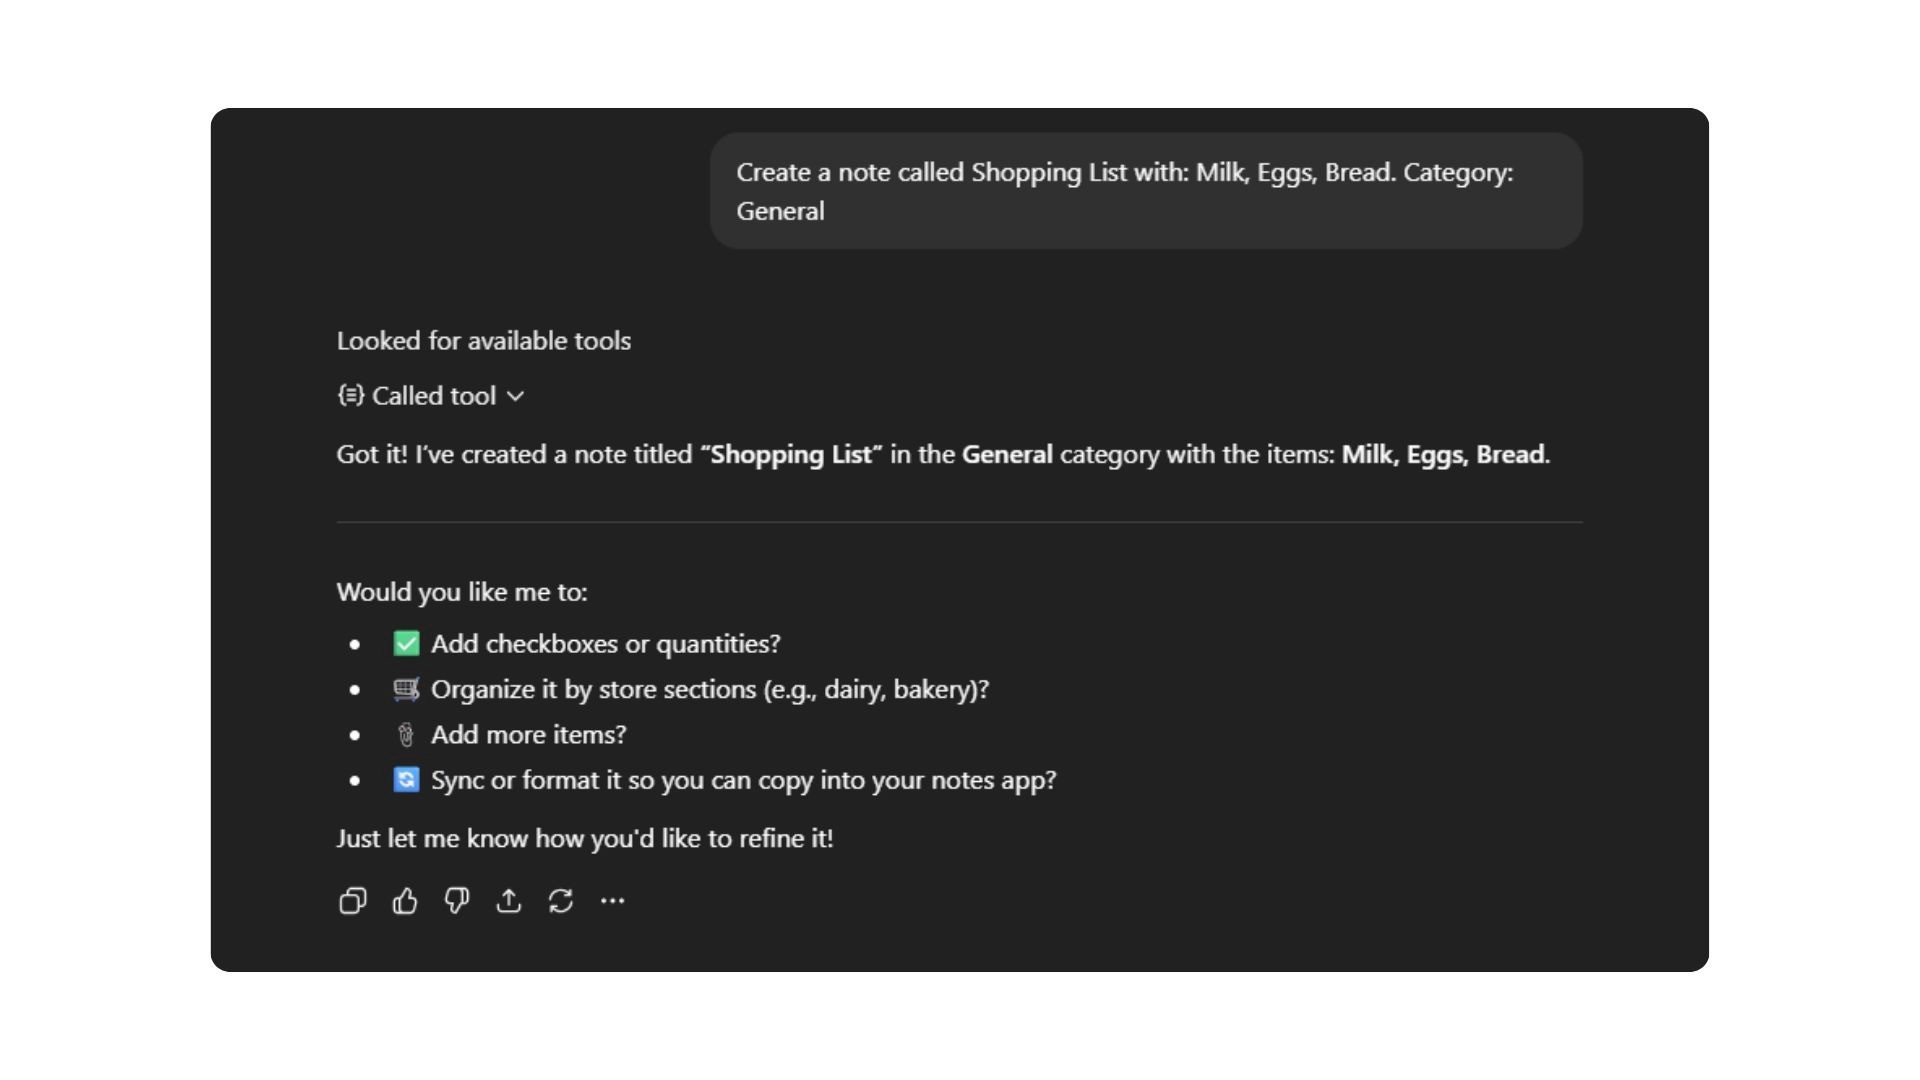
Once you refresh your note taking app, an automatic list should appear :
You can use this tool across different conversations too - remember, it supports multiple actions:
create_note(add a new note with title, content, and category),delete_note(remove a note by its ID),get_note(retrieve a specific note),list_notes(view all notes or filter by category), andsearch_notes(find notes by keyword in title or content).
So go ahead, experiment and have fun with it!
Understanding the Conversation Flow
Here's what happens behind the scenes when you say "Create a note about the meeting":
ChatGPT understands your intent - it recognizes you want to create a note
ChatGPT calls the create_note tool - it passes the title="Meeting" and content="..."
MCP bridge receives the request - it translates this into your app's format
Your app saves the note - the database stores the new entry
Response travels back - MCP → ChatGPT → you see confirmation
All of this happens in under a second, making it feel like ChatGPT is directly controlling your app.
Debugging :
Sometimes, the process might not go as smoothly.
Some common situations like these can arise :
What Happened | What To Do |
ChatGPT says "can't reach server" | Tell Emergent: "Restart my tunnel and MCP server" |
App was working, now it's not | Tell Emergent: "Check what's wrong with my app" |
Changed the app, need to restart | Tell Emergent: "Apply my changes and restart services" |
Either way, you can just tell the Emergent agent to take care of something if it's not working and it will autonomously debug itself.
You can also attach screenshots of the error and the agent will return a working version!
What You Can Build Next
Once you've got the basics down, here are some ideas to take your apps further:
1. Add User Authentication
Right now, anyone with your app link can access all the notes. Add user accounts so:
Each person has their own private data
You can share the app with friends or family
Data stays secure and separated
Tell Emergent:
“Add user authentication with email and password. Each user should only see their own notes.”
2. Set up your custom UI inside ChatGPT
Make your app work have a custom ui on ChatGPT by asking Emergent:
“Please set up custom ui for my app while I use it in ChatGPT. Refer to this : https://developers.openai.com/apps-sdk/build/custom-ux”
3. Add Rich Features
Enhance your notes app with:
Tags and categories - organize notes by topic
Favorites - star important notes
Timestamps - see when notes were created/edited
Markdown support - format notes with headers, lists, bold text
Attachments - upload images or files to notes
4. Create Related Apps
Use the same skills to build:
Expense tracker with category analysis and budget alerts
Reading list with ratings and progress tracking
Contact manager with notes about each person
Travel planner with itineraries and packing lists
Wrapping Up
You just built something powerful: an app that responds to natural conversation through ChatGPT.
Instead of clicking through menus and filling out forms, you can now:
Create data by talking naturally
Search and find information by asking questions
Manage your personal information through simple conversation
Build tools that actually fit how you think and work
Thousands of Emergent users are building apps like this to manage their lives, track their goals, and organize their world without learning to code.
Some are building personal CRMs to track relationships, others are creating custom productivity tools, and many are making apps for problems that off-the-shelf software doesn't solve.
Your turn: What will you build next?
The pattern you learned here works for literally any app where you want ChatGPT to take actions. The only limit is your imagination.
Ready to start?
Head to emergent.sh and tell the agent what you want to build!