Intermediate
•
How to Build a Multi-LLM Application on Emergent?
Automatically turn ingredient photos into beautiful recipe articles with AI
Written By :

Avilasha Chalki
Create a Fully AI-Powered Recipe Blog with GPT and Claude
Have you ever wished you could automatically turn ingredient photos into beautiful recipe articles? In this tutorial, you’ll learn how to do exactly that using Emergent’s Universal Key, a feature that lets you integrate multiple large language models (LLMs) such as GPT and Claude in a single app.
We’ll walk through what LLMs are, how Emergent’s Universal Key works, and how to build a Recipe Blog App that generates human-like recipes from ingredient photos. By the end, you’ll have a working app where GPT identifies ingredients from an image, Claude writes the recipe, and you can decide which ones to publish.
Understanding LLMs
Before diving into the build, it’s important to understand what Large Language Models (LLMs) are. LLMs like GPT and Claude are AI models trained on vast amounts of text data to understand and generate human-like language. They can write, summarize, answer questions, interpret visual data and even generate images.
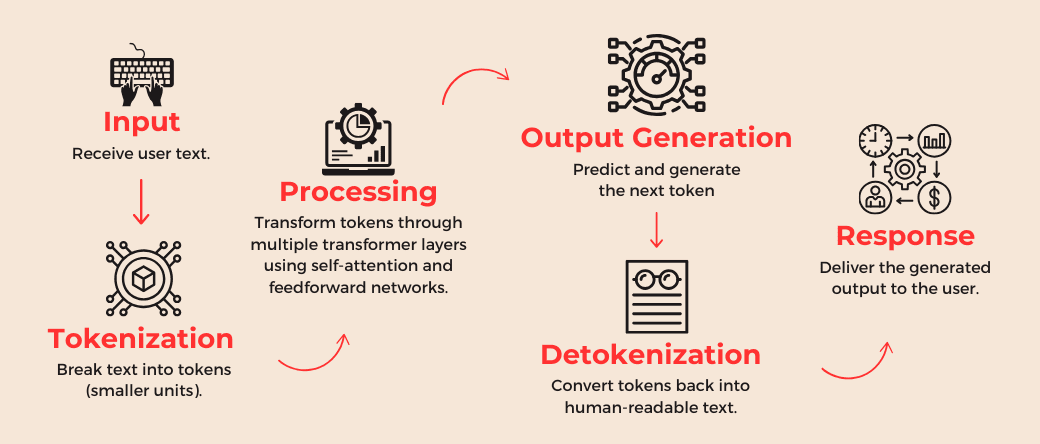
How do LLMs Work
Input: The process begins when the model receives text from the user.
Tokenization: The input text is broken into smaller units called tokens, which represent words or subwords. This helps the model process language in a structured, numerical form.
Processing: The tokens pass through multiple transformer layers that use self-attention and feedforward networks. This enables the model to understand relationships, context, and meaning within the text.
Output Generation: The model predicts and generates the next token based on learned patterns and probabilities from its training data.
Detokenization: The generated tokens are then converted back into human-readable text.
Response: Finally, the system delivers a coherent and contextually appropriate response to the user.
Together, these steps enable Large Language Models (LLMs) like GPT to comprehend, reason, and communicate naturally with humans.
In this project we are going to be using 2 different LLMs in one application based on their specialisation:
GPT-5: We will be using GPT-5 by OpenAI for interpreting visual data. Here, that means that we will be analysing the ingredients in the uploaded image using GPT-5.
Claude 4.0 Sonnet: We will be using Claude 4.0 Sonnet by Anthropic for writing the recipes. Claude excels at writing in a natural, empathetic, and human tone.
OpenAI gpt-image-1: We will be using this model by OpenAI to generate images for the recipes. Claude does not support image generation at the moment.
When you combine both in a single app, you get the best of both worlds: accuracy and creativity.
How to integrate these LLMs into your App
Now that we understand what LLMs are and what they can do, the next step is learning how to bring their power into your own app.
Traditionally, if you wanted to use multiple LLMs, you had to do a lot of setup. Each model comes from a different platform, so you would need to:
Sign up on each platform (like OpenAI for GPT, Anthropic for Claude).
Generate and manage separate API keys for each model.
Set up billing for each platform individually.
Handle the technical details of sending requests and receiving responses from different APIs.
This can get complicated quickly, especially if your app needs to use multiple LLMs for different tasks. You also have to make sure your API calls are secure, your keys are stored properly, and that each request reaches the right model.
Emergent simplifies this with the Universal Key. Instead of juggling multiple API keys, you just use a single key in your app. Emergent automatically:
Routes your prompts to the correct LLM.
Consolidates billing and usage tracking in one place.
What Happens Behind the Scenes When You Integrate LLMs?
When you connect LLMs to your app through Emergent, a lot happens automatically behind the scenes. Using our Recipe Blog app as an example, here’s the flow:
Admin Uploads an Ingredient Photo
The admin uploads a photo of ingredients through the admin panel. The image is securely sent to Emergent’s backend.
GPT Processes the Image
Emergent routes the image to GPT’s vision model. GPT identifies the ingredients and outputs them in a structured JSON format like:
JSON makes it easy for your app to read, store, and pass the data to other processes.
Claude Generates Recipe Content
Once GPT outputs the ingredients, Emergent sends this JSON data to Claude. Claude generates a full recipe in JSON, for example:
Your app can now display or store this structured content. The admin can preview, edit, and decide which recipes to publish.
Now let’s actually Build the Recipe Blog with Multiple LLMs
Now that we understand how the LLMs interact, it’s time to actually build the app in Emergent. You’ll see how the Universal Key makes integration effortless and how to create prompts that bring your ideas to life.
What’s the app idea?
A Recipe Blog app where the admin uploads ingredient photos, GPT identifies the ingredients, and Claude generates human-like recipe articles that can be reviewed and published for readers to read. Optional header images for each recipe can also be generated using GPT.
Describe Your App in Plain English
Emergent works best when you explain what you want clearly. Here’s the prompt I used to build this:
Once you hit enter, Emergent will ask you a few follow-up questions to get your app right:
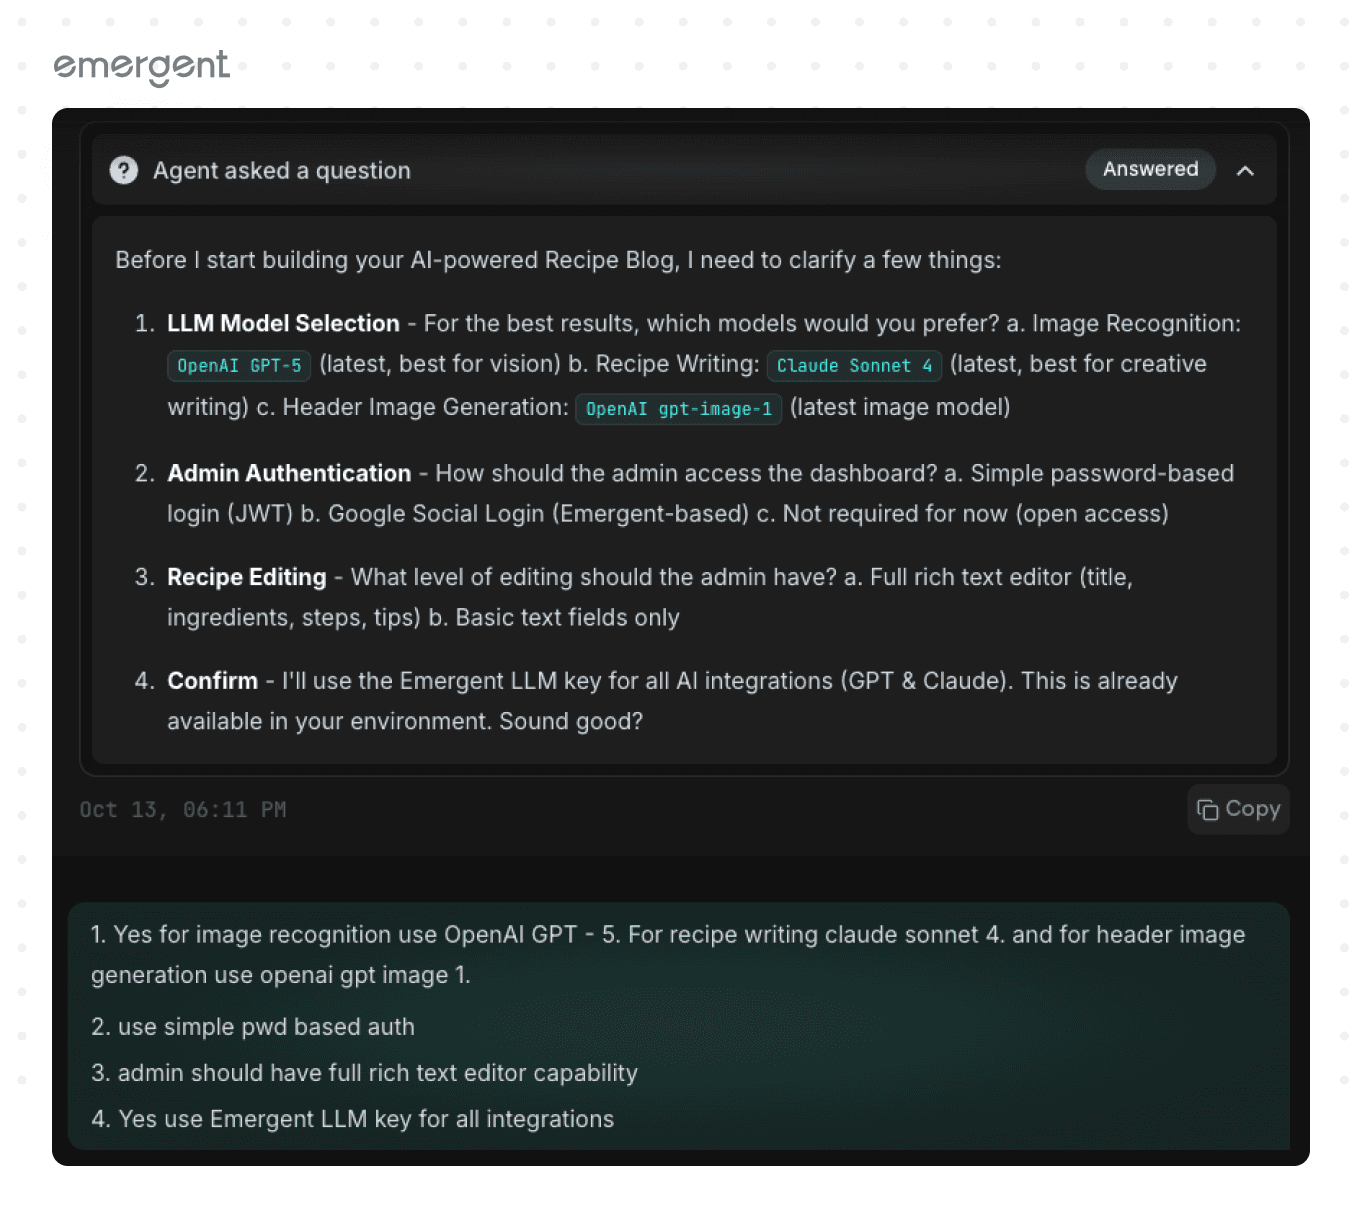
I’ve included the responses I gave as well in the above image.
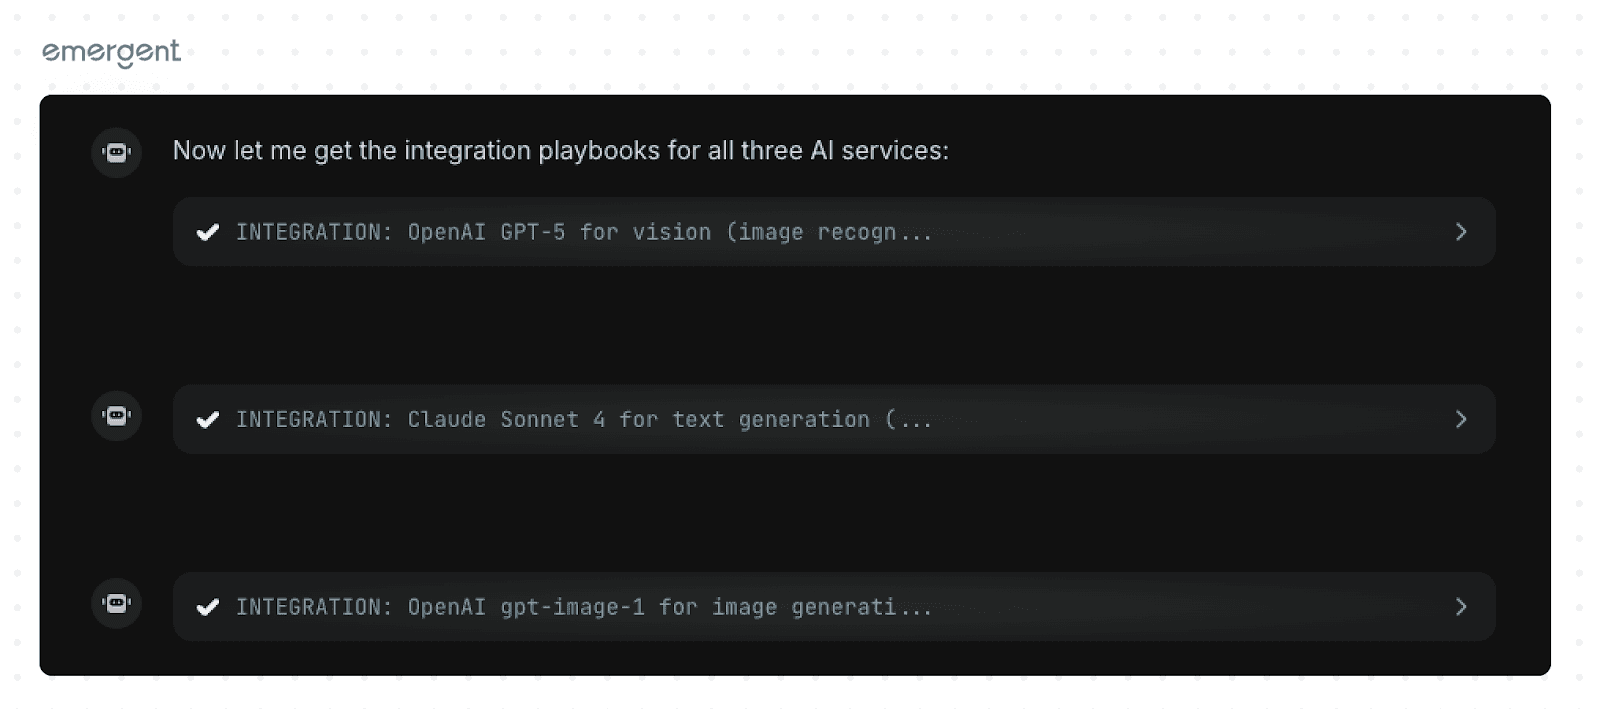
Emergent has integration playbooks for all these use cases and you can see the agent fetch and use these integration playbooks. This reduces manual intervention from your side.
How does the admin setup work
Emergent creates a simple interface where the admin can:
Upload ingredient photos.
View GPT’s identified ingredient list in JSON.
Generate recipes with Claude.
Preview, edit, and approve recipes.
Generate optional header images.
Note: The admin panel is visible only to the admin and is behind a login page - you would have to ask the emergent agent to setup the admin page with credentials of your choice otherwise it sets up a default username: admin and default password: admin123.
Testing the App
Once all the core functionality is built - Emergent calls the testing agent to thoroughly test your app. The agent will fix any issues it finds by itself - no intervention required.

The Emergent Testing Agent is one of our most advanced tools, designed to thoroughly test your app - which is why it consumes more credits than standard agents. Once testing is complete, the agent will notify you and prompt a manual review. A live preview of your app will automatically open, allowing you to explore and test the first version yourself.
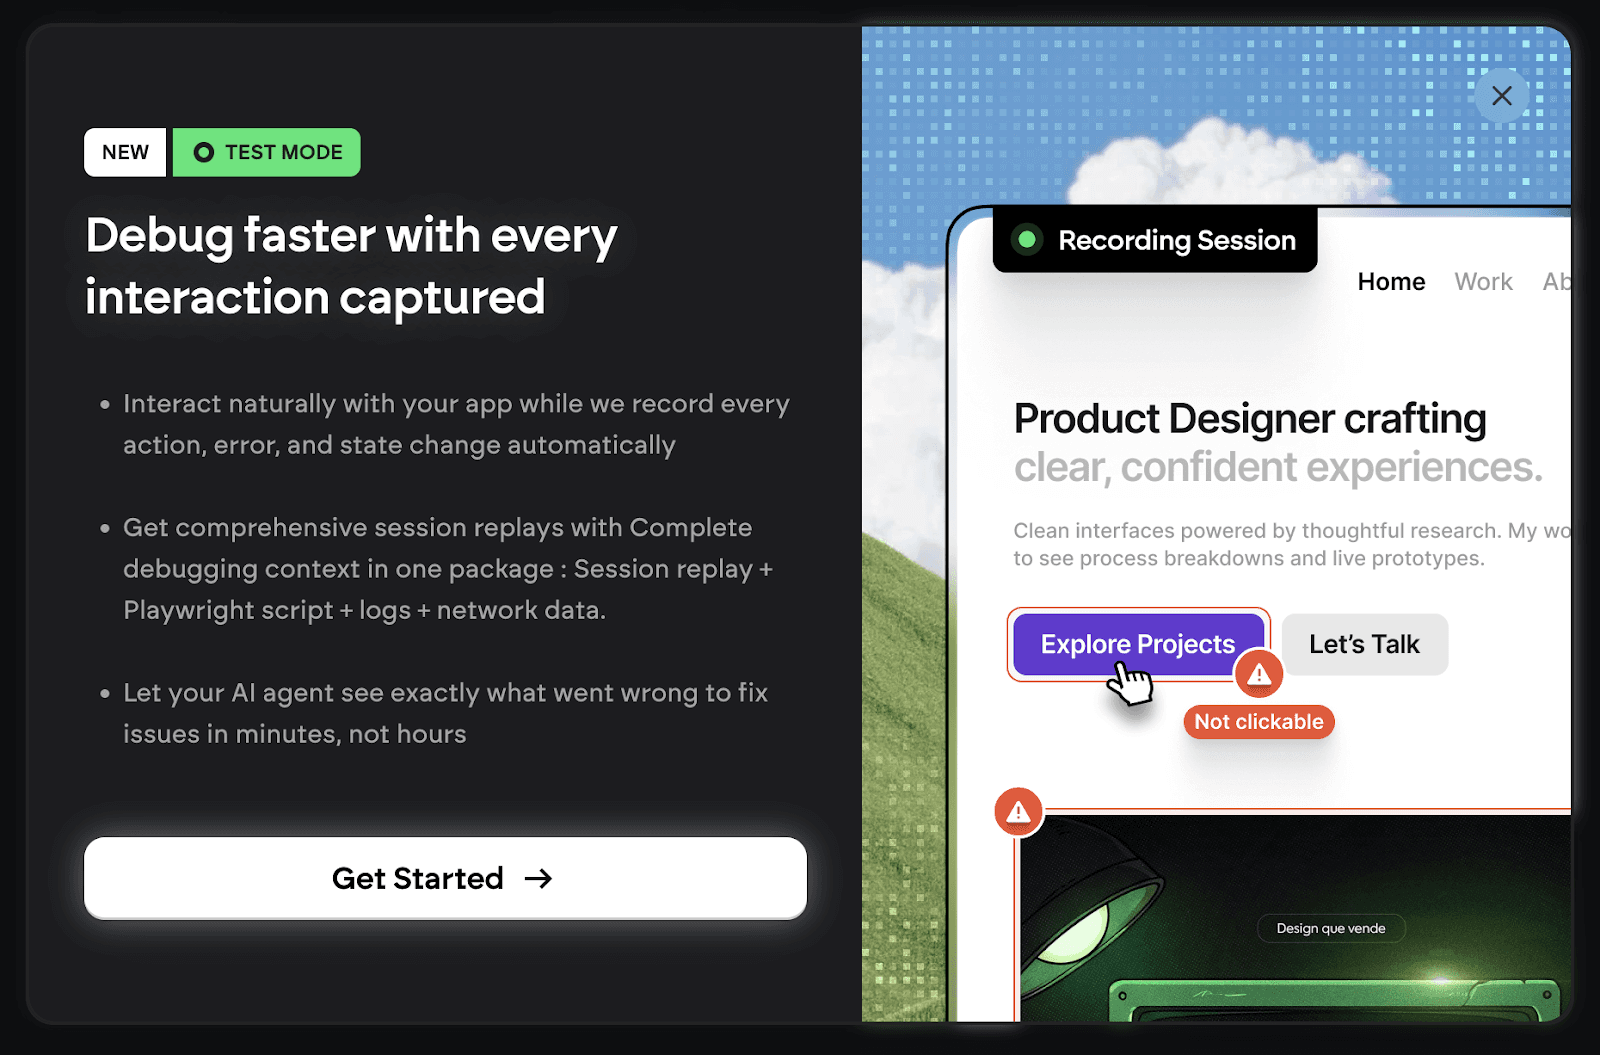
One standout feature here is Visual Testing Mode, displayed as “Test Mode” above your preview. When enabled, it records your testing session and automatically captures any visual inconsistencies or UI issues for the agent to analyze and reference in future improvements.
The Final App
This is the final version of the blog interface - the part visible to readers. I’ve made a few design improvements, including a responsive hero carousel, refined button styles, and category pills on each recipe card for a cleaner, more modern look.
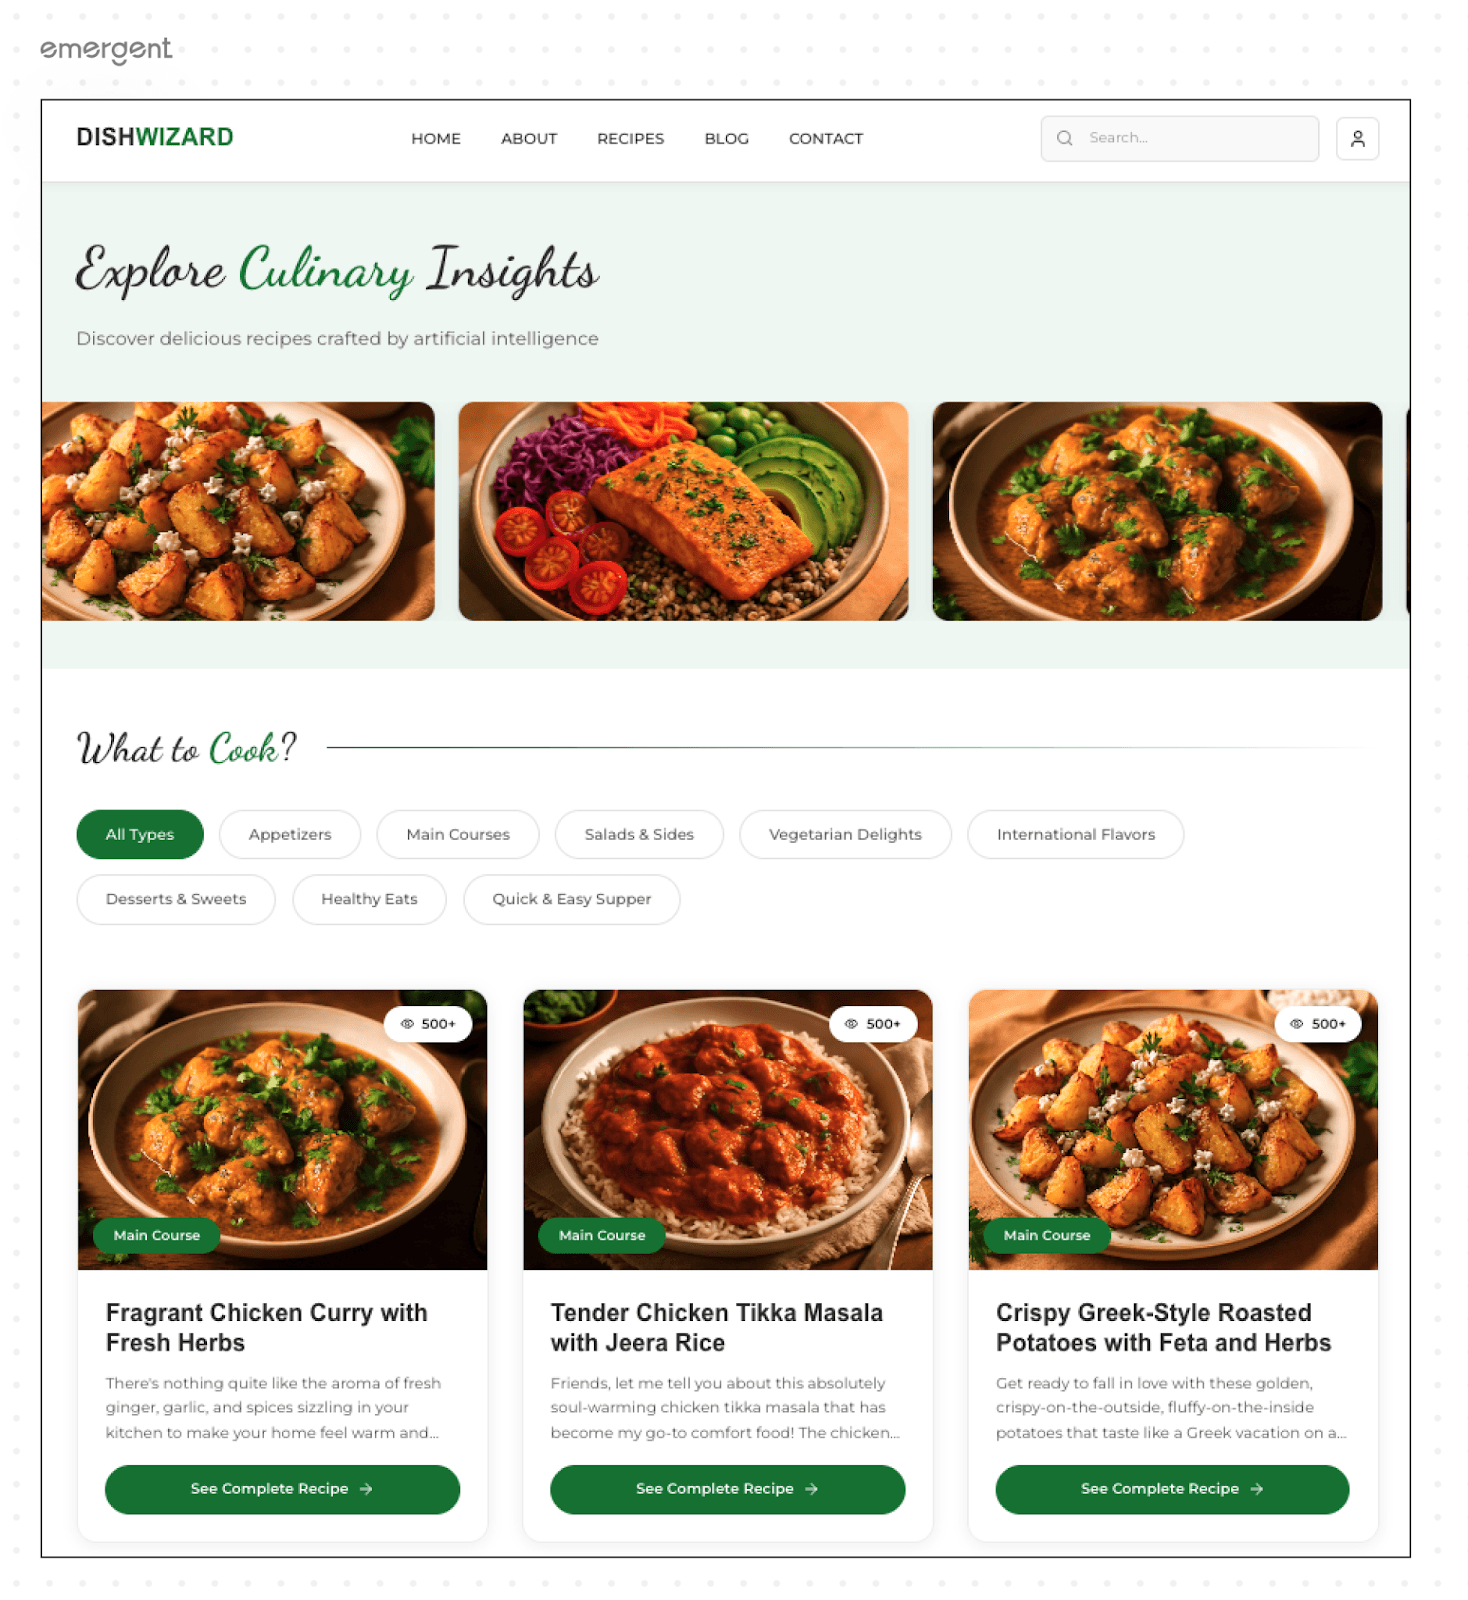
Now let me show you the backend functionality through the admin dashboard. The admin will be able to control what is visible on the blog through this dashboard.
This is how it looks:
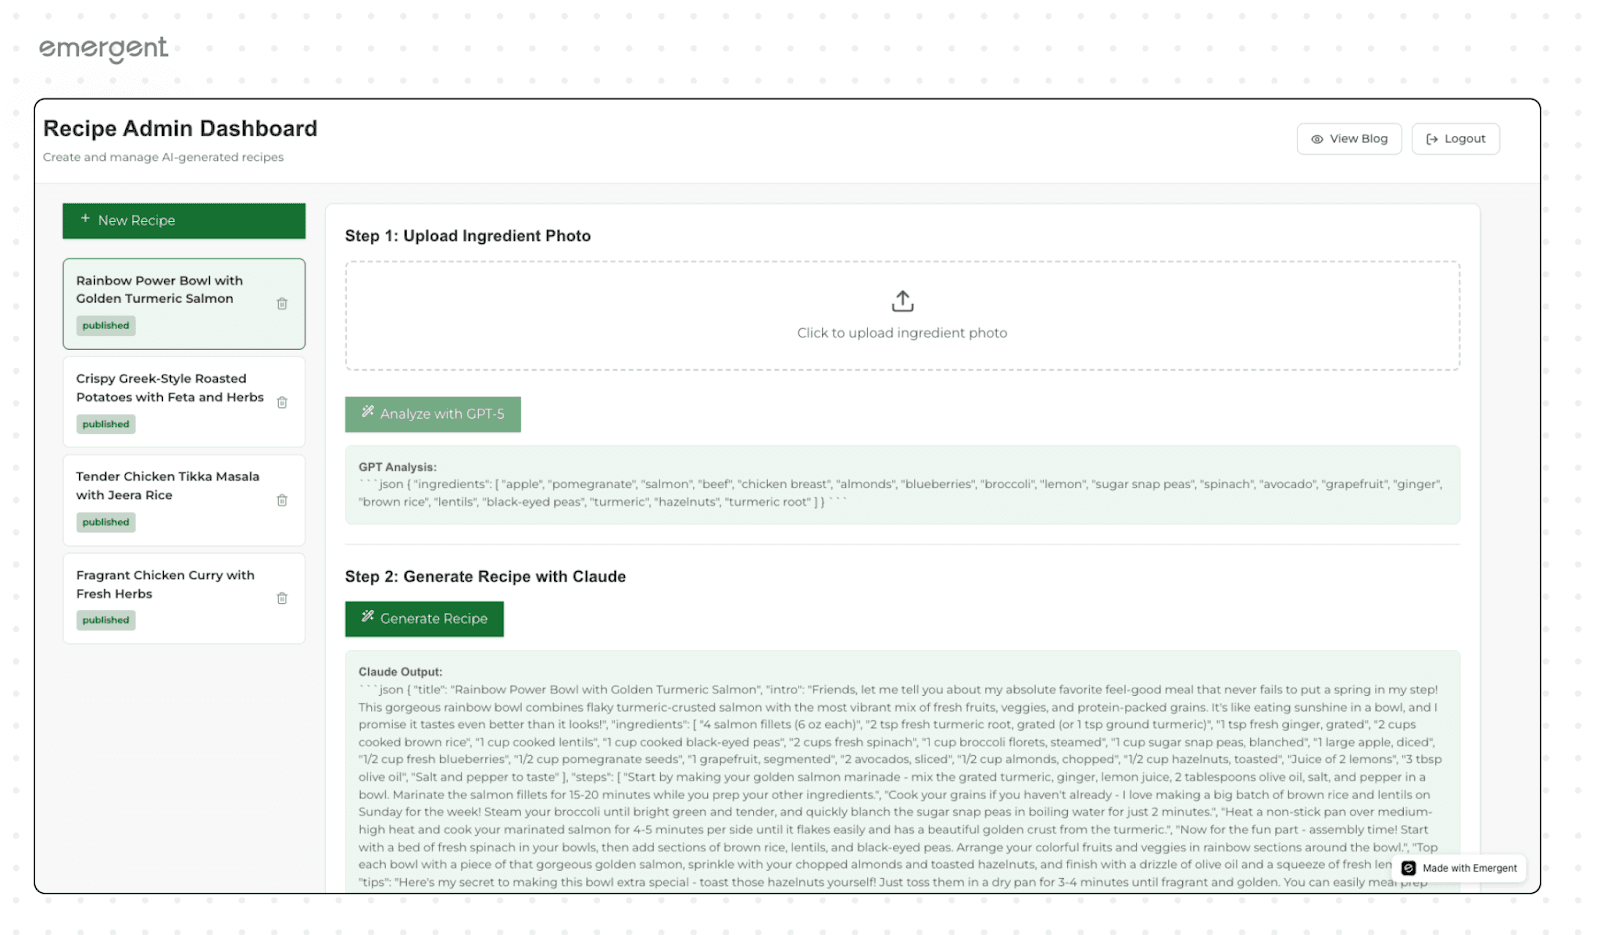
Now lets generate a recipe and push it to the blog using the admin dashboard:
Click on “New Recipe” from the dashboard.
Upload a photo of the ingredients.
Click on “Analyse with GPT-5” - it will:
Identify and analyse the ingredients from the image.
Generate a JSON output (used later by Claude to create the recipe).
(Note: The JSON output is visible for now, but can be hidden later.)
Once the ingredients are analysed, generate the recipe using Claude.
Claude will produce a JSON output, which automatically fills the recipe input fields.
You can edit or refine the text before publishing.
Next, generate the header image using gpt-image-1.
This process takes about a minute.
It creates an accurate and visually appealing image that matches the recipe.
After reviewing everything, click “Publish Recipe” to push it live on your blog.
That’s it - your new recipe is ready for your readers!
Video Link: Recipe Generation Walkthrough.mp4
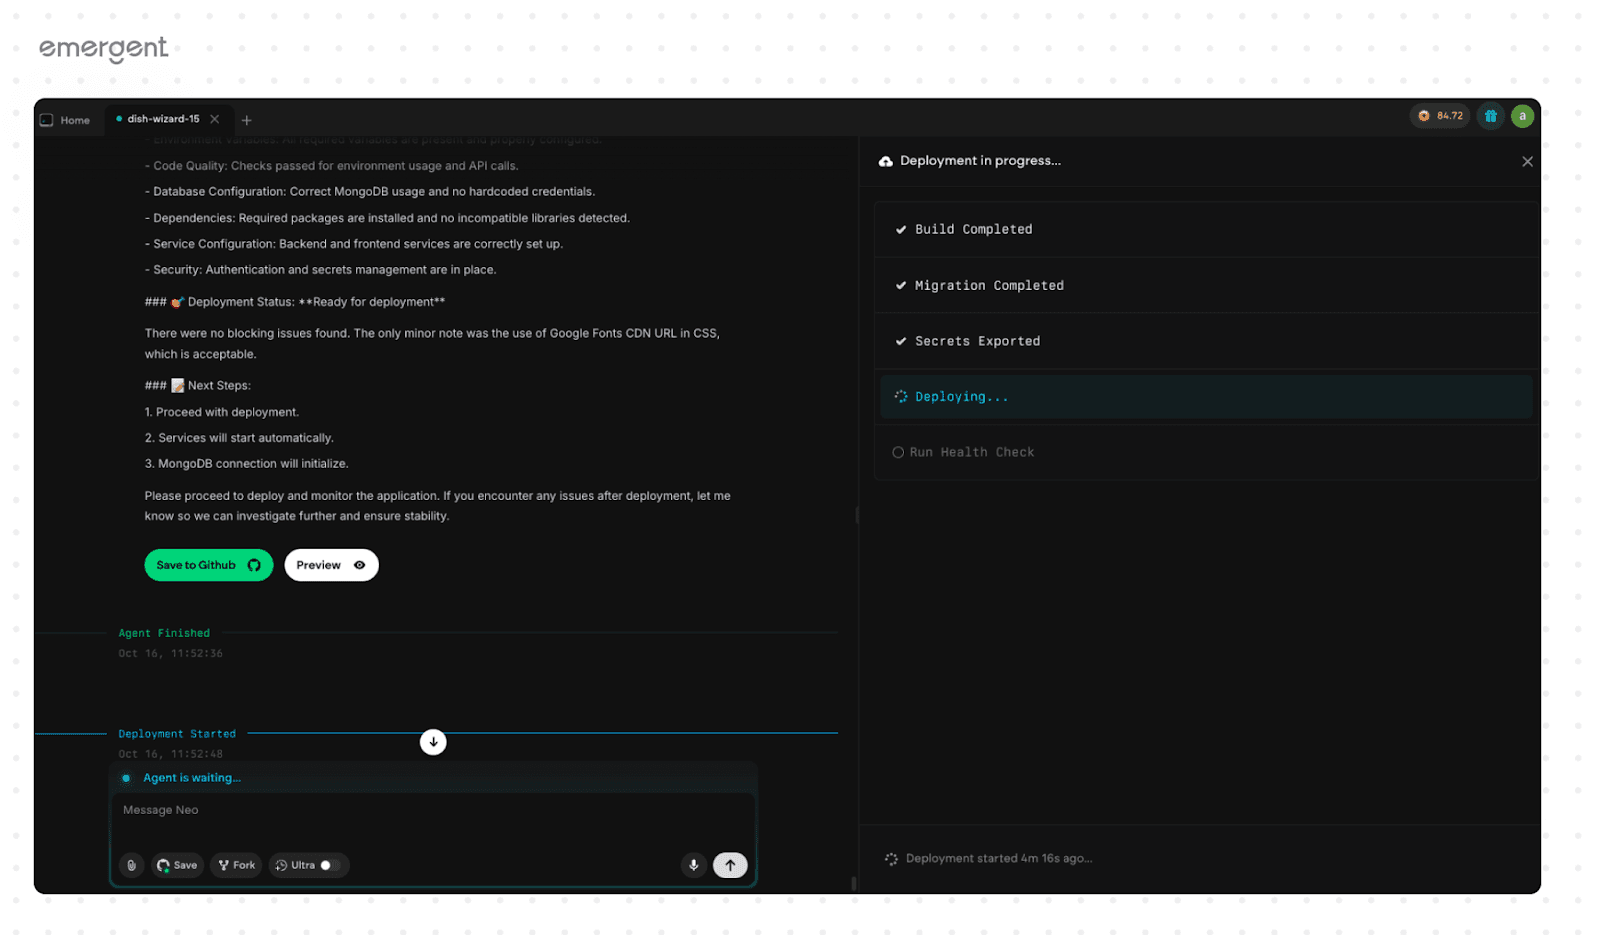
How to Deploy your app for everyone to use?
To make your app available for everyone, simply head to the top-right corner of the dashboard and click on the Deploy button. Start by running the Pre-deployment Health Check - this step ensures that your app is stable and won’t break after deployment. Once the check is complete and everything looks good, click on Start Deployment to begin the process.
The agent will then automatically handle everything for you - it will build the necessary packages, migrate your database, securely export all secrets, deploy the app, and run another round of health checks to confirm that everything is functioning smoothly. When the deployment is complete, you’ll receive a live deployment link where your app will stay active and never go to sleep. You can even connect your own custom domain to this link for a fully branded experience.
How can you improve the app further?
Once your app is deployed, you can focus on refining and enhancing it to deliver a richer user experience. Start by improving the UI design - create an updated layout in Figma and share the image with the agent. The agent will accurately replicate your design, including fonts, colors, and layouts. You can also browse Behance or Dribbble for design inspiration and upload those visuals as references for the agent to follow.
Beyond design, you can expand your app’s functionality by adding:
Google Authentication - for quick and secure user sign-ins.
Recipe Submission System - allowing users to upload and share their own recipes.
Review & Rating System - so readers can leave feedback and interact with your content.
Payment Gateways - to monetize the blog through premium content or ad-free subscriptions.
Dark Mode - offering a sleek, user-friendly interface for low-light viewing.
Multi-language Support - to make your app accessible to a global audience.
Social Share Options - enabling users to share recipes directly on social platforms.
These additions not only improve the app’s interactivity and accessibility but also help it grow into a vibrant, community-driven platform.
Deployed Link: https://dish-wizard-15.emergent.host/