



A lead generation website can collect plenty of form submissions and still leave the business with a messy follow-up process. The real test is whether each request reaches the right place with enough information for someone to act.
My first Lone Star Roof Care preview took about 15 minutes to build in Emergent. Refinements added another 25 minutes of active build time, and the full project used 20 credits.
The real test started once I submitted leads myself. I found issues in routing, copy, attribution, and mobile layout that a good-looking preview couldn’t show me.
If you’re learning how to build a lead generation website, I’d follow the same order again. Start with what a useful lead looks like, build the path around it, then test every handoff before you send traffic to the site.
What Is a Lead Generation Website?
A lead generation website turns interested visitors into people your business can contact and follow up with.
It usually combines a clear offer, calls to action, forms, trust proof, lead storage, source tracking, and a follow-up process.
A simple lead path looks like this:
Traffic source → relevant page → call to action → form → lead record → follow-up
A landing page can do part of this job. A full lead generation website can support several services, search topics, locations, and visitor needs.
The website still has one clear goal. You want the right visitor to take a useful next action.
What You’ll Need Before Starting
Get the business decisions ready before you build pages. This saves time later because your website builder won’t have to guess how your business works.
Prepare these first:
- One main offer: Pick the action you want visitors to take, such as requesting a quote, booking a call, or asking for an inspection.
- Qualification rules: Decide which answers make a lead urgent, relevant, or outside your service area.
- Contact fields: Decide which details you need in order to follow up.
- Real trust proof: Gather reviews, credentials, customer results, project photos, and awards you can verify.
- A lead destination: Choose where new requests will be stored and reviewed.
- A tracking plan: Decide how you’ll tell search, ads, referrals, email, and other sources apart.
You’ll also need an AI website builder that can support the workflow you have in mind.
For a simple campaign with one offer, starting with a landing page builder can help you compare that route.
If you need service pages, a private lead dashboard, saved records, and routing rules, choose a business website builder that can handle those pieces together.
For my test, I used Emergent.
Its Free plan includes 10 monthly credits. Standard includes 100 credits per month and costs $20/month. My 20-credit test went past the Free plan’s monthly allowance. Keeping the site live costs a further 50 credits per month per deployed app, so budget for build credits and hosting credits separately.
How to Build a Lead Generation Website Step by Step
Step 1: Define Your Main Conversion and a Qualified Lead
Start with one question. What do you want a useful visitor to do?
For Lone Star Roof Care, my main conversion was a free roof inspection request.
Then I decided what the fictional roofing company needed to know before following up.
I used these qualification fields:
- ZIP code
- Service needed
- Urgency
- Approximate roof age
- Property type
- Name
- Phone
I also set one simple priority rule. An active leak should arrive as Priority. A request from someone planning ahead should arrive as New.
That rule later became one of the most useful parts of the test.
Step 2: Plan for the Traffic You Want
Your website needs to fit the reason someone arrived.
For Lone Star Roof Care, I planned the site around two things: where a visitor might come from and what they would want when they arrived. Someone searching for an emergency roof leak is much closer to requesting an inspection than someone still researching roof replacement.
For a roofing company, traffic might come from:
- Google searches for roof repair in Austin
- Storm-damage ads
- Local search listings
- Referrals
- Social posts
- Direct visits
A homeowner searching for an emergency roof leak is already close to taking action. For that visitor, explain the service quickly and keep the inspection request easy to find.
Someone researching roof replacement needs more context first. Give that visitor answers about the service, process, area covered, and proof of past work.
Step 3: Map the Full Lead Path
Plan what happens after someone lands on the site. For Lone Star Roof Care, I mapped the route from the first visit through the inspection request, confirmation, dashboard, and email notification before I started building.
For Lone Star Roof Care, I used this flow:
Search or campaign → homepage or service page → Free Inspection CTA → three-step form → confirmation page → private dashboard → email notification
Writing the path first helped me keep the public site focused. Lone Star Roof Care only needed Home, Roofing Services, About, Request an Inspection, and Thank-you pages, with the same inspection request guiding visitors toward the main conversion.
That step can change by page, while the main conversion stays consistent across the site.
Read More: How to Create a Small Business Website in Simple Steps
Step 4: Write a Clear Offer and Add Real Trust Proof
Tell visitors exactly what they’re asking for.
“Contact Us” leaves the next step vague. “Request a Free Roof Inspection” tells the homeowner what the click starts.
I used that inspection request as the main CTA throughout Lone Star Roof Care.
The first build also created spaces for customer reviews, project photos, license information, insurance details, and local affiliations. I kept those areas as placeholders because the business was fictional.
For a real site, fill those spaces with proof you can verify.
I also caught several claims in the first build that I hadn’t supplied. The copy described scheduling steps, written findings, estimates, and other service details.
I changed them to neutral wording that matched the workflow I had built.
Review these claims before you publish:
- Offers: Make sure prices, free services, and discounts are real.
- Timelines: Promise only response and service times your business can meet.
- Reviews: Use genuine feedback with permission.
- Credentials: Check licenses, insurance, memberships, and awards.
- Service details: Describe the process your customers will receive.
- Privacy statements: Match the way your business handles lead data.
Step 5: Build the First Version
Emergent turned my first detailed prompt into a usable Lone Star Roof Care preview in about 15 minutes.
The first version already included a homepage, service sections, a three-step process, service areas, FAQs, repeated CTAs, and spaces for trust proof.
Here’s a shorter version of the prompt I used:
Build a lead generation website for a fictional roofing company called Lone Star Roof Care serving homeowners in Austin, Texas.
The main goal is to generate qualified requests for a free roof inspection.
Create a homepage with roofing services, service areas, FAQs, trust sections, and a clear Request a Free Roof Inspection call to action.
Build a three-step inspection form that collects ZIP code, service needed, urgency, approximate roof age, property type, name, email, and phone.
Store each submission in a private internal lead view.
Give leads a status that the company can update during follow-up.
Use placeholders for reviews, licenses, insurance, affiliations, and project photos until verified information is available.
Choose a design that fits a professional Austin roofing company.
Make the site work on desktop and mobile.

I let Emergent choose the visual style. It created an off-white background, dark type, orange CTAs, large headings, and roofing photography.
That first result was good enough to test. I kept the parts that worked and spent the next refinement prompts on the lead flow.
If your first prompt feels hard to write, Emmy can help inside Emergent. Emmy is Emergent’s free web chat assistant. She can ask questions about your idea, turn the answers into a build-ready prompt, explain unfamiliar choices, review screenshots, and guide you through publishing. Talking to Emmy doesn’t use credits.
Step 6: Build a Short Qualification Form
Keep the form focused on the information you’ll use.
My form had three screens.
Screen 1 asked for:
- ZIP code
- Service needed
Screen 2 asked for:
- Urgency
- Approximate roof age
- Property type
Screen 3 asked for:
- Name
- Phone
This order felt natural during testing. I started with simple questions about the roof and asked for contact details at the end.
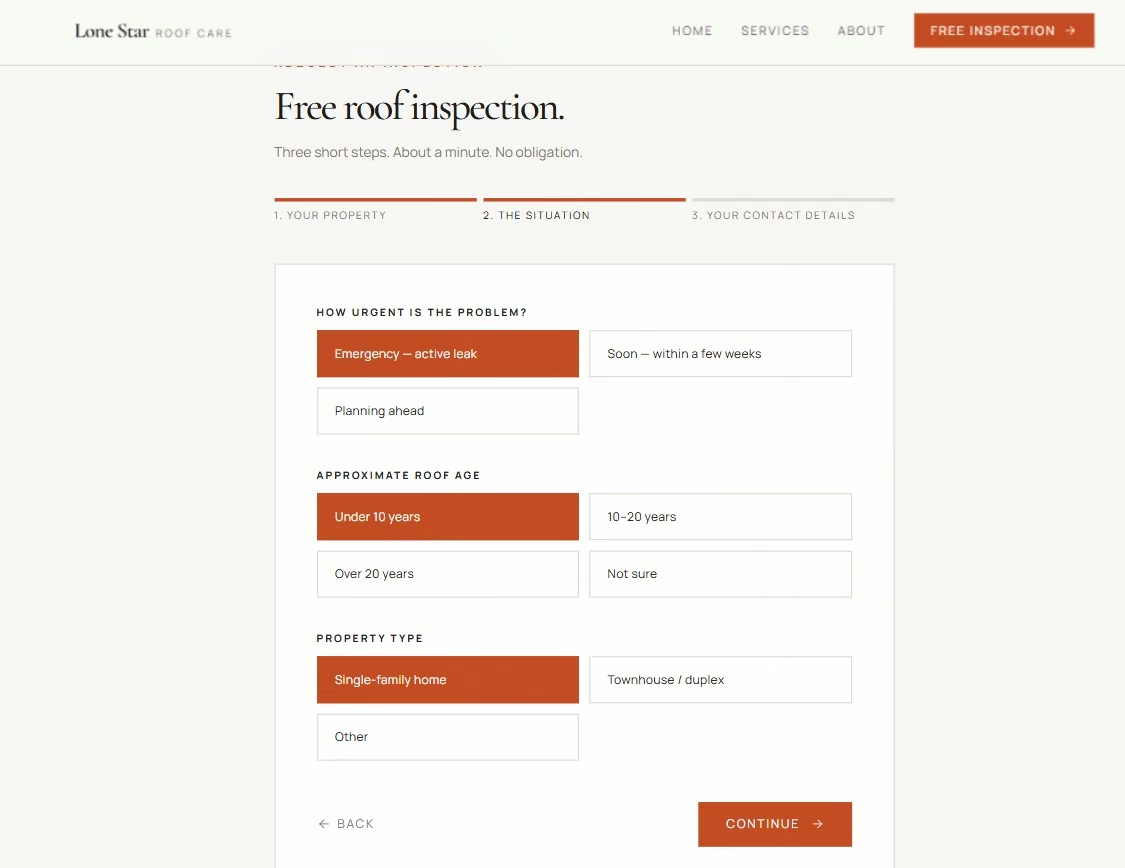
The form also showed progress across all three screens.
Then I entered an invalid email. The form blocked the submission, which confirmed that basic validation was working.
An early successful submission took about 7 seconds from clicking Submit to seeing the confirmation page.
Step 7: Store and Protect Every Lead
A form needs a private place for the information it collects.
I asked Emergent to create a password-protected internal lead dashboard. It stayed outside the public navigation, so homeowners saw the public roofing site while the fictional business could review requests separately.
Each lead record included:
- Name
- Service
- ZIP code
- Urgency
- Submission time
- Status
- Phone
The dashboard also supported follow-up stages such as New, Priority, Contacted, Scheduled, Completed, and Closed.
Later, I added a details view so the main table could stay easy to scan. That view held extra qualification and campaign data.
Keep real lead data private. Give dashboard access only to the people who need it. For a live business, use individual logins instead of sharing one password across the team.
Step 8: Route Important Leads Automatically
Use the answers in your form to tell your team which requests need attention first.
This is where I found one of the clearest bugs in my build.
The dashboard already had “Priority” in its status menu. My first emergency submissions still arrived as New.
I gave Emergent a direct rule:
When urgency is Emergency-active leak, create the lead with Priority status automatically.
Create all other new leads with New status.
Apply the rule during submission so an admin does not need to change the status manually.
Then I submitted a fresh emergency request through the public form.
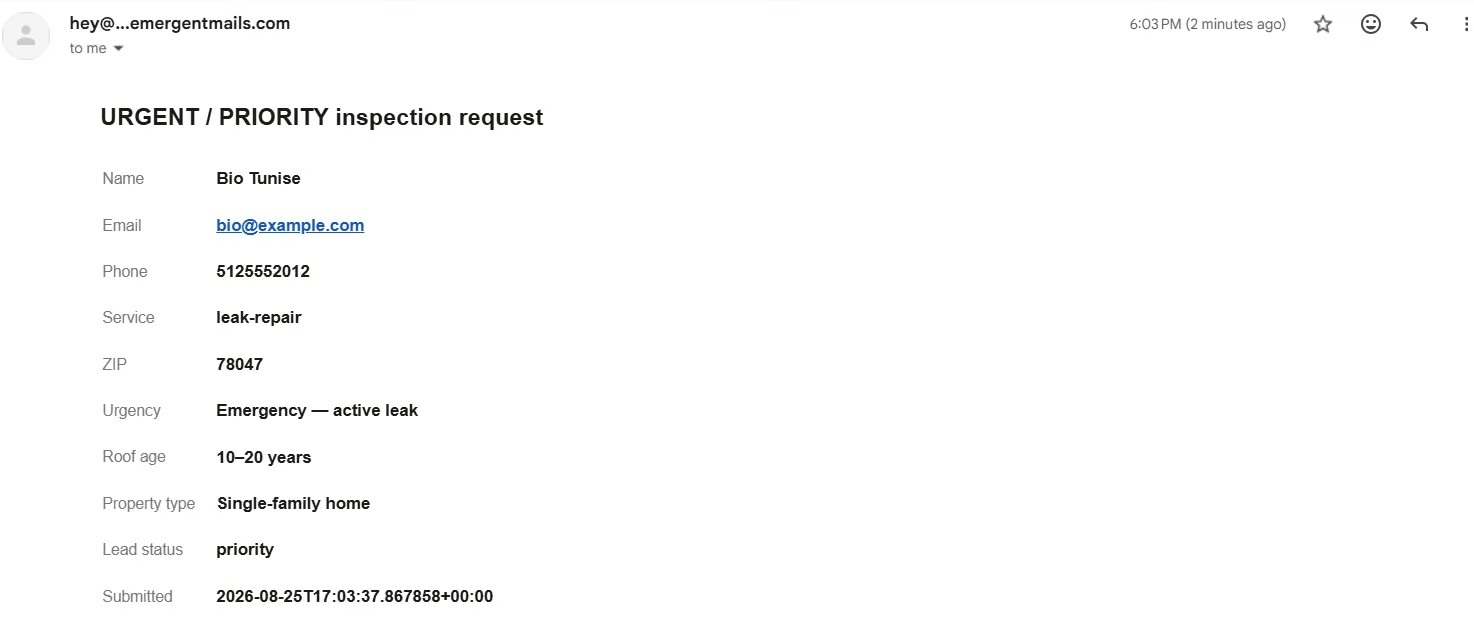
It arrived as Priority without me touching the dropdown.
I also connected a company inbox. Normal requests and Priority requests both triggered email alerts.
The emergency email used the subject “URGENT / PRIORITY inspection request.” It carried the lead’s contact and qualification details, so the recipient could understand the request from the inbox.
Step 9: Give Every Lead a Follow-Up Process
Decide what happens once the lead arrives.
For my build, the protected dashboard became the working lead list, using the stages I set up in Step 7 so every request had a visible next stage.
That gave each lead a visible next stage.
If your team already works in HubSpot, Salesforce, or another customer relationship management (CRM) system, send the same lead details there. Emergent’s HubSpot integration connects it using your own API credentials, so the same lead details flow through.
A good example of this comes from Emergent’s Brickline case study.
A Bay Area general contractor built a public quote form that sends each request into a private lead tracker, where the team can move leads through stages such as New, Contacted, Quoted, Won, and Lost.
Emergent reports that the setup cut first-response times from days to hours and reduced missed follow-ups by about 90%.
The useful takeaway: Once someone fills out your form, give that lead a clear status and next action. That keeps follow-up organized and makes it much easier to see which leads still need attention.
Read More: How to Build a CRM in 13 Steps Tested on a Real Business
Step 10: Remove Conversion Friction
Now use the website like a first-time visitor. I checked the CTA wording, number of questions, form order, validation messages, confirmation page, and promises in the copy. They were asking the same question at each point: would a homeowner know what to do without reading it twice?
Check these parts one by one:
- CTA wording: Tell people what the click starts.
- Form length: Keep questions tied to qualification or follow-up.
- Field order: Start with easy questions.
- Validation: Show the visitor what needs fixing.
- Progress: Show where someone is in a multi-step form.
- Confirmation: Tell the visitor the request went through.
- Tap targets: Give mobile buttons enough space.
I also changed the thank-you page during this pass.
The revised version showed the name, email, service, ZIP code, and urgency that had been submitted. That gave the visitor a useful confirmation without adding service promises I couldn’t verify.
Step 11: Track Where Each Lead Came From
Source tracking tells you which traffic produces useful leads.
I tested this by opening Lone Star Roof Care with campaign tags in the URL, moving through the site, and submitting the form.
My test values were:
- utm_source=google
- utm_medium=cpc
- utm_campaign=my-test
The saved lead showed all three values. It also stored the original landing-page URL.
Google’s campaign URL guidance says to always use utm_source, utm_medium, and utm_campaign together when you tag a URL by hand.
A simple test path looks like this:
/request-inspection?utm_source=google&utm_medium=cpc&utm_campaign=my-test
After submitting, open the lead record and check whether those values survived the full path.
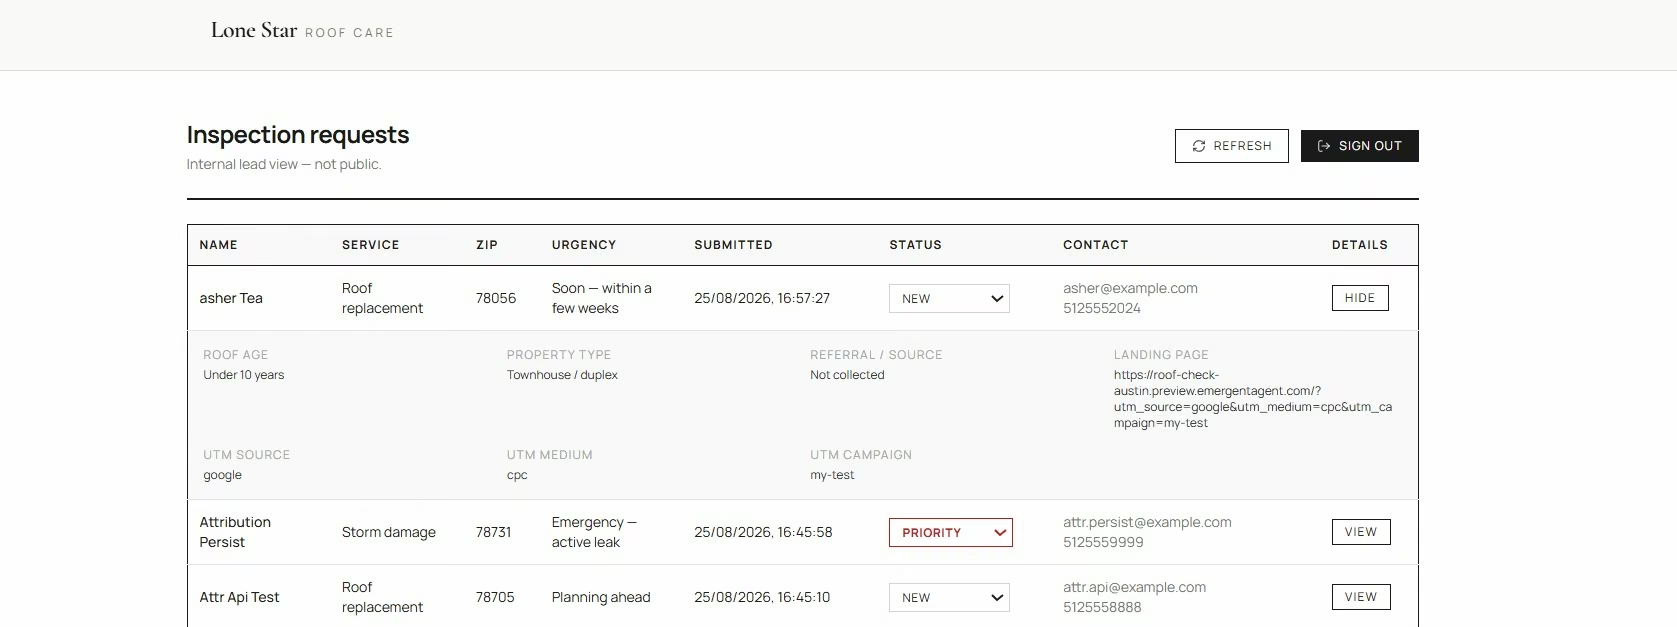
Useful source data includes:
- Landing page
- Referring source
- Campaign source
- Campaign medium
- Campaign name
- Form completion
- Lead status
- Final booked or closed result
Step 12: Test the Whole Form on Mobile
Open the finished lead flow on a narrow screen and complete it yourself.
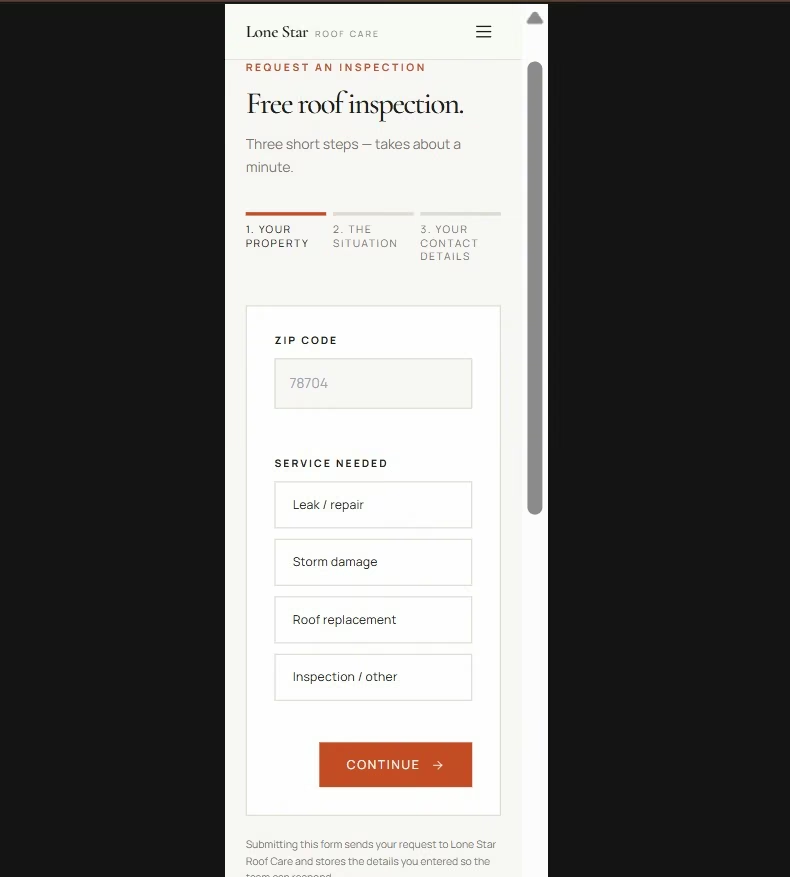
My mobile version switched to a hamburger menu. The service choices stacked vertically, the form stayed inside the screen, and the main Continue button remained easy to tap.
I noticed one small layout detail: the three progress labels wrapped onto several lines on the narrow screen. They were still clear, so I kept the layout. I wouldn’t have caught the wrapping from the desktop version alone.
Run this mobile test:
- Open the homepage.
- Tap the main CTA.
- Complete all form steps.
- Trigger a validation error.
- Check every option and text field.
- Submit the form.
- Read the thank-you page.
- Check the saved lead.
- Confirm the notification email.
Once your site is public, Google’s PageSpeed Insights gives you another way to check page performance.
Step 13: Launch and Test the Full Lead Path Again
Run one fresh submission after the final changes.
Fresh data gives you a clean answer. Old test records can reflect earlier versions of your rules.
My final lead test covered:
- Open the website with a test campaign source.
- Click the Free Inspection CTA.
- Complete the qualification questions.
- Enter valid contact details.
- Submit the form.
- Confirm that the thank-you page appears.
- Check that one lead was stored.
- Confirm the correct New or Priority status.
- Check the qualification details.
- Check the campaign data.
- Confirm the company email arrives.
- Repeat the flow on mobile.
After launch, start watching what real visitors do.
Google Search Console shows which queries bring clicks and impressions to your pages. You can also compare performance by device to check how mobile and desktop traffic differ.
Track these business outcomes:
- Form starts
- Form completions
- Qualified leads
- Priority leads
- Lead response time
- Leads by source
- Booked calls or jobs
- Lead-to-customer rate
Ask customers how they found you too. A referral, repeated visit, social post, or offline recommendation can be hard to reconstruct from one analytics report.
Common Mistakes to Avoid
A good lead generation website can still lose useful leads through small gaps.
These are the mistakes I’d check first:
- Using a vague CTA: Tell visitors what they’re requesting.
- Asking too many questions: Every extra field adds work for the visitor, so remove questions your team won’t use.
- Publishing invented proof: Use real reviews, credentials, and customer results.
- Leaving urgent routing manual: Turn clear qualification rules into automatic actions.
- Skipping mobile form tests: Complete the same workflow your visitors will use.
- Ignoring source data: Save enough campaign information to learn which traffic creates useful leads.
- Stopping after the first preview: Submit real test leads before you send traffic.
Taking It Further
Once the basic lead path works, improve it with real visitor data.
You can build service-specific landing pages, add location pages where they serve a real audience, test new offers, and connect the form to the tools your team already uses.
If you’re building campaign pages around paid traffic, the best AI landing page builders guide can help you compare faster ways to create and test those pages.
Keep your tests tied to an outcome. A new headline is useful when it helps more qualified visitors start the form. A new field is useful when it helps your team handle the lead.
Emergent Makes Lead Generation Websites Easier to Build
Emergent worked well for this test because I could describe the public website and the lead workflow in the same conversation.
I started with the roofing site, then added the form, private lead list, Priority rules, campaign tracking, and inbox notifications as I tested each part.
Here’s where it helped during my build:
- Prompt-based building: I described pages, fields, and lead rules in plain English.
- Fast iteration: I could point to the exact routing behavior that needed fixing.
- Connected workflow: The public form and private lead records lived in the same project.
- Publishing support: Emergent lets you publish from the same project you built in.
- Emmy assistance: The free chat help from Step 5 stays with you through publishing, and talking to her costs no credits.
Most of my refinement work went into the lead rules and notification flow. The public-facing pages needed much less intervention after the first build.
Your build won't match mine. Page count, lead rules, integrations, and the number of revisions will change the build.
You can start building with Emergent when you’re ready to test your own lead flow.
Final Takeaway on How to Build a Lead Generation Website
If you’re working out how to build a lead generation website, start with the lead itself.
Decide what a useful lead looks like. Plan how that person reaches the site. Give them one clear action, collect the information you need, and create a reliable follow-up path.
Then submit leads yourself. That final step gave me the most useful findings in the Lone Star Roof Care build. It exposed the routing issue, proved the campaign tracking worked, confirmed the notification flow, and showed how the form behaved on mobile.
Build the page, then test the business process behind it.

Describe what you want and Emergent builds it. A real, production-ready app you can launch the same day.
- One prompt to build
- Zero code required
- Deploy in minutes