


I spent a few weeks building the same home-baker membership three times: on WordPress, on a community-first platform, and on an all-in-one platform. The build was never the hard part. Here's how to build a membership website that members stick with, step by step, so you skip the rework I didn't.
Before we get into the build, it helps to pin down what a membership website actually is and what members are paying for.
What Is a Membership Website (and How It Actually Works)?
A membership website is a site that gates specific content, community, or features behind a recurring payment, so only paying members get in. You decide the tiers and the access rules.
To build one, choose your membership model and one weekly retention loop before you pick software. Then choose between a hosted platform and an owned setup based on how members will use it.
After building it three times, the pattern was clear. People kept paying when the site gave them a recurring incentive to return, like scheduled drops, live sessions, or active discussions. Static content alone was not enough to hold attention.
Under the hood, every membership site does the same thing. It checks who's logged in, confirms their plan is active, and shows or hides content based on their tier. Most run on a few common models:
- Tiered: Members pick from several price levels, each unlocking more.
- All-access: One price unlocks everything.
- Drip: Content releases on a schedule instead of all at once.
- Freemium: A free tier hooks people, a paid tier delivers the depth.
- Hybrid: A mix, like a free community with paid courses inside.
People often blur "membership" and "subscription." A subscription usually focuses on ongoing access to a product or service. A membership can include that too, but often adds exclusivity, participation, or a sense of belonging. Both can bill on a recurring cycle.
Also read our best website builders for subscription services guide for platforms built around recurring billing and member access.
What You'll Need Before You Build
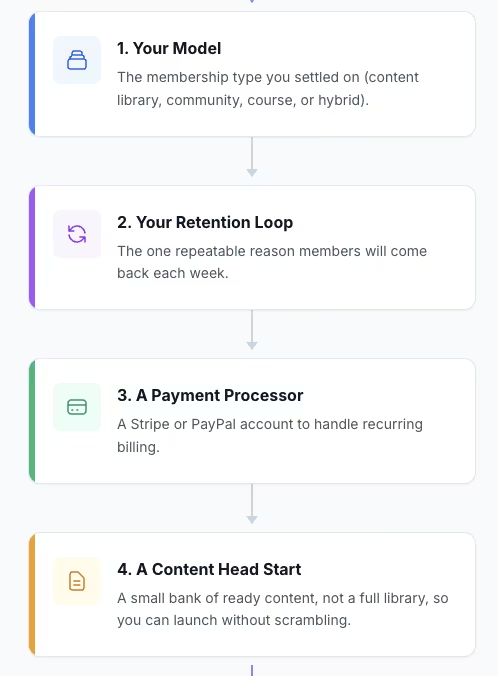
Before I touched a single platform, I had to decide four things, or every build stalled out. Lock these first, and the rest of the process gets shorter:
- Your model: The membership type you settled on, whether that's a content library, community, course, or hybrid.
- Your retention loop: The weekly habit you want members to build.
- A payment processor: A Stripe or PayPal account to handle recurring billing.
- A content head start: A small bank of ready content, not a full library, so you can launch without scrambling.
You'll also want a clear niche and a rough sense of who's paying you. A membership for "everyone who likes baking" is harder to sell than one for "home bakers who want to go pro."
Time required: A few days to a couple of weeks on a hosted platform, and longer on the WordPress route since you assemble the pieces yourself. Customization and content volume push that number up either way.
The budget depends entirely on the route you pick, so I'll cover the numbers in Step 2. A hosted plan is one monthly fee, while WordPress means hosting plus plugins plus your own time on upkeep.
One filter helped me decide faster whether I needed a membership site. It makes sense when people need ongoing access, repeated interaction, or a scheduled habit.
If you're selling a one-off download, one course with no updates, or a simple service page, a membership setup can be more system than you need. The model works best when the value grows over time, not when the sale ends after checkout.
How to Build a Membership Website: Step-by-Step
Here's the full sequence, in the order that saved me the most rework. Each step builds on the one before it, so resist the urge to jump ahead to picking software.
Step 1: Choose Your Membership Model Before Any Software
My first mistake was picking the prettiest builder, then realizing my home-baker membership needed a model first. A content library needs different tools than a live community, and a course needs different tools than both. Choose the wrong model, and you'll fight your platform the whole way.
So start with how members get value. Each model fits a different kind of membership:
- Content library: Recurring access to a growing set of resources, videos, or templates.
- Paid community: The value is the people, the discussion, and the events.
- Course or coaching subscription: Structured learning or group coaching on a cycle.
- Resource vault or paid newsletter: Lighter-touch content delivered on a schedule.
- Hybrid: A community wrapped around courses, or a library with a discussion layer.
For my bakers, the real product was the weekly rhythm and the people, with a video library as support. That made it a community-first hybrid rather than a course. Naming that early told me which platforms to look at.
Before you build anything, validate the model. Run a quick survey, pitch it to a handful of people in your niche, or pre-sell a founding spot. If nobody bites at the idea, no platform will save it.
Pick a content library when members return for depth of resources. Pick a paid community where members get value from each other and from showing up. Pick a course model when structured teaching or coaching is the core offer.
Compare the idea with the three patterns that show up most often to pressure-test it. A professional membership usually needs renewals, events, resources, and a searchable member base. A creator or expert membership usually needs discussion, live sessions, and a clean mobile login.
A resource vault usually lives or dies on search, filters, and how often new material appears. If your idea does not clearly resemble one of those patterns, tighten the offer before you build.
If you'd rather own the whole build without a plugin stack, Emergent can generate the app for you. More on that below.
Step 2: Match the Platform to How Members Will Use It
I ran the same baker brief through every route instead of trusting a feature list. I judged each one on launch speed, content protection, login feel, billing, mobile, and support, because that's what members feel day to day.
On the owned route, I gated the recipe library in MemberPress on top of WordPress, wired Stripe, and set a weekly drip rule. Then I spent the whole afternoon on updates and a plugin-compatibility check before it felt safe to launch.
The payoff is total control over content, pricing, data, and search engine optimization (SEO). The cost is that you own the maintenance. (Paid Memberships Pro is the free-core challenger here if you want to start at zero before adding paid add-ons.)
On the community-first route, I moved my bakers into Circle. The upgrade wall hit the moment I needed to bulk-remove test accounts and lift the invite cap. The community itself came together fast, and the automation and media tools were strong for a weekly drop.
Then I opened the same community on my phone in Mighty Networks. The daily login felt cleaner than the giant navigation I'd just fought elsewhere. In my test, Mighty felt better on mobile, while Circle gave me stronger automation and media tools for the workflow I was building. Skool is the simpler, less customizable challenger in this lane, with a $9/month Hobby plan that charges a 10% transaction fee.
On the all-in-one route, I rebuilt the membership in Kajabi as if the bakes were a course and took a test payment. Then I set up a data export the same day, because the lock-in question wouldn't leave me alone.
It was the fastest path to checkout-plus-content, but design and automation flexibility were thinner. Podia launched a clean storefront in an afternoon with the least customization. That worked until I wanted custom access logic. For course-first builds, I ran the video library through Teachable and sanity-checked the same flow in Thinkific.
Two other routes are worth mentioning. I tested the newsletter-led version in Ghost to feel the content-membership route. And I stood the whole thing up on Patreon first, in about an hour, just to confirm bakers would pay before I built anything I owned.
Here's how the lanes compare, organized by what kind of membership you're running:
The biggest decision in this table is hosted versus WordPress. A hosted platform gets you live faster and handles the plumbing, but you trade control and live inside their pricing and limits.
WordPress gives you control over content, pricing, data, and SEO, but you own the updates, backups, and security checks for good. Plugin conflicts are real, and a membership can break when an unrelated plugin updates.
Choose owned if: You want long-term control and you'll maintain it.
Choose community-first if: Members participate daily and mobile matters.
Choose all-in-one if: Your membership is a course or coaching business at heart.
Choose validate-first if: You're not sure people will pay yet.
Step 3: Design the Site and Set Up Essential Pages
Seven pages showed up in every build, the same ones each time, and the members-only pages are where access rules get tested. Get the structure right before you decorate.
Your public pages do the selling and the housekeeping:
- Homepage: What the membership is and who it's for.
- Pricing page: Tiers, what each unlocks, and a clear call to join.
- Login page: A clean, obvious way back in.
- Help and cancel page: How to get support and how to leave, no dark patterns.
Your members-only pages do the delivering with the member dashboard, gated content, and the community or event page.
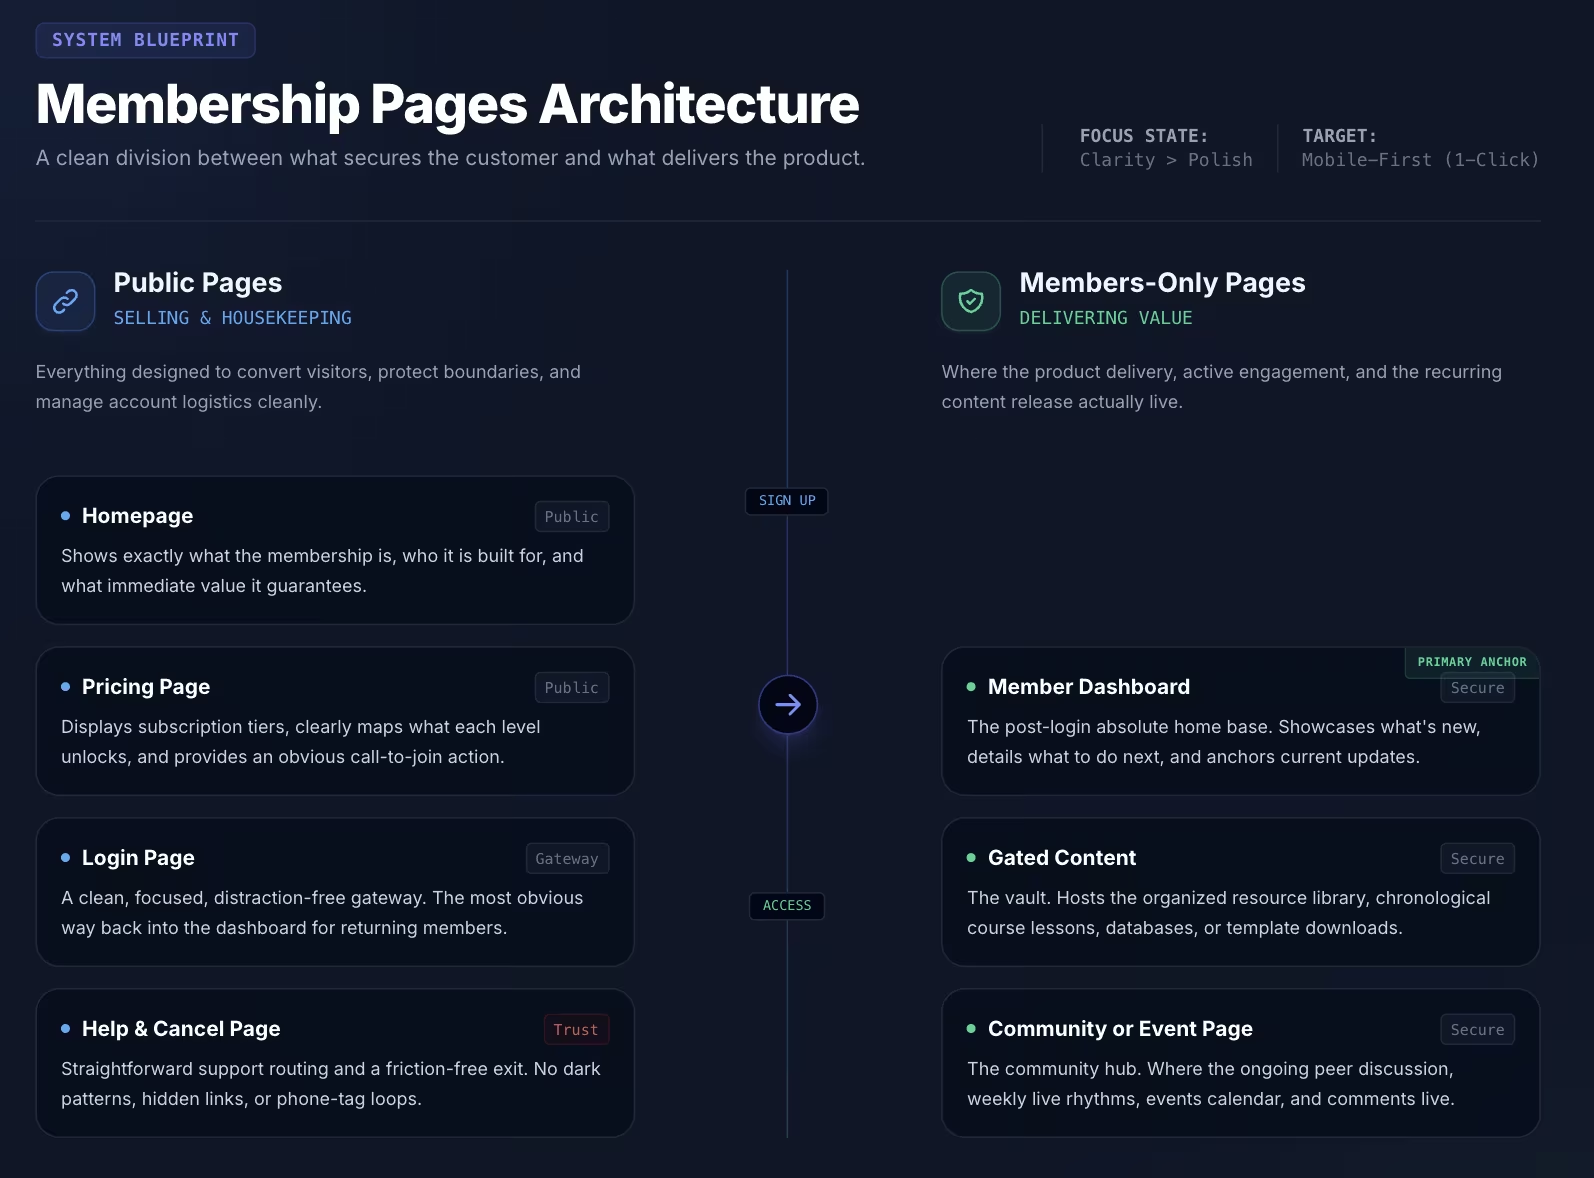
Keep navigation simple and put the dashboard one click from login. Design for mobile first, since a lot of daily check-ins happen on a phone. Clarity matters more than polish here. If a member can't find this week's drop, the homepage design will not save the renewal.
If networking matters, add a searchable member directory and a self-serve account page early. Members should be able to update their profile, check renewal status, change billing details, and manage communication preferences without opening a support ticket.
On the public side, an About page, a contact page, and a small public resources section do real work too. They build trust, answer basic questions, and give non-members a preview of the value behind the paywall. If your platform supports it, social login can also reduce friction on the first visit.
Step 4: Add Your Content and Protect It
I launched with one month of recipe drops and a few technique videos, not a full library. Then I set the gating and drip rules and checked that paid pages stayed locked for non-members. On day one, having enough content to prove the rhythm matters more than having a full vault.
Aim for one to three months of content banked before launch. That covers you while you find your production pace and keeps the early weeks from feeling empty. Mix formats so the experience does not get stale. Use written guides, short videos, downloadable resources, and a live element if your model includes one.
Then decide how content reaches members:
- Drip: Release on a schedule so the value keeps arriving and pacing feels intentional.
- All-access: Open the whole library at once, better for reference-style memberships.
People often skip testing whether the protection holds. After I set the access rules, I logged out and tried to reach gated pages directly. I opened them in a private window and confirmed that a non-member hit a wall every time. If your gated content is reachable without paying, it's a free site with extra steps, and members won't pay for that.
If you want gated articles or resources to appear in search, follow Google’s guidance for subscription and paywalled content. The correct markup helps Google recognize the access restriction and distinguish it from cloaking.
The content bank gets easier to scope when I turn it into a short launch plan. My minimum version is five to eight foundational resources, one or two live or recorded sessions, and the first two to three dates on the calendar.
That is enough to prove the rhythm without disappearing for three months to build a giant library. After launch, I would rather publish on a steady cadence than dump a pile once and stop for weeks..
Step 5: Set Up Payments, Tiers, and Renewals
Set up billing before you polish the membership pages. Stripe went in with a monthly and an annual option with a founding-member price.
Keep your tiers simple. Two or three is plenty, and more than that confuses buyers and bloats your support. Match your pricing model to your content:
- Tiered: Different levels for different depths of access.
- All-access: One price, everything included.
- Freemium: A free entry tier feeding a paid one.
Stripe and PayPal are the common processors, and most platforms connect to them in a few clicks. On price, peer memberships often land between $50 and a few hundred dollars a month, depending on niche and depth. Use that range as context rather than a rule. Price on the value members get and your costs, then adjust.
The settings that save you grief are the unglamorous ones. Turn on automatic renewals and set up dunning for failed payments, so a declined card doesn't silently cancel someone. Decide your refund and cancellation flow before launch, so you are not making that decision during your first angry email. Add coupons and an easy upgrade or downgrade path while you're in there.
Before taking a real payment, I check the trust basics members look for without saying it out loud. SSL is live, the privacy policy is easy to find, the refund rules are plain English, and the cancellation path is obvious.
I also like offering more than one payment option when the platform allows it, especially card plus PayPal or wallet checkout. For higher-ticket memberships, monthly installments can widen the funnel without forcing a cheaper plan.
Step 6: Build One Retention Loop Before You Add Anything Else
I watched my membership limp along until I gave members one weekly anchor: the recipe drop plus the monthly bake-along
This is the step that decides whether your membership survives.
A retention loop is a single, repeatable behavior members do on a rhythm. Pick one core loop before you produce extra material. Four that work:
- Weekly Office Hours (or live Q&A). A standing weekly time members can count on. It gives the community a reliable anchor point for connection and problem-solving.
- Monthly Challenge (shared goal). A shared objective with a clear start and finish. Collective momentum and focused sprints drive engagement.
- Live Teardown (or feedback thread). Members submit their work, you respond, and everyone learns. Individual cases become high-value lessons the whole group can scale from.
- Member Spotlight (accountability check-in). Built on the people rather than the content. Showcasing member wins builds peer-to-peer connection and community loyalty.
Rule of thumb: good loops are predictable and social.
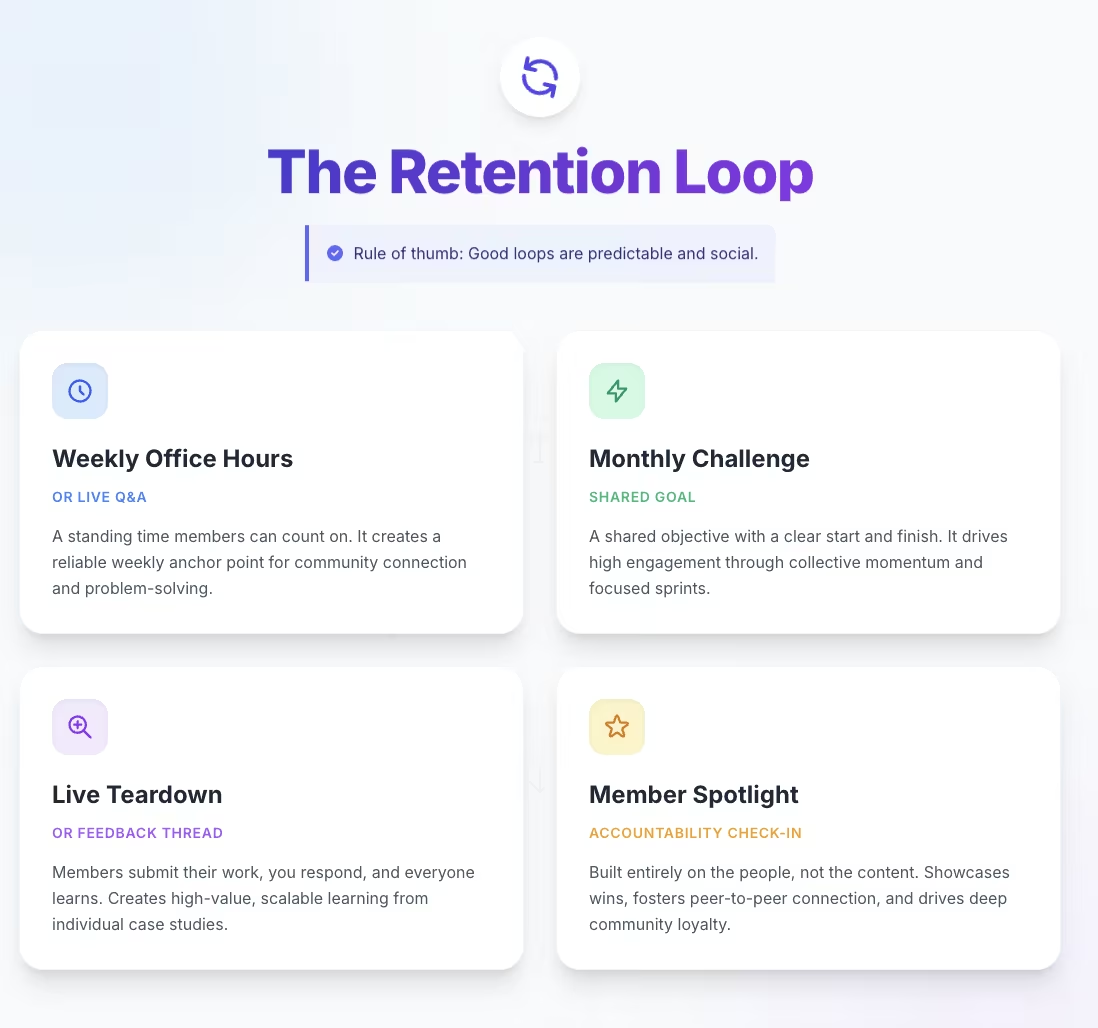
Retention comes from a repeatable habit. The monthly bake-along pulled members back every cycle. The recipe archive, however large it got, never did that on its own. The loop is what turns a one-time signup into a habit.
Pick your single-core loop now, before you spend weeks producing extra material. One loop done consistently beats five done occasionally. You can always add more once the first one is sticky.
Step 7: Test the Boring Stuff Before You Launch
The least glamorous afternoon of the whole build was the one that saved me most. Feed your own site declined cards, cancel a few test accounts, reset a password, and watch what snaps. That afternoon told me more than any feature list.
Billing, invites, support, and data are where setups break first. You want to find those problems on a Tuesday before a paying member does.
Run every failure path on purpose before you let anyone in:
- Failed payment: Use a test card that declines and confirm that dunning kicks in.
- Cancellation: Cancel a test account and check that access ends cleanly.
- Refund: Process a refund and confirm the records line up.
- Password reset: Reset a login and make sure the email arrives.
- Bulk member removal: Try removing several accounts at once. This is where I hit Circle's upgrade wall.
- Export: Pull your member data out and confirm you can get it cleanly.
- Mobile login: Log in on a phone and walk the whole flow.
- One support ticket: Send a real question to your platform's support and time the reply.
Support response time becomes part of your product the moment billing, access, or data goes wrong. You want to know that wait before your members do.
The export test matters as much because every hosted platform carries some migration risk. A backup you've tested is the difference between a bad day and a lost business.
Step 8: Launch to a Small Founding Group
I opened to about 30 founding bakers before going public, so the problems surfaced privately, and the first reviews came from people rooting for me. A small founding cohort, somewhere around 20 to 50 people, is one of the safest ways to catch problems before a public launch.
Offer them a founding-member price or a permanent perk for being early. They get a deal, you get live usage on a working billing cycle without a public audience watching the rough edges. Run your full pre-launch checklist, then invite them in.
Onboarding is where you keep them. Make the first week obvious:
- Send a clear welcome: What's here, where to start, and what happens this week.
- Point them at the loop: Get them to the first live event or drop fast.
- Ask for feedback early: They'll tell you what's confusing before strangers do.
Use the first 30 days to fix friction and gather testimonials. By the time you open publicly, the build is tested, the loop is running, and you've got proof from people who were rooting for you.
The founding group tests the product, and the public launch tests distribution.
Before opening wider, prep the first week of promotion in one batch. Include a launch email, two or three social posts, one partner or peer mention, and a short FAQ that answers price, who it's for, and what happens after signup.
Pair that with a simple onboarding sequence. Send a welcome email, point members to the first action, remind them about the next event or discussion, and ask what felt confusing.
Step 9: Track Retention, Not Just Signups
After launch, I stopped watching signups and started watching whether bakers came back. Login frequency, bake-along attendance, churn, and cancellations told me far more than the headcount did. Signups feel good, but retention is what pays the bills.
Watch the metrics that show whether the habit is forming:
- Active members: How many log in, not just how many pay.
- Churn rate: The percentage canceling each month, your single most important number.
- Login frequency and event attendance: Whether the loop is pulling people back.
- Discussion activity and content engagement: Signs the community is alive.
- Refunds and support tickets: Early warnings that something's broken.
Once you have enough members to see a pattern, add two more numbers next to churn: Member satisfaction and acquisition cost versus lifetime value. Churn shows whether people stay, while satisfaction helps explain why. Acquisition cost versus lifetime value shows whether the model can scale profitably.
Set a maintenance cadence, too. On WordPress, that means regular updates, backups, and compatibility checks. On a hosted platform, it means watching for plan limits and keeping your export current. Wait until churn is low and the loop is full before you scale with a branded app, sub-communities, or a new tier.
Three Membership Website Examples
These examples show how the membership model changes the build.
Professional membership: American Marketing Association is a good example of a professional membership. Members get resources, training, local chapters, and event discounts, so the site has to make account access, events, and member benefits easy to find.
Creator or expert community: Lenny's Newsletter shows how a creator membership can combine paid content with a private community. Paid members get the archive, product-focused writing, and access to a private Slack community.
Resource vault or template library: Swipefile fits the resource-vault model. The paid offer centers on saved examples and template access, so search, categories, and clean account access carry the experience.
Common Mistakes to Avoid When Building a Membership Website
These are the mistakes I either made or barely dodged across three builds. Each one is avoidable if you see it coming.
- Choosing the tool before the model: Pick your membership model first, or you'll fight a platform that was never built for your kind of membership.
- Too many tiers: Stick to two or three, because more options slow the buyer down and pile up support work.
- Ignoring mobile: Test the phone login early, since most daily check-ins happen on mobile, and a clunky one kills the habit.
- Dumping 100 resources instead of one loop: Build the weekly habit before you produce a giant library nobody returns to.
- Making joining a chore: Keep signup short, because every extra field or confusing step loses people at the worst possible moment.
- Skipping the failure-path tests: Run a failed payment, a cancellation, and a refund on purpose, or your members will find the bugs for you.
- Underpricing: Charge for the value and your own costs, not the lowest number you think people will tolerate.
Also read our guide on how to build a website for everything you need to get the foundation right before you add membership logic.
How Emergent Helps You Build a Membership Website Without Stitching Tools Together
Across all three routes, I ran into the same tradeoff. Hosted platforms were easier to launch, but I hit limits faster when I wanted custom access logic or a clean export. WordPress gave me more control, but it also left me owning the upkeep.
Emergent fills the gap between hosted-platform limits and WordPress upkeep. You get a working membership site with member logins, gated content, and recurring payments that you own.
Emergent runs specialized agents in parallel to build the interface, wire up data and integrations, and test the work before anything ships.
If a hosted community tool already fits how your members behave, use it. But say you've decided you want to own the build and the data, and the off-the-shelf tools keep pinching where it counts. Building your own membership website this way is worth a look.


Describe what you want and Emergent builds it. A real, production-ready app you can launch the same day.
- One prompt to build
- Zero code required
- Deploy in minutes