

Hey there!
In this tutorial, we're going to show you how to transform your free app into a revenue-generating business by adding user authentication and payment processing.
The idea is simple: instead of spending days learning Stripe APIs, OAuth protocols, and payment security, you just tell Emergent what you want, and it builds the entire monetization system for you.
Basically, we'll show you how to:
- Add secure user authentication (signup, login, password reset)
- Integrate Stripe payment processing for one-time payments or subscriptions
- Set up different pricing tiers (free, pro, enterprise)
- Test your payment flows safely before going live
- Switch from test mode to production when you're ready to charge real money
Using this approach, builders have added monetization to note-taking apps, SaaS dashboards, productivity tools, and more, turning side projects into actual businesses that generate revenue.
By the end of this guide, you'll know exactly how to add payments and authentication to any Emergent app, whether you're starting fresh or upgrading something you've already built.
Let's get started!
Understanding Authentication and Payments
So here's the thing: most developers spend weeks learning how to properly implement user accounts and payment processing.
Authentication means building signup forms, login systems, password security, email verification, session management, and more.
Payments mean integrating Stripe APIs, handling webhooks, managing subscriptions, dealing with failed payments, and ensuring PCI compliance.
With Emergent, you skip all of that.
What is Stripe Integration?
Stripe is the payment processing platform that lets you accept credit cards, manage subscriptions, and handle all the financial complexity.
You don't need to learn Stripe's API documentation. You just describe your pricing model, and Emergent builds everything.
Why You Need Both?
Authentication + Payments = Complete Business Platform
Here's how they work together:
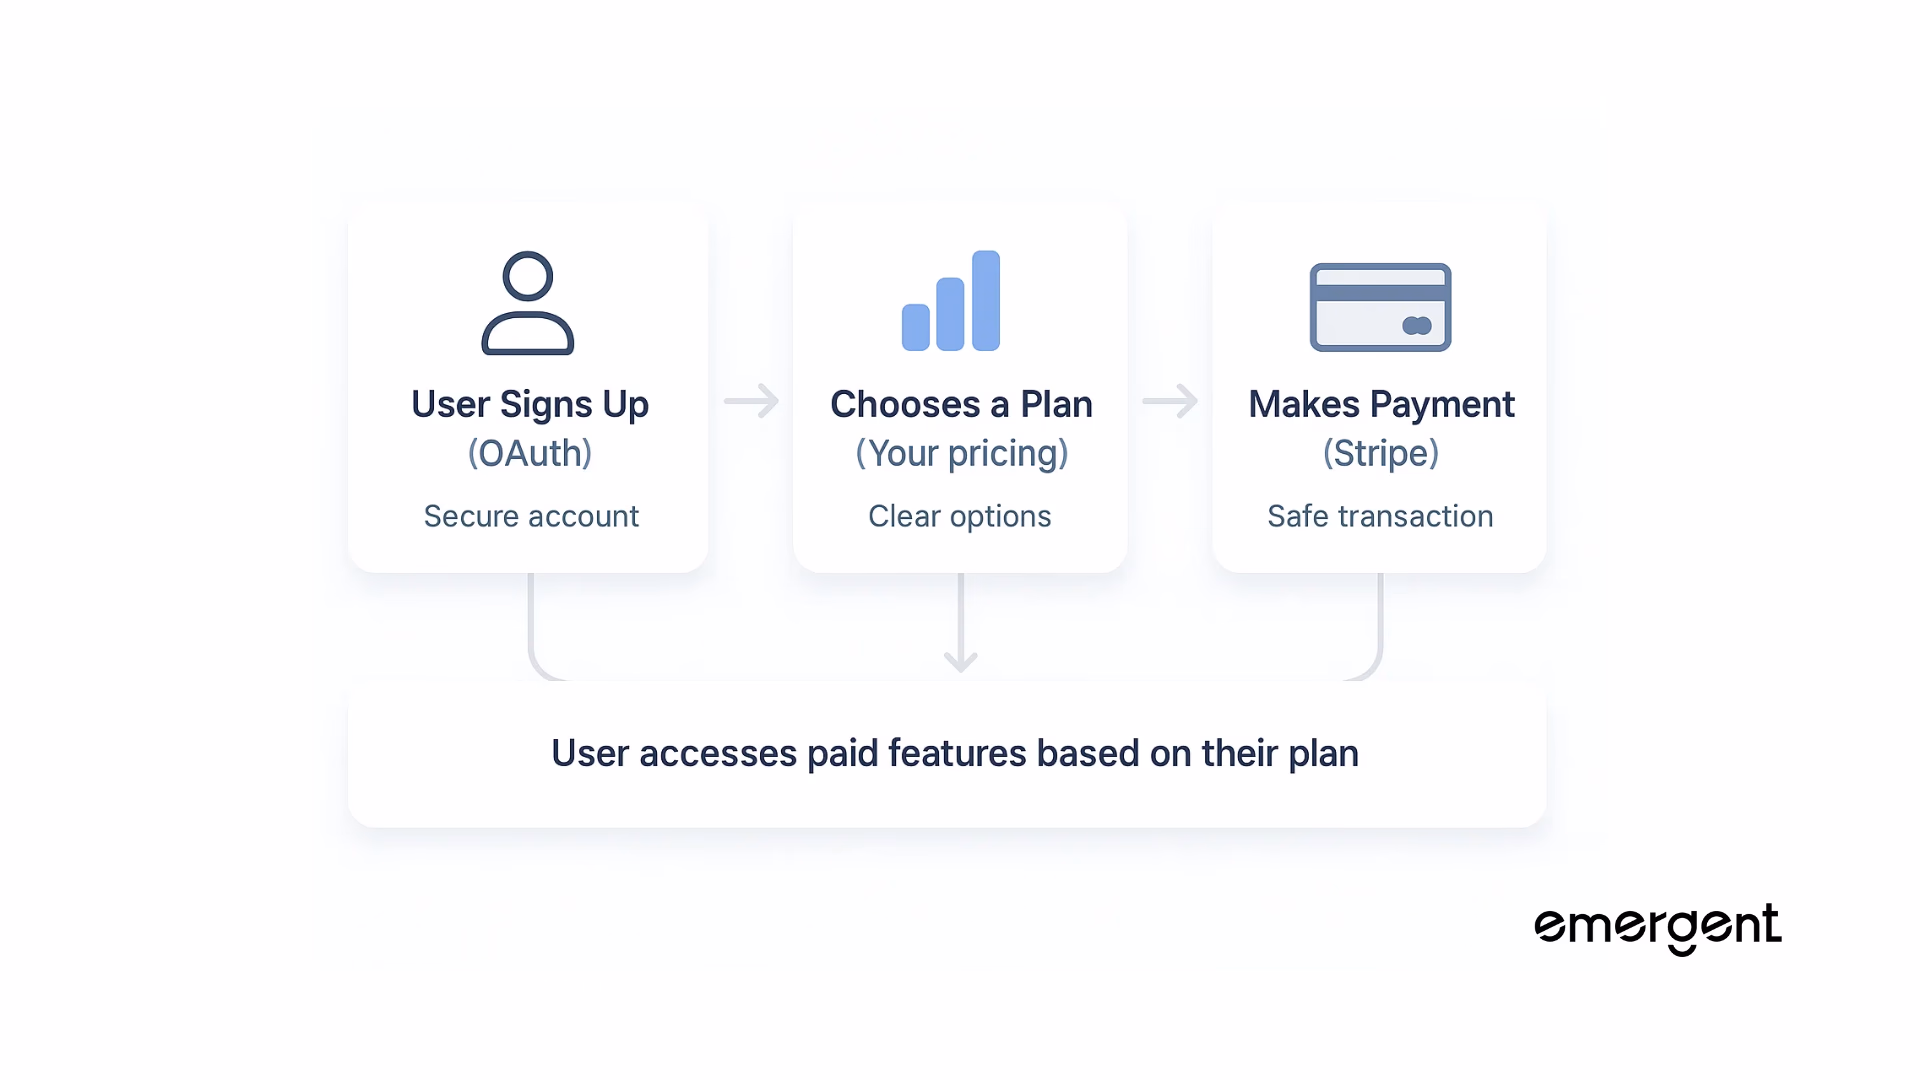
Without authentication: Anyone can access your app, but you can't charge them or track their usage.
Without payments: Users can sign up, but you have no way to generate revenue.
With both: You have a complete business that can acquire customers and collect money.
Real-World Example
Let's say you built a habit tracking app:
Free version (no authentication needed):
- Anyone can use it
- Data stored locally
- No revenue
With authentication only:
- Users create accounts
- Data synced across devices
- Still no revenue
With authentication + payments:
- Free tier: Track 3 habits
- Pro tier ($5/month): Unlimited habits + analytics
- Premium tier ($10/month): Everything + coaching features
- Revenue generated every month
This is how you transform a useful tool into a sustainable business.
Building on Emergent
Once you’re on Emergent, creating your app begins with a single detailed prompt.
This is where you describe exactly what you want the app to do - Emergent’s AI then builds it for you automatically.
Here’s the exact prompt we used to create the Habit Tracking app:
Build a habit tracker app with daily checkboxes, streak tracking, calendar view, and local storage. Use a clean, mobile-friendly notion style UI with soft colors, progress indicators, and light/dark mode toggle.
We are starting simple - so that our entire focus can be on the stripe integration!
The agent will ask a few clarifying questions, once you answer that - the agent will start building your entire project.
Here is what the first preview looks like :
After testing the functionality, we can proceed to the next step.
Adding OAuth for user authentication
This part is quite simple, all you have to do is ask the agent to add the OAuth.
Here is the exact prompt we used :
“Could you please add OAuth integration to the application”
The agent will again ask some clarifying questions like :
- Which OAuth provider would you prefer? We will be going with the Emergent-based Google Social Login because it has the easiest setup and it is built-in
- What should the authentication flow look like? We will be going ahead with required login where users must authenticate to use the app
- Where should the data be stored? We are going ahead with MongoDB for now.
After you answer the questions, the agent edit the app/backend/server.py and add OAuth to the application.
Here is how it works now :
Adding Monetization
You just need one clear request to the Emergent agent:
Please integrate Stripe for payments and Emergent OAuth for user authentication.

I want to offer:

- Free tier: Track 3 habits

- Pro tier ($5/month): Unlimited habits + analytics

- Premium tier ($10/month): Everything + coaching features

Use test keys initially so I can test the payment flow before going live.
What Happens Next?
The agent will automatically build your monetization system, including a clean pricing page with tier comparisons and upgrade buttons, and a full Stripe checkout flow for subscriptions, billing, and receipt emails.
It also sets up feature access control so free users see limited features while paid users unlock everything.
Since you’re using Emergent’s test keys, you’re currently in a sandbox environment - meaning you can safely test payments and flows without real transactions before switching to live mode.
Here is what it looks like now:
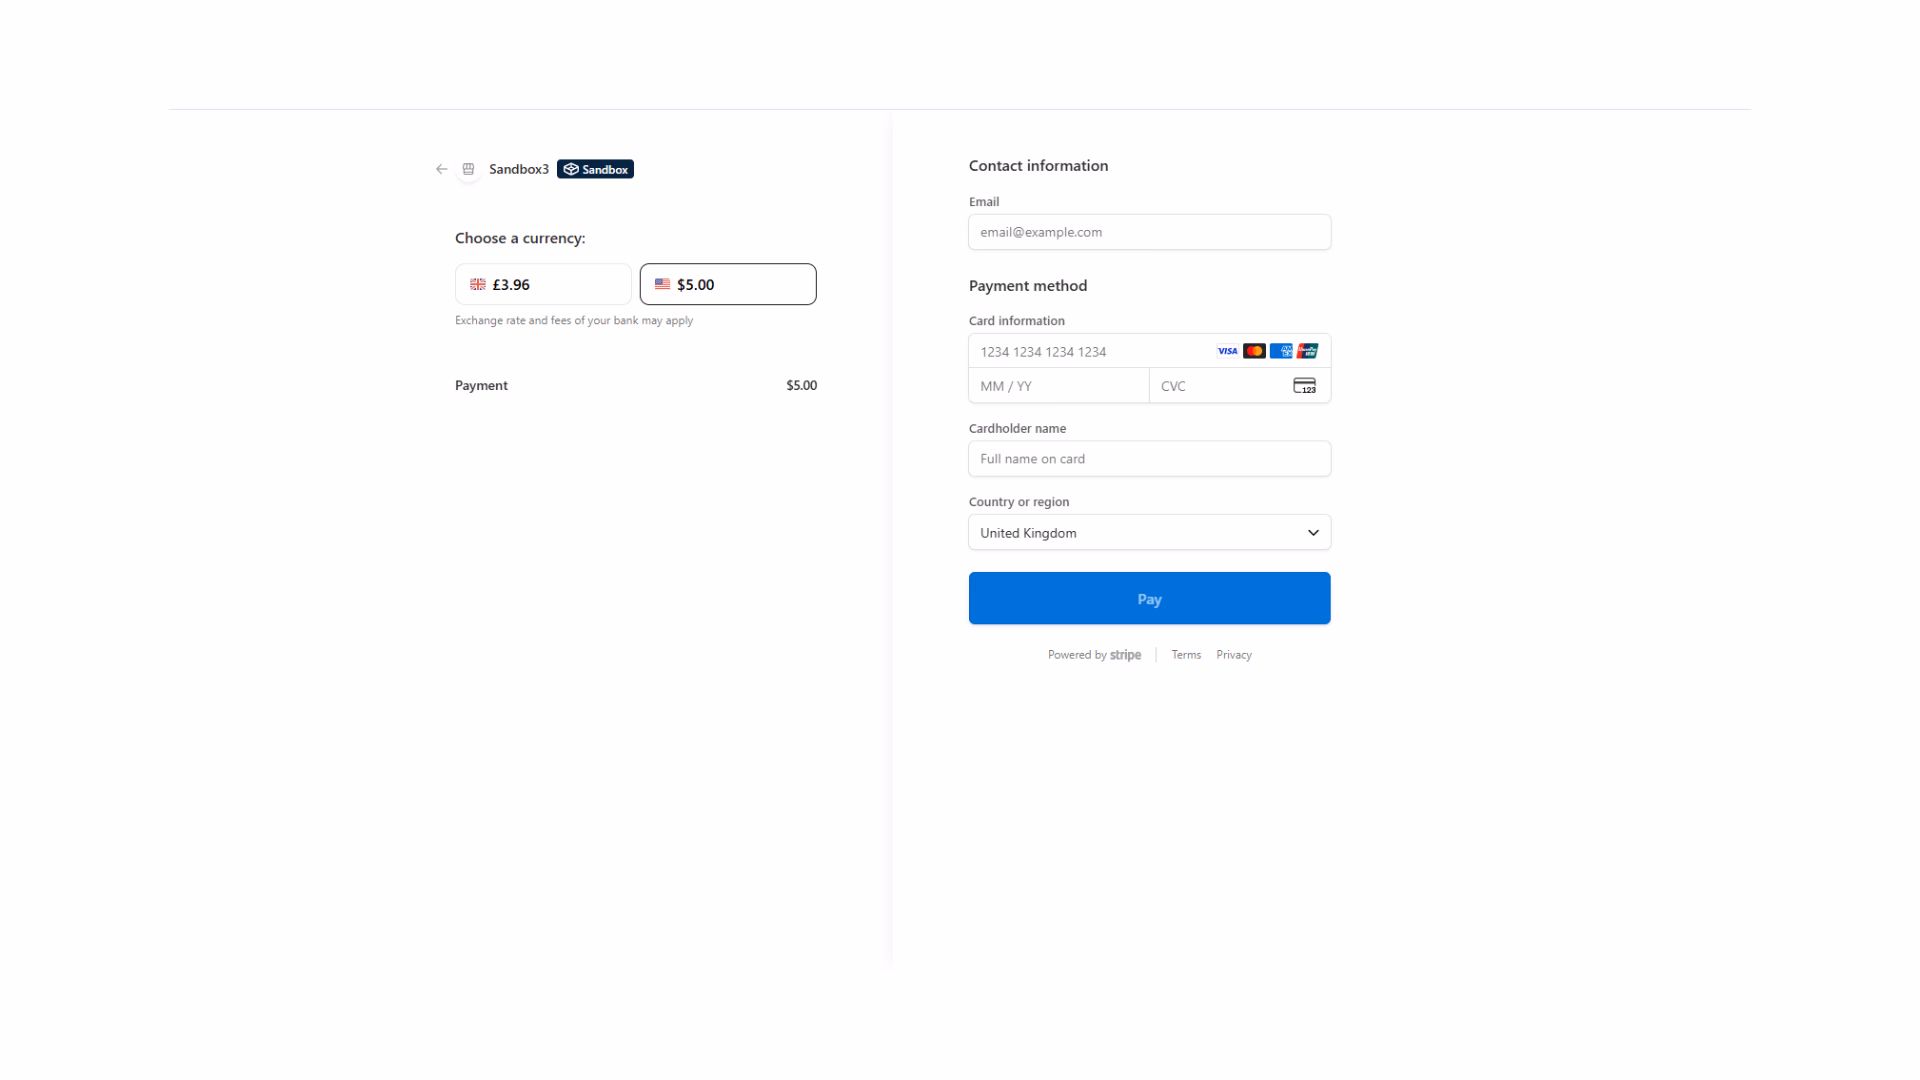
And once you click on the upgrade button, you are redirected to the Stripe checkout page :
At this point, we also wanted to update the UI of the app, so we just asked the agent to improve the UI and attached some screenshots as inspiration.
The agent immediately gets to work and makes some changes in the /app/frontend/src/pages/DashboardPage.jsx and this is how the final product looks :
How to integrate your own Stripe Keys?
This is basically your personal Stripe account credentials.
Use when:
- You're ready to accept real payments
- You've tested everything thoroughly
- You want payments to go into your bank account
How to get them:
- Sign up at stripe.com
- Complete account verification
- Go to Developers → API Keys
- Copy your Publishable Key and Secret Key
Just type this into the prompt box:
"Use my Stripe keys:

- Publishable Key: pk_live_xxxxx

- Secret Key: sk_live_xxxxx"
Important: Keep your secret key private! Never share it publicly or commit it to code repositories.
Understanding Test vs. Production Mode
Test Mode:
- Safe environment to experiment
- Use fake credit card numbers
- No real money involved
- Perfect for development
Test credit card numbers:
Success: 4242 4242 4242 4242
Decline: 4000 0000 0000 0002
Requires authentication: 4000 0025 0000 3155
Production Mode:
- Real payments processed
- Actual money transferred
- Connected to your bank account
- For live customers
You can switch between modes anytime by updating your Stripe keys in the Emergent agent.
Testing Your Monetization Setup
Once the agent builds your authentication and payment system, test it thoroughly:
Authentication Testing
- Create a new account using a test email.
- Log out and log back in to verify login works.
- Test the password reset flow.
- Verify email confirmation (if enabled).
- Ensure the user dashboard loads correctly after login.
Payment Testing (with test keys)
- Sign up for a free-tier account.
- Visit the pricing page and click “Upgrade to Pro.”
- Complete checkout using the test card 4242 4242 4242 4242.
- Confirm Pro features are now unlocked.
- Access the customer portal and manage the subscription.
- Test canceling a subscription.
- Verify that downgrading to the free tier restores limited access.
Feature Access Testing
- As a free user, check that Pro features are inaccessible.
- Upgrade to Pro and confirm Pro features are available.
- Downgrade back to Free and ensure Pro features are locked again.
Result: Your free habit tracker app is now a SaaS business ready to generate monthly recurring revenue.
Key Considerations for Authentication and Payments
Before you launch your monetized app, understand these important concepts:
Stripe API Keys: Test vs. Production
Test Keys:
Purpose: Safe environment for development and testing
Identifiers:
- Publishable key starts with
pk_test_ - Secret key starts with
sk_test_
Use for:
- Building and debugging
- Demo presentations
- User acceptance testing
- Training team members
Limitations:
- No real money transferred
- Only test card numbers work
- Not connected to your bank
- Data doesn't appear in production dashboard
Production Keys:
Purpose: Accept real payments from real customers
Identifiers:
- Publishable key starts with
pk_live_ - Secret key starts with
sk_live_
Use for:
- Live website with real customers
- Actual revenue generation
- Production environment only
Requirements:
- Verified Stripe account
- Business information submitted
- Bank account connected
- Security best practices followed
Critical: Never expose production secret keys publicly!
Best Practices
- Start in Sandbox Mode (Test Keys)
Always begin by integrating Stripe using test keys from your Emergent workspace. This ensures all your authentication, checkout, and billing flows work perfectly before handling real payments. You can safely simulate purchases, upgrades, and cancellations without moving actual funds. - Design a Clear Monetization Strategy
Decide early how your app will generate revenue.- Subscriptions: Ideal for ongoing access to features (e.g., “Pro” or “Team” tiers).
- One-time Purchases: Better for downloadable assets or one-off tools.
- Freemium Model: Offer core functionality for free, then prompt users to upgrade within the product.
This clarity helps the agent design pricing pages, feature gating, and upgrade prompts that match your business logic.
- Simulate Real Scenarios
Test every key payment event as if you were a real user: signing up, upgrading, canceling, and reactivating. Use Stripe’s test cards to verify success and failure cases, including expired or declined cards. This step ensures a smooth, error-free experience for paying customers. - Prioritize a Seamless User Journey
Authentication and payment flows should feel natural, not technical. Make sure sign-up, login, and checkout all share consistent design and messaging. The fewer friction points, the higher your conversion rate. Add confirmation messages, friendly upgrade prompts, and visible account statuses (e.g., “Free,” “Pro,” “Team”).
Moving to Production
Once your sandbox version is fully tested and stable:
1. Create or Log Into Your Stripe Account
Set up your verified business account on stripe.com.
2. Obtain Live API Keys
Navigate to the Stripe dashboard → Developers → API Keys. Copy your Publishable and Secret live keys.
3. Update Keys in Emergent
Ask your Emergent agent to replace your sandbox keys with production ones. The agent will automatically reconfigure your backend and ensure secure handling of sensitive credentials.
4. Run a Real Transaction Test
Perform a small real payment (e.g., $1) to confirm everything works in live mode - from checkout to email receipts. Once verified, your SaaS is officially ready to accept real customers and payments.
Wrapping Up
Monetizing your Emergent-built product doesn’t have to be complex. With a single request, your agent can integrate authentication, pricing tiers, and secure payments - all tied to your Stripe account.
Start safely in sandbox mode, explore how billing and subscriptions behave, and once everything feels right, switch to live keys to begin earning revenue. The agent manages the technical setup behind the scenes, so you can focus on what matters most - building something people love.
In just a few steps, your idea transforms from a prototype into a fully functional SaaS business.
Your product is ready to start generating real income - go launch it.

Emergent turns your idea into a full-stack web or mobile app, no coding required.
 No coding required
- Web & mobile apps
- Deploys instantly


on Emergent today