


TL;DR
- Hosted platforms charge you a cut of every sale, forever: Teachable takes 7.5% on its entry plan, and Kajabi's publicly listed starting price is $179/month before you sell anything. A custom build on Emergent starts at $20/month (100 credits, or $17/month billed annually) with no cut of any sale.
- Pick your delivery model before you pick software: Free, open online courses finish at a median rate of about 12.6%, and paid self-paced courses feel the same pull. Cohort-based courses ($500–$5,000) finish at a much higher rate because of live sessions and fixed schedules.
- One prompt builds the whole platform: Course catalog, Stripe checkout, video lessons with progress tracking, and an instructor dashboard, all built together in one project.
- Completion has to be designed into the platform from the start: Soft deadlines, visible progress milestones, and one project-based assignment per module all raise the odds a student finishes. Build them in before launch, not after.
- Test as a real student would, from a fresh account: Your builder account skips the paywall, so it never sees what a buyer sees. Create a separate test account, enroll, and pay with a real card before launch.
- Launch to 15-30 beta students first: A discounted beta run surfaces bugs real students hit and gets you testimonials before the public launch.
- Completion rate is your real scoreboard: 300 enrollments at 60% completion beats 1,000 enrollments at 10% completion. Completed students are the ones who refer, review, and buy again.
- Emergent has a free tier: $0/month with 10 credits, enough to prompt out a first version of the catalog and lesson structure before you commit to a paid plan.
Thinking of hosting your online course on a hosted platform? Account for the per-sale fees first. Teachable takes 7.5% of every sale on its entry plan. Kajabi's publicly listed starting price is $179 a month, before you've sold a single course.
The same tradeoff runs through all of them: your course lives inside their design, their checkout flow, and their branding in the URL.
I wanted to figure out how to build an online course platform from scratch, sidestepping the hosted platforms without hiring a developer. So I built one: course catalog, student logins, video lessons organized by module, Stripe checkout, and an instructor dashboard, using an AI app builder with no template.
Here's the exact process, the prompts that worked, the research on why most courses never get finished, and when you should consider building your own course platform versus using a hosted platform.
What Is an Online Course Platform (and How It Actually Works)
An online course platform is software that turns your teaching into a product. It hosts your video lessons, tracks who's paid and how far they've gotten, and takes payment for access.
Every platform, hosted or custom, runs on the same structure: courses contain modules, modules contain lessons, and the platform tracks each student's progress against that structure. Platforms differ on two things only, how much of it you control and how much each sale costs you.
Most course platforms fall into one of a few delivery models, and picking the right one shapes everything downstream: your price, your workload, and whether students finish.
- Self-paced (evergreen): Students buy access and move through the content whenever they want. Easiest to scale, and typically priced $29 to $79 per course.
- Cohort-based: A fixed group starts and finishes together on a schedule, with live sessions and peer interaction. Hardest to scale, and it supports a $500 to $5,000 price because students are paying for live access to you, not a recorded lesson.
- Hybrid: Self-paced core content with scheduled live touchpoints layered on top, like weekly office hours.
- Drip-fed: Content unlocks on a set schedule, used in both self-paced and cohort formats to control pacing.
The model you pick shapes your price, your workload, and your completion rate. Decide it first.
Free, open online courses finish at a median rate of about 12.6%, according to a study by Katy Jordan, and paid self-paced courses feel the same pull. Cohort-based courses, where students move through content together with live sessions and deadlines, tend to report noticeably higher completion.
If your business depends on students finishing and getting results, that gap should shape which model you build.
If what you're building is closer to an ongoing community with courses inside it, rather than a fixed curriculum, our guide on How to Build a Membership Website (Tested on 3 Platforms) covers that model in more depth.
Why Build Your Own Course Platform Instead of Renting One
Hosted platforms exist because building your own used to require a development team. That changed, so it's worth pricing out what a hosted platform actually costs you across a year of sales.
- Transaction fees compound fast: Teachable's entry plan takes 7.5% of every sale on top of payment processing fees. On a $500 course sold 20 times a month, that's $750 gone before you've paid for anything else.
- Your brand takes a back seat: Your checkout page, student dashboard, and course URL structure all live inside the platform's design system. A custom domain only changes the address bar; everything inside it still looks like every other course on the platform.
- You can't add what they haven't built: Want a community forum tied to enrollment, a referral program, or a client portal alongside your courses? You're stuck waiting for their roadmap or bolting on a third-party tool that can't access your student data.
- Migrating later means starting over: Every hosted platform locks your students, progress data, and course content into its own system. If you have to switch platforms for some reason, you'd have to rebuild from zero.
Here's how the major players in this space compare, so you can weigh the honest tradeoffs before deciding which route fits your course.
| Platform | Best For | Starting Price | Billed Annually | Cut of Each Sale |
|---|---|---|---|---|
| Teachable | Fastest path to your first sale | $39/month | $29/month | 7.5% (Starter plan) |
| Thinkific | Course selling with no platform transaction fee | $54/month | $40/month | 0% (US, via Thinkific Payments) |
| Kajabi | All-in-one marketing plus courses | $179/month | $143/month | 0% |
| Podia | Budget-friendly storefront | $49/month | $42/month | 5% (Mover plan) |
| LearnWorlds | SCORM/compliance, interactive video | $29/month | $24/month | $5 per paid enrollment (Starter plan) |
| Skool | Community-first courses | $9/month | $7.50/month | 10% (Hobby plan) |
| LearnDash (WordPress) | Full ownership, comfortable with WordPress | $259/year | (annual only) | 0% |
| Udemy | Marketplace discovery over pricing control | Free to list | N/A | Udemy keeps 63% of organic marketplace sales, and up to 85% of subscription views |
| Emergent | A custom platform you own outright | $20/month | $17/month | 0% |
Stripe's processing fee (2.9% + 30¢ in the US) applies on every route, including a custom build. It's the cost of card processing, not a platform fee.
Choose a hosted platform if: You want to sell your first course this week and don't want to think about infrastructure.
Choose WordPress and LearnDash if: You're comfortable managing a WordPress site and want zero transaction fees long term.
Choose a marketplace like Udemy if: Student discovery matters more than pricing control, and you're comfortable trading some revenue and control for a built-in audience.
Choose a custom build if: You want full ownership of the platform, your data, and your fee structure without a monthly per-transaction cut.
Note: Start from your delivery model and price point, then shortlist the platforms that support both. Feature count is the last column to compare.
Hosted platforms still win on speed. Someone who wants a course live this week, with no thought given to infrastructure, gets there faster on Teachable or Podia. Building a custom platform often makes more sense once you're past that first course, or once platform fees start outweighing the convenience.
What It Actually Costs to Build Your Own
Take your price and your realistic first-year volume. Here's the same math both ways, on one worked example.
Twenty sales a month at $500 on Teachable's Starter plan is $750 a month in platform cuts (7.5% of $10,000 in monthly sales) on top of the $39 subscription. Over a year, that's $9,468 in subscription and platform fees combined.
The same year on a $20/month plan with no per-sale cut costs $240 total. Stripe's standard processing fee (2.9% + 30¢ per transaction) still applies on both routes at roughly the same dollar amount, so it doesn't change which side wins. The $750/month platform cut is the real gap.
Run your own numbers before you pick a route: your price, your expected monthly sales, and the fee column in the table above tell you which side of that math you're on.
Is There a Free Way to Build a Course Platform?
Most hosted course platforms have dropped their permanent free plans. Teachable, Podia, and Skool don't currently offer one; Thinkific replaced its free plan with a 30-day trial. What's left is mostly time-limited trials, not a place to run a real course for free.
Emergent has a $0/month tier with 10 credits. It won't carry a full course platform to launch, since a build with courses, payments, and progress tracking uses more credits than a landing page, but it's enough to prompt out a first version of your catalog and lesson structure and see whether the approach fits before you commit to a paid plan.
What You'll Need Before You Start
Prerequisites:
- A course outline: Modules, lessons, and what each lesson covers
- A delivery model: Self-paced, cohort-based, or hybrid
- A Stripe account: Set up and verified
- A pricing model: One-time purchase, subscription, payment plan, or cohort pricing
- No coding experience: None required
Time required: A working first version takes 30 to 60 minutes of prompting. Turning it into something you'd hand to paying students takes longer; plan for a few sessions spread across a week.
How to Build an Online Course Platform: Step-by-Step
Step 1: Choose Your Course Delivery Model First
This decision comes before software, before content, before anything else, because it determines whether students finish what they paid for.
Real-world examples make the tradeoff concrete. On Maven, instructors set their own prices, and cohort courses commonly run from a few hundred dollars up to about $3,000. Reforge takes a different route: a $1,995-a-year membership that bundles live, cohort-based courses. Both lean on live sessions and small groups specifically to keep completion high.
Compare that to a typical self-paced course on Udemy priced under $50, sold at volume with no live component, and completion rates that run in the single digits, well below cohort courses.
Cohort-based fits if: You can commit to a live teaching schedule and want to charge a premium for direct access.
Self-paced fits if: You want a scalable product you build once and sell indefinitely, and you can accept that most buyers won't finish it.
There is a hybrid alternative: self-paced core lessons with optional live office hours or a discussion thread.
Step 2: Map Out Your Course Structure
An AI app builder can only structure what you tell it. Open a blank prompt and type "build me a course platform," and you'll get a generic mishmash of modules and lessons with no real relationship to what you're teaching.
Before loading up an AI builder, write out:
- How many courses you're launching, one or several
- How each course breaks into modules, and each module into lessons
- Whether lessons include video, downloadable files, quizzes, or all three
- Whether students move through content in order or have access to everything at once
That outline becomes the structure your platform gets built around, which is the difference between a platform shaped like your course and one shaped like nothing.
Step 3: Do the Fee Math on Your Own Numbers
Weigh the comparison table above against your delivery model. Take your price and your realistic first-year sales volume, and run it against the fee column: once a platform's cut exceeds what a custom build costs you per month, the math flips toward building your own.
If you're unfamiliar with what building a course platform involves, our no-code app development guide is a good starting point.
The rest of this guide walks through the AI app builder route, since it gives you full ownership of the platform without requiring you to write code.
Step 4: Design the Platform's Page Structure
Five elements show up in every working course platform. Get them right before you touch content or design.
- Course catalog or sales page: What the course covers, who it's for, and the syllabus.
- Checkout and enrollment page: As few steps as possible between "buy" and being enrolled.
- Lesson player: Where the lesson video, downloadable resources, and quiz live together.
- Student dashboard: Enrolled courses, progress bar, and certificates, one click from login.
- Instructor dashboard: Content management, enrollment, and revenue, covered in Step 9.
Make sure the student dashboard is the first thing a student sees after logging in. If they have to hunt for where they left off, you've already made completion harder than it needs to be.
Step 5: Prompt Your Platform's Core Structure
Start with a single, detailed prompt that describes the full structure. Here's the prompt I used:
"Build an online course platform where students can browse available courses, purchase access with Stripe, and watch video lessons organized into modules with progress tracking and end-of-module quizzes. Include a certificate on course completion and an instructor dashboard to upload lessons, manage courses, and view enrollment and revenue analytics."
Emergent asked a handful of clarifying questions before building, about how users would sign in, how lessons would be added, and how quizzes would be formatted.
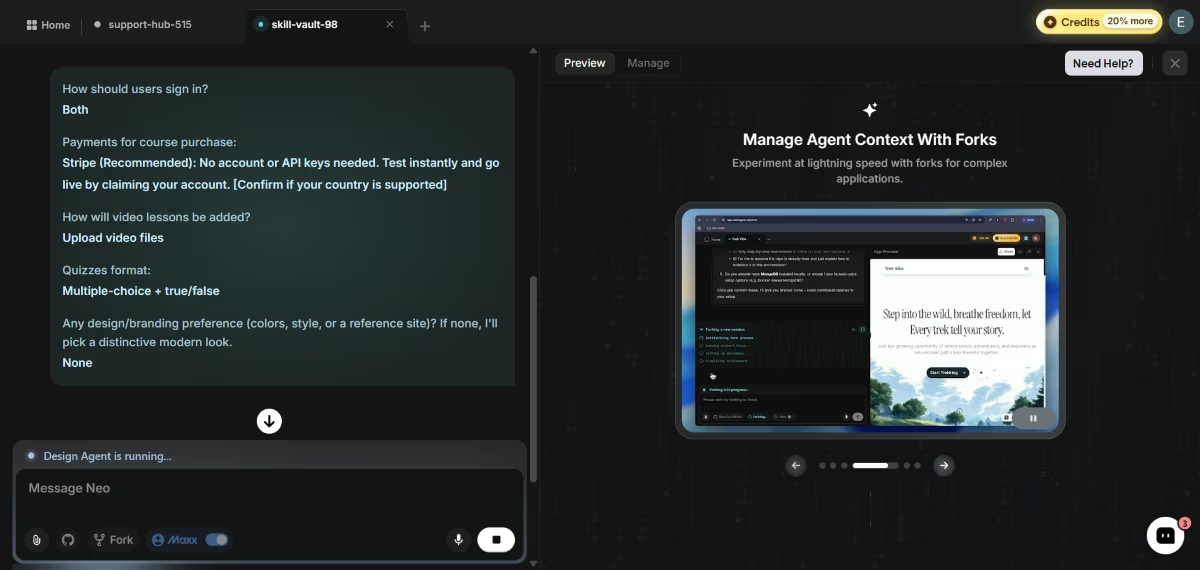
Since this project has many connected data types, courses, lessons, enrollments, and progress, it's worth using Maxx, Emergent's advanced reasoning mode. The extra time it takes to plan the database properly is more important here than for a website with a few pages.
Step 6: Set Up Student Accounts and Content Gating
A course platform is a membership site with a curriculum on top. The same login and gating logic used for membership websites applies here too. What students see after logging in depends on what they've paid for.
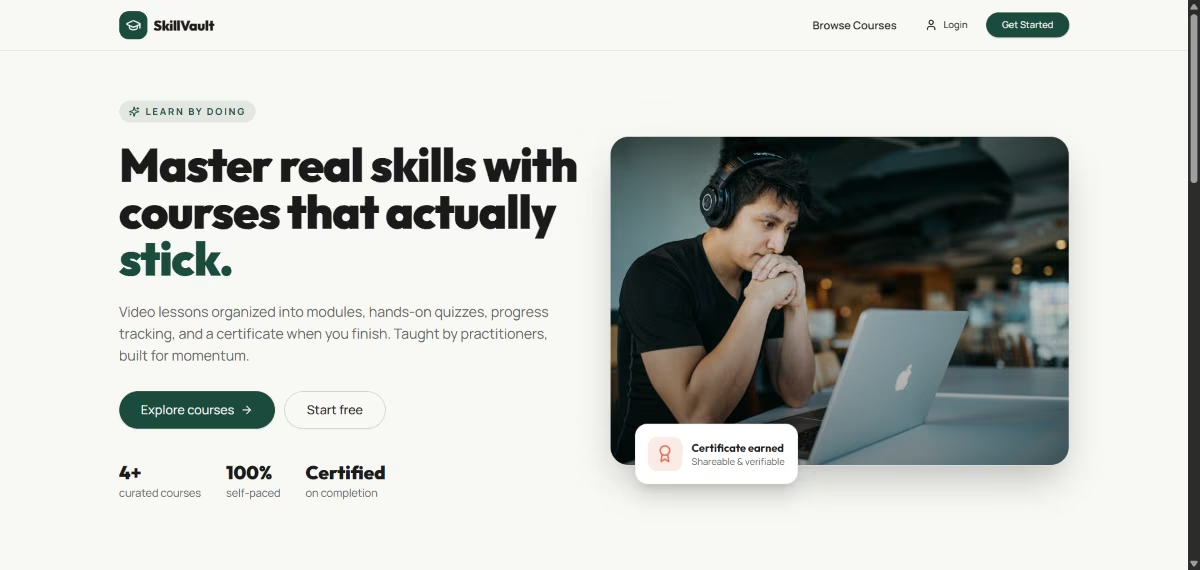
If you haven't set up access control before, our How to Build a Membership Website guide covers login-and-gating logic in depth.
On Emergent, content gating boils down to two things: authentication and role-based access. Emergent Auth handles account creation and login without requiring a separate identity provider.
Then, you define two roles in your prompt, student and instructor, and specify what each can see: students get their enrolled courses and progress, instructors get the content management and analytics dashboard.
Test this by creating two accounts, one for each role. Confirm a student account can't reach instructor-only pages by guessing the URL. This is a common gap in first-pass builds.
Step 7: Add Payments and Choose Your Pricing Model
In Emergent, you set up Stripe by describing it in the prompt. Describe the pricing model you settled on (one-time purchase, subscription, payment plan, or cohort pricing), and the payment flow gets built around it.
Match your price to your delivery model. Self-paced courses usually sit between $29 and $79, priced for volume.
Cohort-based courses command a higher range of $500 to $5,000 because of the live access and smaller group sizes. Payment plans, splitting a $1,500 cohort price into three installments, for example, widen your buyer pool without dropping the actual price.
If you're still deciding between models, our guide on app revenue models breaks down the tradeoffs between one-time payments, subscriptions, and tiered pricing.
Step 8: Design for Completion From the Start
The most-cited completion benchmark, a study of 221 open online courses, puts the median at about 12.6%. That number should shape how you build. Some self-paced courses finish in the low single digits.
Cohort-based courses tend to see higher completion than self-paced ones, likely for the same reason gyms with a workout partner see better attendance. Four of those mechanics work inside a self-paced course too.
Build in certificates as part of this: a certificate on completion is one of the simplest, most-requested progress milestones, and it costs little to add. Prompt for it directly: a name on the certificate, issued once a student hits 100% of the modules. It doubles as the visible milestone that keeps students moving toward the finish line.
To maximize completion rates, prompt for the following mechanics specifically, because a generic "course platform" build won't include them by default:
- Soft deadlines, even in self-paced courses: A suggested schedule with dates, even if not enforced, gives students a pace to measure themselves against.
- Progress milestones tied to something visible: A completion percentage, a badge, or a certificate at the halfway point keeps momentum visible and concrete.
- At least one project-based assignment per module: A student who just built something with a lesson has a reason to open the next one. Lecture-only modules give them nothing to carry forward.
- A completion touchpoint, even a lightweight one: A weekly email nudge, an optional live Q&A, or a discussion thread tied to each module gives students a reason to come back that isn't just the content itself.
Step 9: Build the Instructor Dashboard
This is the part hosted platforms hide from you if you're not paying for their top tier: a real view into who enrolled, when, and how much revenue each course is generating.
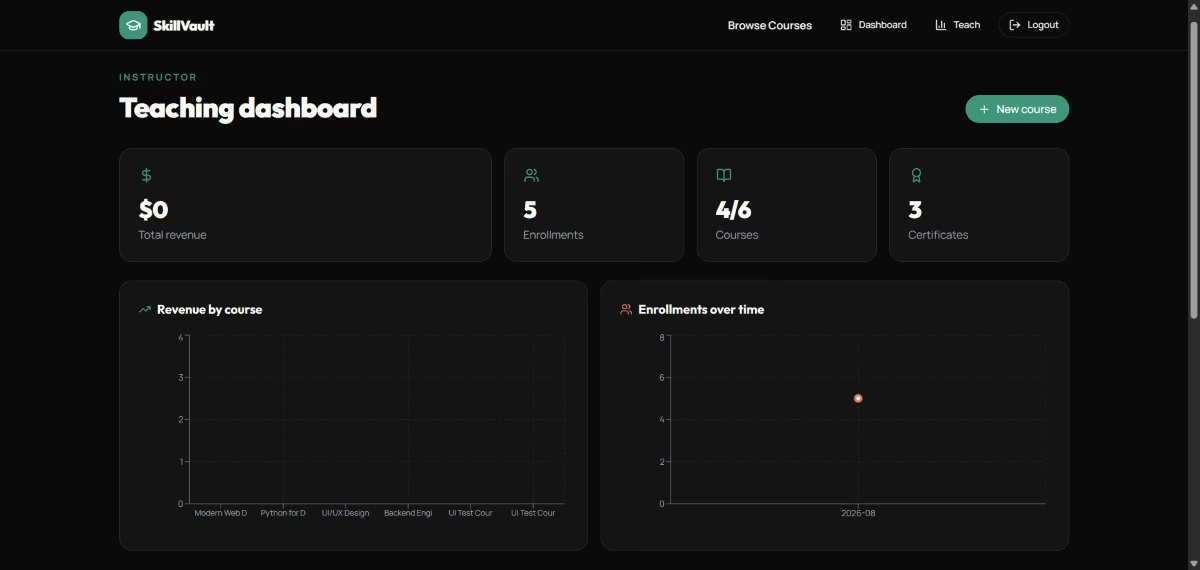
When building a custom course platform, prompt for four things specifically:
- Content management: Uploading and editing lessons without touching code
- Enrollment tracking: Who's enrolled in what, and when they signed up
- Revenue analytics: Which courses are selling, broken down by time period
- Completion tracking: Where in each course students drop off, so you know what to fix first
Step 10: Handle Video, Accessibility, and Mobile Playback
Video is where most early builds show their seams. Prompt specifically for adaptive playback that adjusts quality to connection speed. That way a student on hotel Wi-Fi gets the same lesson as one on fiber, just at a lower resolution.
Add captions to every video. Captions on prerecorded video are a Level A requirement under WCAG 2.1, the standard most accessibility rules point to, and they give students a second way to process a lesson.
Test playback on a real mobile device, since a resized browser window won't catch mobile-only issues. Video that looks fine on a 15-inch laptop screen can buffer, crop awkwardly, or fail to resume from where a student left off on mobile, and mobile is where a large share of course-watching happens.
Step 11: Test the Student Experience End-to-End
Emergent's testing agents click through the app and catch broken workflows automatically. Then walk the whole path yourself, as a student would. They find broken buttons, and you find confusing ones.
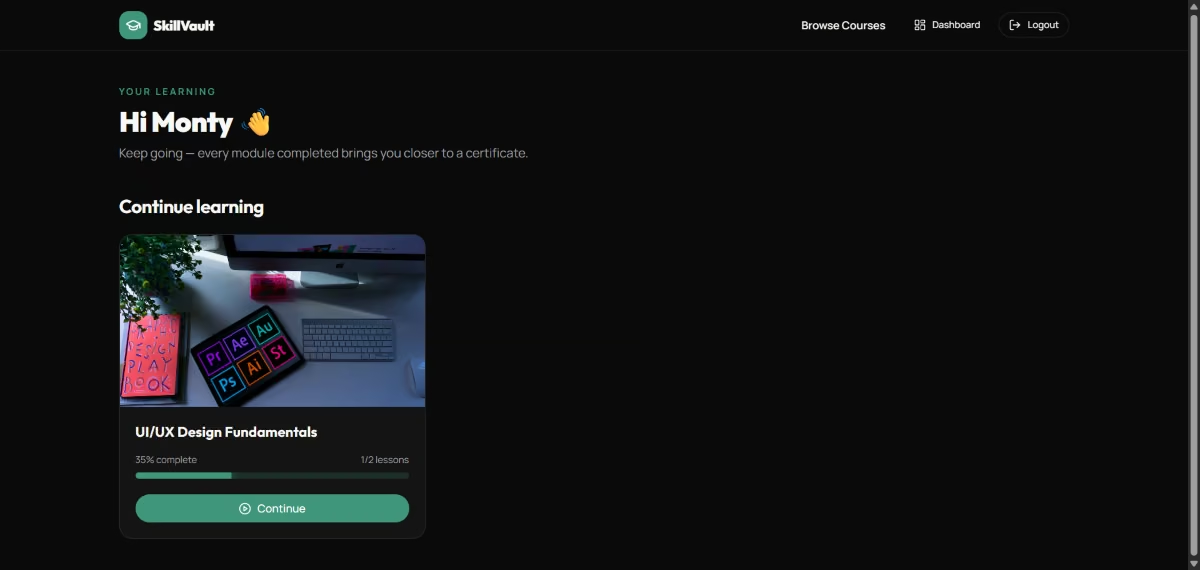
Walk through the full path: sign up, browse the course catalog, purchase a course, watch a lesson, take a quiz, and confirm your progress saves and shows correctly when you log back in. Confirm that certificates generate with correct names and that drip content unlocks when it's supposed to. Do this on both desktop and mobile.
It's worth knowing upfront that after repeated deployments, your preview database and your live one can drift apart. Run your final round of testing against the deployed version, because that's the copy students will see.
Step 12: Launch to a Beta Cohort Before Going Public
Open enrollment to a small beta group, 15 to 30 students, before announcing publicly. Price it at a genuine discount in exchange for two things: their patience with rough edges, and a testimonial if the course delivers.
A beta run gives you two things you can't get alone. It shows where real students get stuck, which is rarely where you'd guess, and it puts testimonials in your hands before the public launch.
Run the same testing checklist from before, then use the feedback from beta testers to fix content gaps and platform bugs before you open registration publicly.
Step 13: Deploy and Connect Your Domain
Once testing is clean, deployment is automatic; Emergent pushes the app to managed infrastructure with SSL already configured. Connect a custom domain so your course platform doesn't live on a subdomain, and the certificate updates automatically.
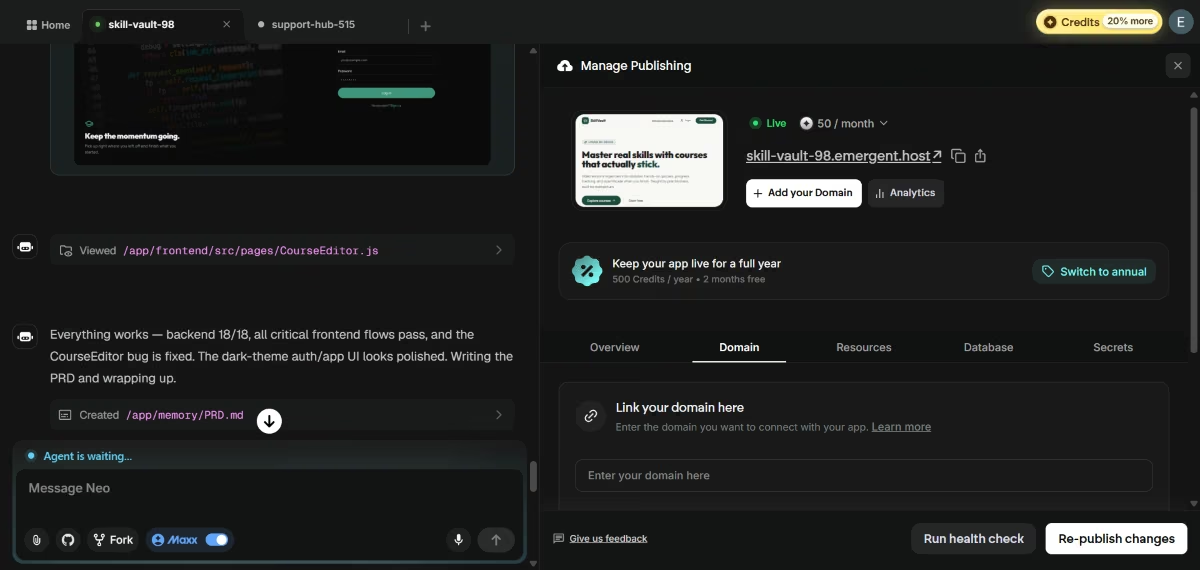
If you want a developer to take over the codebase later, or just want a copy for yourself, GitHub sync (available on Standard plans and above) pushes every build to a repository under your own account.
Step 14: Track Your Completion Rate Weekly
Once you're past launch, completion rate becomes your main dashboard number. Completion is the number that turns a student into a referral, so give it the weekly check most creators reserve for signups.
- Completion rate: The number most course creators never check, and the one that predicts everything else.
- Drop-off point: Which specific lesson loses the most students, so you know exactly what to fix.
- Refund rate: A spike here usually means the sales page oversold what the course delivers.
- Revenue per student: Measures how much the average student spends with you over time.
- Repeat purchase rate: Measures what percentage of students come back to buy another product. A high repeat purchase rate is a strong signal that your course delivered real value.
Check your drop-off report monthly. If one lesson loses more than a quarter of the students who start it, rerecord that lesson before you write another one.
Three Online Course Platform Examples
These examples show how the delivery model changes the build.
Self-paced marketplace: Udemy runs on volume, courses typically priced under $50, sold to a broad audience with no live component. Price and distribution carry the sale here, which is why the model scales even at single-digit completion.
Cohort-based, premium pricing: An independent operator running a $1,200, six-week cohort with a 25-seat cap and a fixed weekly schedule shows the model at a smaller scale than Maven or Reforge: live sessions and a hard enrollment cap keep completion above the self-paced average.
Corporate and compliance training: Platforms like LearnWorlds are built to support SCORM, the standard corporate learning departments require for tracking mandatory training. If you're selling to companies rather than individual consumers, this compatibility often matters more than any other feature.
Common Mistakes to Avoid When Building a Course Platform
- Choosing the wrong delivery model for your content: A self-paced course priced and structured like a cohort, or the reverse, is where most low completion rates start.
- Skipping the content map: Building before you've outlined your modules and lessons produces a platform structured around nothing.
- Testing only as the instructor: Your builder account skips the paywall, so it never sees what a buyer sees. Enroll from a fresh account, pay with a real card, and take the course from the outside.
- Skipping captions: Beyond the accessibility requirement, captions improve comprehension, retention, and engagement.
- Not testing checkout with a real card: Buy your own course once with a live card, then refund it. That's the only way to see the real price display, the receipt, and what actually lands in a student's inbox.
- No refund policy: Write your refund window into the sales page before launch, so your first complaint already has an answer waiting.
- Treating a recorded course as finished forever: Content goes stale, and outdated lessons eventually show up in your reviews.
- Building for desktop only: Consider students who access course content from their phones between other tasks. Test the full flow from registration to completion on mobile before launch.
Emmy: Emergent's AI Assistant for When You Get Stuck
Building a course platform involves more moving pieces than a typical app: courses, enrollment, payments, progress tracking, and video. It's easy to hit a point where you're not sure what to do next.
Emergent built Emmy, a free chat assistant available from every page in the product, for that moment. Talking to her doesn't cost credits. She already knows what you're working on, so you don't have to explain your build before asking a question.
Not sure which building agent fits your project? Describe what you're making and she'll walk you through the tradeoffs, then point you to the one that suits it. If a step confuses you, drop in a screenshot and ask what you're looking at.
You'll find her useful throughout the build process. Early on, describe your course platform idea in plain language, and she'll turn the conversation into a build-ready prompt, refining details like drip content or quiz structure before you commit credits to a first attempt.
Later, she can tell you whether your balance covers what's left to build, and walk you through the deployment sequence when you're ready to go live.
Emmy answers in the same window you're building in, so you get your answer while the problem is still in front of you. She's on desktop web for now, not yet available on mobile web or in the mobile app. If an issue needs a human, she says so and hands it off with your build context attached.
Learn more about Emmy in this guide.
How Emergent Makes Building an Online Course Platform Easier
Course structure, student accounts, payments, completion tracking, and the instructor dashboard all live in one project inside Emergent. One build covers all five.
On any paid plan, that means you get:
- One prompt, complete platform: Course catalog, student accounts, payments, and admin dashboard all get built together in a single project.
- Built-in deployment: Every build deploys to managed infrastructure with SSL, a database, and authentication already in place.
- Mobile app support: The same build that generates your web platform can also produce native iOS and Android apps.
- GitHub sync: On Standard plans and above, every build is synced to a GitHub repository, so you can continue development outside Emergent or hand the codebase to another developer whenever you choose.
Start with Emergent if you're ready to start building.
Most AI app builders stop at prototypes. Emergent creates production-ready apps you can actually launch.
- Production-ready apps
- Web & mobile apps
- Deploy in minutes