



A food delivery app looks simple until one order has to pass through a customer, kitchen, driver, payment processor, and refund path without losing its status. I reviewed the current Emergent workflow, official platform documentation, and the strongest competitor guides to map a process you can follow without guessing.
Here’s how to create a food delivery app in 10 steps: choose one delivery model, build the full order loop, test the failed-payment and failed-delivery cases, and publish only after your operating rules work.
What You’ll Need Before Starting
You need a defined delivery area, a real menu, clear order rules, and accounts for any external services you plan to connect. Gather these inputs before opening the builder:
- Your restaurant or delivery business name
- Menu categories, products, prices, modifiers, and allergen notes
- Opening hours and order cutoff times
- Delivery ZIP codes, radius, or service boundary
- Delivery fees, order minimums, taxes, and tipping rules
- Cancellation and refund policy
- Brand colors, logo, and product photos
- A payment-provider account
- An Apple and Google developer account if you plan to publish native apps
- Test customer, kitchen, driver, and administrator profiles
Emergent currently offers a Free plan with 10 monthly credits and a Standard plan with 100 monthly credits. Standard costs $20 per month on monthly billing or $17 per month when billed annually. I recommend using Free to validate your scope and screen structure, then moving to Standard for a serious multi-role build.
For native distribution, the Apple Developer Program costs $99 per year. A Google Play Console account has a $25 one-time registration fee. Google also applies testing and device-verification requirements to certain personal developer accounts.
Planning estimate: Set aside one focused day for scope and the first build, followed by several days for payments, delivery rules, device testing, and revisions. A multi-restaurant marketplace needs more time because it adds restaurant onboarding, commissions, split payouts, permissions, and disputes.
Also read our guide on how much it costs to create an app to see how the build route affects the total before you commit to a timeline.
How to Create a Food Delivery App: Step-by-Step
Step 1: Choose One Delivery Business Model
Start by deciding who sells the food, who collects the payment, and who completes the delivery. I recommend choosing one of these models:
- Single restaurant: One restaurant controls the menu, kitchen, payments, and delivery.
- Meal-prep or subscription business: One operator sells scheduled meals or recurring plans.
- Multi-restaurant marketplace: Several restaurants receive orders through one platform.
- Independent delivery service: You deliver orders for local merchants but don’t prepare the food.
Build the single-restaurant or meal-prep version first unless your business already has signed restaurant partners.
Plate OS followed the same path using Emergent. It started as a small Shopify meal-prep project, then grew into a larger platform over six months. Today, it supports kitchen operations, delivery routing, driver tracking, subscriptions, and 600 to 700 orders per day.
A marketplace adds merchant approval, commissions, payout timing, menu ownership, service disputes, and more complicated access rules.
Write your scope in one sentence:
Build a mobile-first ordering and delivery app for one meal-prep company serving customers within 10 miles of Austin, Texas.
That sentence becomes the filter for every feature request. Anything outside it moves to a later release.
Step 2: Define The Smallest Complete Order Loop
Your minimum viable product (MVP) should complete one real order from menu selection to delivery confirmation. It needs enough functionality to run the business for a small number of real customers.
Include these customer actions:
- Create an account or continue through your approved guest flow
- Browse menu categories
- View prices, descriptions, photos, and allergen notes
- Select item sizes and modifiers
- Add or remove cart items
- Enter a valid delivery address
- Review taxes, delivery fees, tips, and the final total
- Pay through a secure provider
- Follow the order status
- Receive a delivery confirmation
Include these operating actions:
- Accept or reject an order
- Set or update preparation time
- Mark an order as preparing and ready
- Assign a driver
- Mark pickup and delivery
- Cancel or refund an order
- Change item availability
- Update menu prices and business hours
Leave loyalty points, AI recommendations, multi-city support, route batching, subscriptions, and referral programs for later. Your first release succeeds when one customer, one kitchen operator, and one driver can complete an order without manual database edits.
Also read our guide on app design and development for a founder's view of what it takes to go from first release to a product that scales.
Step 3: Map Roles, Data, And Order States
Define your roles and order states before generating screens. This prevents a customer from opening an admin page or a driver from changing menu prices.
Use four roles for the first version:
- Customer: Browses, orders, pays, and tracks delivery
- Kitchen manager: Accepts orders and controls preparation status
- Driver: Views assigned jobs and confirms pickup and delivery
- Administrator: Manages the whole operation
Use controlled order states instead of a free-text status field:
- Draft
- Placed
- Accepted
- Preparing
- Ready for pickup
- Picked up
- Delivered
- Canceled
- Refunded
Each state should allow only specific next actions. For example, a driver can’t mark an order “delivered” before it reaches “picked up.”
Starter data model:
Emergent’s current app builder pages state that you can define interface screens, data relationships, role permissions, workflows, and integrations through prompts. Its supported output includes web apps, progressive web apps (PWAs), and export-ready Android and iOS projects.
Step 4: Start The Emergent Project With A Planning Prompt
Open the Emergent AI app builder and ask for an implementation plan before asking it to generate the full project. Reviewing the plan costs less effort than rebuilding incorrect role or order logic later.
Caption: Select the Mobile App build before entering your food delivery app prompt.
Use this master prompt:
Build a mobile-first food delivery app called [APP NAME] for a
single [RESTAURANT OR MEAL-PREP BUSINESS] serving [DELIVERY AREA].
Create four role-based experiences:
- Customer
- Kitchen manager
- Driver
- Administrator
Customers must be able to:
- Create an account and sign in
- Browse menu categories
- View item photos, descriptions, prices, and allergen notes
- Select sizes and paid modifiers
- Add items to a persistent cart
- Enter and save delivery addresses
- See item totals, tax, delivery fee, tip, and final total before payment
- Pay through a connected payment provider
- View order status and estimated preparation time
- Receive order and delivery updates
- View past orders and reorder
Kitchen managers must be able to:
- Accept or reject new orders
- Set preparation time
- Change status to accepted, preparing, and ready for pickup
- Mark menu items sold out
- View current and upcoming orders
Drivers must be able to:
- Set themselves available or unavailable
- View only deliveries assigned to them
- See pickup and drop-off details
- Call or message the customer
- Mark an order picked up
- Mark an order delivered and add proof of delivery
Administrators must be able to:
- Manage menu categories, items, modifiers, prices, and photos
- Manage hours, delivery zones, minimum order, fees, and promo codes
- Manage customers, kitchen staff, and drivers
- Assign drivers manually
- View and refund payments
- View order and delivery history
Use these order states:
draft, placed, accepted, preparing, ready_for_pickup,
picked_up, delivered, canceled, refunded.
Create the data model, permissions, workflows, and sample records.
First, return:
- The screen list
- The data model
- Role permissions
- Allowed order-state transitions
- External services required
- A phased build plan
Do not generate the full app until I approve the plan.

Check that the response separates roles, lists every order state, and identifies payments, maps, and notifications as external dependencies. Correct the plan before approving the build.
Expected result: You should have a screen map, data model, permission table, order-state diagram, and phased build plan that all match the one-sentence scope from Step 1.
Step 5: Build The Customer Ordering Flow
Build the customer flow before the kitchen and driver dashboards. Every operating workflow depends on the order data produced by this part of the app.
Send this follow-up prompt:
Build the customer ordering flow from the approved plan.
Create these mobile-first screens:
- Welcome and sign-in
- Home with open/closed status
- Menu categories
- Menu item details
- Modifier selection
- Cart
- Delivery address
- Checkout
- Payment result
- Live order status
- Order history
- Account and saved addresses
Apply these rules:
- Required modifiers must be selected before adding an item
- Modifier price changes must update the item and cart totals
- Sold-out items cannot be added
- The cart must persist when the customer changes screens
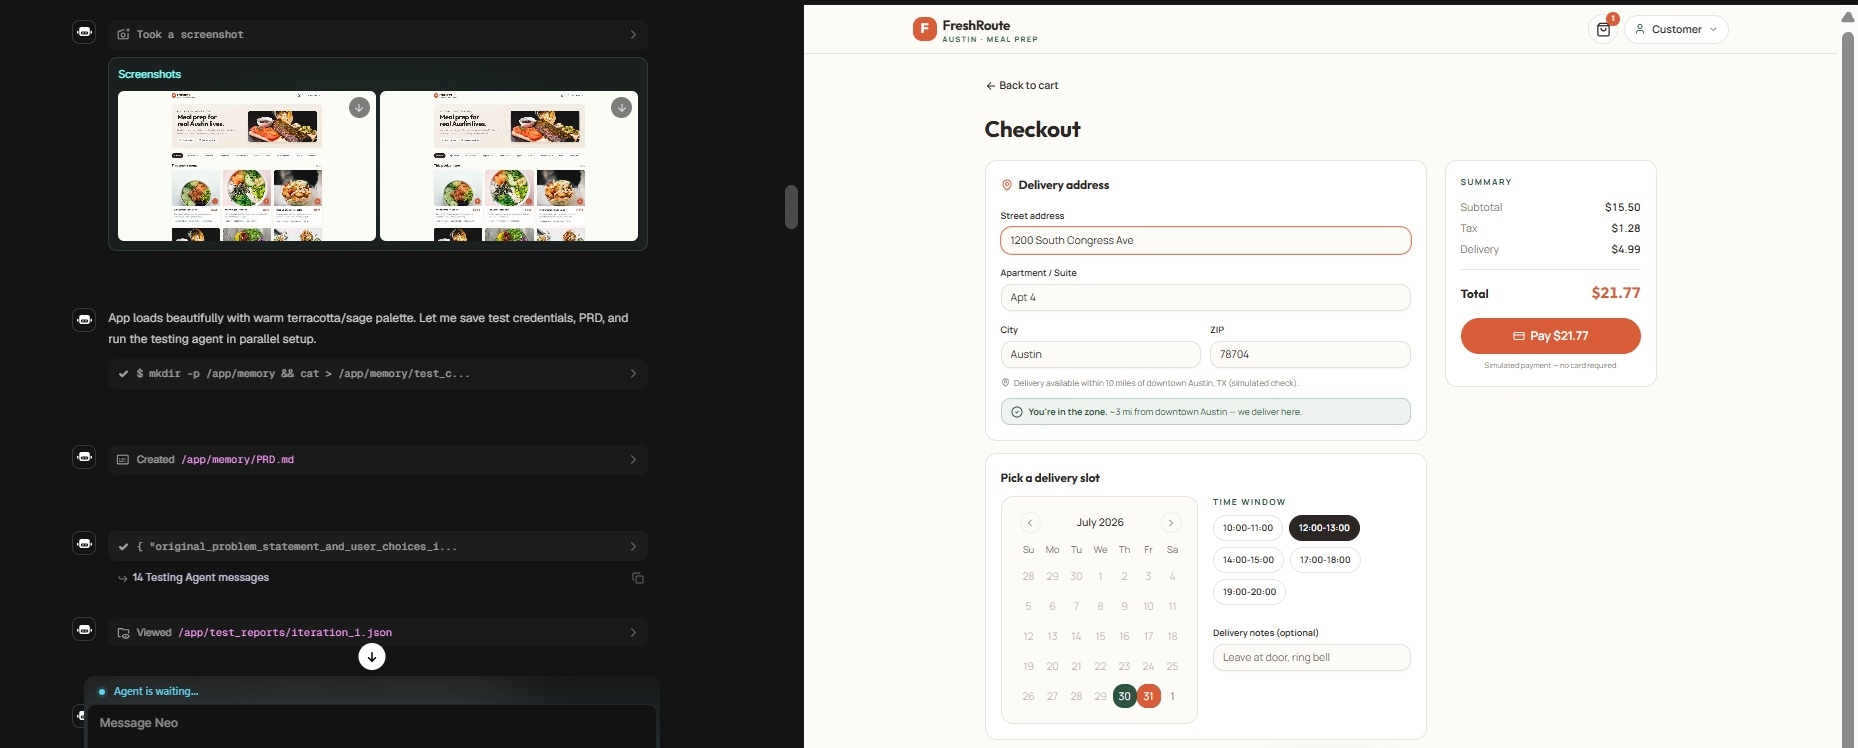
- Checkout must reject addresses outside the delivery zone
- The final screen before payment must show subtotal, discounts, delivery fee, tax, tip, and total separately
- Prevent duplicate orders when the customer taps the payment button twice
- Create realistic sample menu and customer data
After building, list every rule you implemented and every rule that still needs an external integration.
Walk through the flow as a first-time customer. Check every price change by hand. Add and remove modifiers, close the cart, return to it, and enter an out-of-zone address.
The cart total is a business-critical calculation. A polished home screen has little value when the $2.50 avocado modifier disappears at checkout.
Step 6: Build The Kitchen And Administrator Workflows
The kitchen needs a queue, not a generic table of database records. Show the information in the order staff will use it during service.
Use this prompt:
Build the kitchen manager and administrator workflows.
For the kitchen manager:
- Create columns for placed, accepted, preparing, and ready
- Show elapsed time since the order was placed
- Display customer notes, allergens, quantities, and modifiers clearly
- Add accept, reject, start preparing, and ready buttons
- Require a rejection reason
- Let the manager set or update estimated preparation time
- Play a visible and audible new-order alert
- Prevent invalid status changes
For the administrator:
- Create menu, category, modifier, hours, delivery-zone, fee, promo-code, staff, driver, order, and refund management screens
- Add search and filters for order date, status, customer, and driver
- Add an audit trail showing who changed an order and when
- Require confirmation before deleting a menu item or issuing a refund
- Preserve historical order details when menu prices later change
Make both areas responsive for tablets and desktop screens.
Then test a busy-service scenario:
- Place three sample orders within two minutes.
- Reject one because an item is unavailable.
- Change another order’s preparation estimate.
- Mark the third order ready.
- Check that each customer sees the correct update.
- Change a menu price and confirm that the old order keeps its original price.
Expected result: Kitchen staff should understand the next action from the queue without opening each order individually.

Step 7: Add Driver Assignment and Delivery Tracking
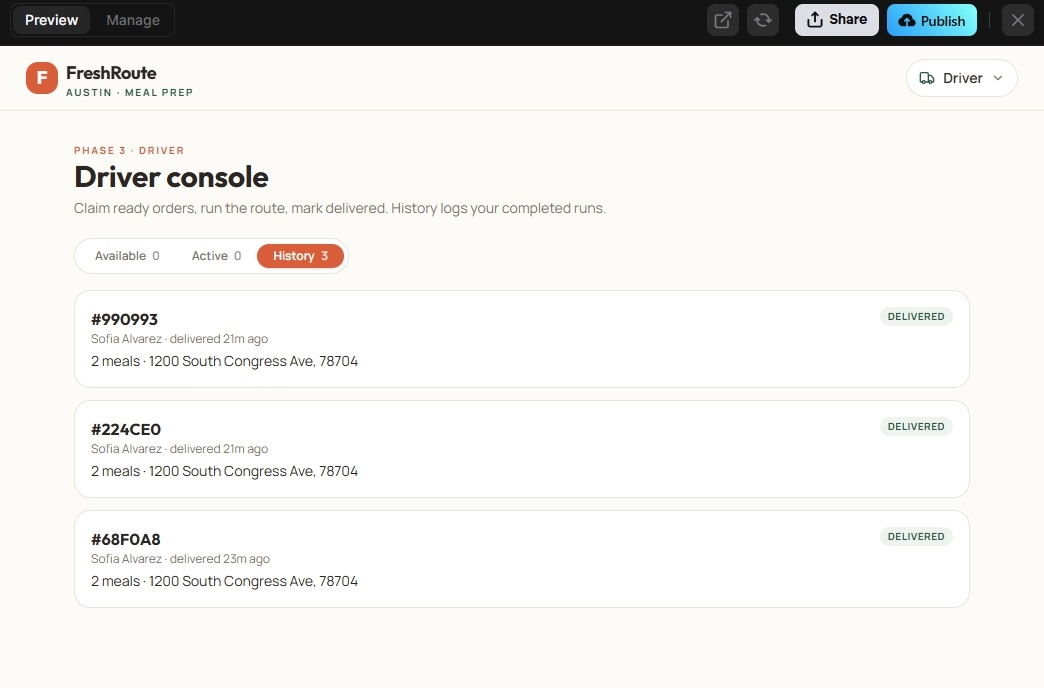
Start with manual driver assignment and milestone updates. Add continuous GPS tracking after the order, payment, and kitchen flows work.
For the first version, the driver needs:
- An availability toggle
- A list of assigned deliveries
- Pickup and customer addresses
- Navigation handoff
- Customer contact controls
- Pickup confirmation
- Delivery confirmation
- Optional photo, signature, or delivery note
- A failed-delivery reason
Use this prompt:
Build the driver delivery workflow.
Create:
- Driver availability toggle
- Assigned-deliveries list
- Delivery detail screen
- Pickup and drop-off address cards
- Open-in-maps navigation button
- Call and message controls
- Picked-up confirmation
- Delivered confirmation
- Proof-of-delivery photo or note
- Failed-delivery reasons
- Delivery history
Apply these permissions:
- Drivers can view only deliveries assigned to them
- Drivers cannot edit food items, prices, fees, or payment records
- A driver cannot mark an order delivered before marking it picked up
- Every status change must store the driver, time, and location when available
- Customer phone numbers must appear only for active assigned deliveries
Start with manual driver assignment by the administrator. Do not add automatic route batching yet.
Use the Geocoding API to convert addresses into coordinates and the Google Maps Routes API when you need routes, travel estimates, or navigation logic. Google Maps Platform uses usage-based pricing, so set quotas and billing alerts before opening the app to the public.
Step 8: Connect Payments, Cancellations, And Refunds
Use one merchant account for a single-restaurant app. Use a marketplace payment product only when several independent merchants must receive their own payouts.
Emergent lists Stripe among its official integrations. Its integrations page also lists PayPal, Twilio, SendGrid, Supabase, GitHub, and other services that fit later parts of this build.
For a single restaurant, connect Stripe Payments or another supported provider. Stripe’s standard U.S. online-card rate is currently 2.9% plus 30 cents per successful domestic card transaction, with no setup or monthly fee on the standard pricing model. International cards, currency conversion, disputes, and other services carry separate rates.
A multi-restaurant marketplace needs connected merchant accounts and payout logic. Stripe Connect is built for platforms that manage payments between multiple parties, but it introduces merchant onboarding, identity checks, payout rules, refunds, disputes, and platform responsibility.
Send this implementation prompt:
Connect the checkout flow to [PAYMENT PROVIDER].
Requirements:
- Use the provider's hosted or secure payment components
- Never store raw card numbers or security codes
- Create the order in a pending-payment state before payment
- Mark the order placed only after verified payment success
- Handle payment failure, cancellation, timeout, and duplicate callbacks
- Prevent duplicate charges and duplicate orders
- Store the provider's payment reference
- Show a clear receipt after success
- Let administrators issue full or partial refunds
- Record the refund amount, reason, staff member, and time
- Update the order and payment records after a refund
- Keep an audit log of payment-status changes
Create a test checklist for successful payment, declined payment, duplicate button tap, abandoned checkout, delayed callback, partial refund, full refund, and canceled order.
Test with the provider’s test environment. Run successful, declined, interrupted, duplicate, and refunded transactions before accepting live payments.
Step 9: Add Notifications And Delivery Rules
Notifications should answer one question: “What does the customer need to know right now?” Send updates when the order is accepted, delayed, ready, picked up, delivered, canceled, or refunded.
Emergent’s current integrations include Twilio for messaging and SendGrid for email. The app-builder page also describes support for communication workflows and push-notification use cases.
Use this prompt:
Add order notifications and delivery rules.
Notification events:
- Order placed
- Order accepted
- Order rejected with reason
- Preparation estimate changed
- Order ready for pickup
- Driver assigned
- Order picked up
- Order delayed
- Order delivered
- Order canceled
- Refund issued
Let customers select available notification channels.
Store whether each notification was sent, delivered, or failed.
Do not send the same event more than once.
Delivery rules:
- Check the current time against business hours
- Block immediate orders while the business is closed
- Support scheduled orders only when enabled by the administrator
- Reject addresses outside the service area
- Apply the correct delivery fee for the address
- Enforce the minimum order before checkout
- Show the earliest available delivery time
- Let the administrator pause ordering without deleting the menu
Add clear customer messages for every blocked action.
Keep notification copy short and specific. “Your order is delayed by 15 minutes.” helps. “Your order status has changed” forces the customer to open the app and hunt for the answer.
Step 10: Test The Full Workflow And Publish The First Version
Test the whole order lifecycle on real phones before publishing. Start with fake customer data and payment-test credentials.
Release test checklist:
Also test:
- Small and large phone screens
- Tablet kitchen view
- Keyboard and screen-reader navigation
- Slow connections
- Long names and addresses
- Empty states
- Expired sessions
- Business closed state
- Notification failure
- Deleted or deactivated staff accounts
I recommend publishing a progressive web app first. It lets you test the ordering URL with real customers without waiting for two store-review processes. Move to native Android and iOS releases after the menu, payments, order states, and delivery operations hold up under real use.
Emergent currently supports PWAs as well as Android and iOS export-ready builds. Its public workflow describes generating, refining, and publishing an app from the same project.
For an Apple submission, provide a complete and functional build, accurate metadata, working support information, and a demo account or demo mode when sign-in is required. Apple also expects the supporting services to be live during review.
Use this final review prompt:
Run a release-readiness review of this food delivery app.
Check:
- Role permissions
- Order-state transitions
- Price calculations
- Delivery-zone rules
- Business-hour rules
- Payment and refund paths
- Duplicate-order prevention
- Notification triggers
- Driver data access
- Empty, loading, error, and offline states
- Mobile responsiveness
- Accessibility labels and keyboard navigation
- Privacy-policy and support-page links
- Demo account requirements for store review
Return:
- Critical launch blockers
- High-priority fixes
- Lower-priority improvements
- A manual test script
- An app-store submission checklist
Do not mark an item complete unless the current project contains
the required screen, rule, or integration.
Common Food Delivery App Mistakes To Avoid
Marketplace First, Before One Restaurant Works
A marketplace multiplies your hardest problems. Prove that customers can order, the kitchen can fulfill, and a driver can deliver for one merchant first.
Order Status Stored as Free Text
Use controlled transitions. Free-text values such as “on the way soon” create broken filters, incorrect notifications, and unclear permissions.
Live GPS Too Early
Manual assignment and pickup-delivery milestones are enough for early validation. Add continuous tracking when customers and operators prove they need it.
Only Testing Orders That Go Right
Failed payments, duplicate taps, sold-out items, closed hours, bad addresses, rejected orders, and refunds are the cases most likely to cost you money.
Staff Can Rewrite Old Prices
Store the item name, selected modifiers, quantity, unit price, tax, fees, and total on the order. A later menu update shouldn’t rewrite yesterday’s receipt.
Fees Hidden Until the Payment Screen
Show delivery fees, taxes, service charges, and the final total before the customer commits. A surprise fee at the final button damages conversion and trust.
No Audit Trail
Record who accepted, rejected, reassigned, canceled, or refunded an order. You’ll need that history when a customer, driver, and kitchen manager remember the event differently.
Taking the App Further After the MVP
Add advanced features only after real orders reveal the next bottleneck. The strongest second-stage additions usually include:
- One-tap reordering
- Favorite items
- Scheduled orders
- Meal subscriptions
- Loyalty rewards
- Promo codes
- Multi-location menu management
- Driver route batching
- Kitchen-capacity limits
- Delivery-time analytics
- Customer support messaging
- Merchant onboarding for a marketplace
The closest official Emergent case study to this workflow is Plate OS. According to Emergent, founder Sushen Dang expanded a small Shopify experiment into a multi-tenant meal-prep platform over six months.
The resulting system handles 600 to 700 orders per day and covers kitchen sheets, labels, routing, driver tracking, proof of delivery, subscriptions, and customer self-service.
The useful lesson is the sequence. Plate OS grew from a narrow operating problem into a larger platform. Follow the same pattern: complete one order loop, use it, identify the next constraint, and expand from evidence.
Emergent Makes Food Delivery App Building Easier
Emergent fits this project because one prompt-driven workspace can cover customer screens, operating dashboards, data relationships, permissions, workflows, and external integrations. Its official app-builder page explicitly includes food delivery apps among its supported examples.
You still own the important decisions:
- Which delivery model to use
- How fees and refunds work
- Who can change an order
- Which payment and mapping services to connect
- How customer data is handled
- Which failure cases block launch
- Whether to publish as a PWA or native app
That division of work is the right one. Let the platform generate and revise the software while you define the business rules and test the result.
Start the project at Emergent with the master prompt from Step 4.
Final Takeaway
The best way to learn how to create a food delivery app is to build one complete order path before adding marketplace features. Start with one restaurant, four clear roles, controlled order states, secure payments, manual driver assignment, and strict failure testing.
Publish the progressive web app to a small service area first. Watch real orders move through the kitchen and delivery workflow. Then add subscriptions, loyalty, route automation, multiple locations, or restaurant onboarding based on the problems you can prove.

Describe what you want and Emergent builds it. A real, production-ready app you can launch the same day.
- One prompt to build
- Zero code required
- Deploy in minutes