



Every AI tool promises the same thing now: describe an app, and it writes the code. That speed holds up well for a website, but an iPhone app also has to feel native and pass Apple's review. The demo that wows you in a minute is a long way from an app that holds up.
To see that gap for myself, I set out to build an iOS app with AI: a content calendar for scheduling social-media posts. An afternoon in, I had a working version running on my phone. Then I added a few features, and one small fix quietly broke two screens I'd already finished.
The real challenge of building an iOS app with AI is keeping the app together as it grows. I ran it as an experiment, pushing one app through AI coding tools and visual builders to see where each one cracked.
Building it took a staged process and more than one tool, so the steps below follow the sequence that held up.
What This Approach Means and Why Staged Builds Hold Up
Building an iOS app with AI, an approach people now call vibe coding, means the AI writes most of the Swift while you steer the structure. It's fast, but it needs close review, because it can break things you thought were done.
The reliable way to build is to do so in stages. You let AI move fast on one piece at a time and check each change before moving to the next, so a single bad edit stays contained instead of taking down parts of the app that already worked.
Native iOS App vs. AI-Generated Web App: The Choice That Shapes Your Whole Build
My first web-first prototype looked fine on a phone, but it still felt like a website in a frame. Tapping around, nothing behaved like a real iPhone app should. Most beginners miss this split, so it helps to get clear on it early.
A native iOS app is built with Swift and SwiftUI, Apple's UI framework. It runs as a true iPhone app with native controls, device features, and a clean path to the App Store. An AI-generated web app is a website, sometimes wrapped to look like an app. It's faster to build, but it hits a ceiling on feel and on what the App Store accepts.
Pick your path before you pick a tool. If you want App Store quality and a native feel, take the native route with SwiftUI. To validate an idea this weekend, a web prototype is a fine, fast starting point.
What You'll Need Before Starting
You don't need to be an iOS engineer to build an iOS app with AI, but you do need a few things ready before step one. I hit each of these the hard way, so here's the checklist I wish I'd had.
Prerequisites:
- A Mac with Xcode installed, since Xcode is Mac-only and you can't ship a native build without it
- An Apple Developer Program account, which costs $99 and is required for TestFlight and App Store submission
- An AI coding tool or visual app builder to generate and edit your app
- A data-layer account with Supabase or Firebase for accounts and data (free tiers exist)
- Enough Swift comfort to read what the AI writes and catch when it goes sideways
Time required: A working prototype comes together in hours. An App-Store-ready app takes days to a few weeks, and almost all of that time lives in the last mile.
Choosing Your AI Tool: What Each One Is Actually For
There is no single best AI tool here, because these tools aren't competing for the same job. I ran the same content calendar brief through each of the ones below and watched them split into groups.
Here's the test brief I used to compare tools side by side, so you can paste it into any of them and reproduce the split:
"Build a native iOS content calendar app for iPhone. Users should be able to sign up for an account, log in, and manage their own content plan. Include a calendar view for scheduled posts, a screen to create and edit posts, a detail view for each post, and a way to mark each post as complete. Each post should store the platform, caption or post idea, scheduled date, status, and notes. Add a Pro paywall where free users get limited access, and Pro users unlock the full calendar. Keep the interface clean, mobile-first, and built to feel like a real iPhone app."
Some help you work inside Swift, some generate an app from a prompt, and one never touches the build at all. Pick based on the job you need it to do.
AI coding partners are the default native path, and I leaned on two of them. I gave Emergent the content-calendar brief, and it stood up a working first version with the accounts and database already wired. Then I used Claude Code on my actual project folder to read the Swift files, catch compile errors, and rebuild the stats view.
Cursor did the same file-level work with diffs I reviewed before accepting. Claude Code and Cursor both keep you in your actual Swift files, which helps when you're editing a native build by hand.
Emergent works differently: you describe the app, and it generates and deploys a working mobile build for you, so I reached for it when I wanted speed and for the file-level tools when I needed to touch Swift directly.
When the build is already broken, Claude Code is the tool I'd open first. Pointing it at my real project folder to read the Swift and fix the stats view in place is the kind of surgical edit a native app needs, and it's where a file-level partner earns its keep.
If you're choosing between the two, they split along the lines of execution versus editor. Treat any of them as an option to test for yourself.
Visual builders are the fastest way to turn an idea into a working prototype. Tools like Manus, Rork, and FlutterFlow can help with mobile builds, visual layout, data setup, payments, and deployment, while Lovable, Bolt.new, and Replit are even faster for web-first demos.
The tradeoff is that a polished preview does not always translate into a native iOS app or a clean App Store path, so test export and packaging early. ChatGPT fits best as a planning and troubleshooting assistant for specs, copy, and error explanations alongside the build.
Also read our best no-code iOS app builders guide for what else is worth trying when you need a native iPhone build without touching Swift.
How to Build an iOS App With AI: Step-by-Step
The order is as important as the tools. I built the app in the exact sequence below, and every step I tried to skip came back to bite me later. Each step names the tool I used and flags where that stage tends to break, so follow it top to bottom.
Step 1: Plan the App Before You Prompt
Before I touched code, I turned my rough content-calendar idea into a plain-language spec. I listed the screens, the data each one needs, the account flow, and the Pro paywall. ChatGPT and Claude are both strong at this planning work.
A tight plan is the difference between a usable first version and a mess. When you hand a builder a clear description of what each screen does, it has a target to hit. Hand it a vague idea, and you get a vague app you'll spend hours untangling.
Step 2: Choose and Set Up Your AI Coding Tool
I set up two tools and used them for different jobs. Emergent took the prompt-to-app work. I described the app, and it generated a working build with the accounts and data layer already in place.

For file-level Swift edits, Claude Code works directly in your project folder, reading the Swift files and compiling in place.
One Claude Code quirk cost me time: each fresh session forgot my conventions until I added a CLAUDE.md project file that spelled them out. After that, every new session picked up my naming and structure without me repeating myself.
Step 3: Generate the Swift Code for Your App
With the plan in hand, I had the AI generate the Swift for the post calendar, and it produced runnable code fast. The screen worked on the first try, which feels impressive when you first see it. Then I slowed down and read what it wrote.
I reviewed the file-level changes before accepting them, and Cursor made that easy. AI can wire a view that looks right while quietly hardcoding a value or flattening your data model in a way you'll regret three features later. Read the diff before you accept it, so today's shortcut gets caught before it becomes next week's rebuild.
Step 4: Build a Native Interface With SwiftUI
Rebuilding the post calendar in SwiftUI is when the app finally felt like an iPhone app instead of a website in a frame. Native controls, gestures, and transitions are what a web wrapper can't fake. On a real device, you feel it in the first 10 seconds.
Ask your AI tool for SwiftUI-native components. The output feels more native immediately. Buttons respond the way iPhone users expect, lists scroll like system lists, and the whole app reads as built for the device.
Step 5: Add a Real Data Layer With Supabase or Firebase
Fake data got the app moving, but I needed real accounts and a real database far earlier than a beginner expects. The moment two people need to log in and keep their own posts, hardcoded data falls apart. Supabase and Firebase both handle accounts, data, and the plumbing between them.
Supabase is beginner-friendly, with a PostgreSQL database, built-in sign-in, and edge functions. Firebase covers sign-in, analytics, crash reporting, and push notifications well.
When the AI generated my database schema, the data structure mapping required a careful second look before I built anything on top of it.
Step 6: Put It Under Version Control With Git
I committed a working build before letting AI refactor the reminders, and it saved the whole project. The refactor broke everything, so I rolled back to my last commit in one step. Version control is a required step here.
Set up a Git repository inside Xcode and use commits and branches from the start. AI edits can extend beyond what you asked, affecting files you didn't expect. A commit before every big change means one bad fix can't sink a working app, because you always have a known-good point to return to.
Step 7: Add Payments With StoreKit (Plan This Early)
I bolted on the Pro subscription at the very end, and it forced a restructuring I could have avoided. Payments touch accounts, data, and what each screen gates, so StoreKit belongs in your plan from the start. This is the step I'd redo first.

Source: Apple
Two rules caught me off guard. The first in-app purchase needs a whole new app version and a full app review to activate, since a new build alone won't do it. Subscriptions also need server-side validation to survive a reinstall.
Step 8: Test on a Real iPhone With Xcode and TestFlight
The simulator looked done, so I almost submitted. Then I ran the build on a real iPhone, and it caught what the simulator hid, from touch targets to the actual purchase flow. Xcode is where the app becomes real, with the simulator, real-device testing, signing, and archiving.
Push a build to TestFlight next, which needs an active Apple Developer account. TestFlight processes the build, then testers get it and run the real install-and-purchase flow on their own phones. Testing the purchase on a real device before you submit is what stops an embarrassing rejection later.
Step 9: Submit to the App Store With App Store Connect
A working, tested app still needs real preparation before it can clear review. In App Store Connect, you fill in the metadata, add a privacy page, and upload screenshots, then submit for review. Review runs in rounds of a few days each, and early submissions usually come back with something to fix.
Review commonly asks for a Terms of Use, a privacy policy, and location-permission onboarding, plus metadata tweaks. If you release in the EU, you'll also need to complete trader verification first. Prepare the privacy page and screenshots up front, so review stays a round of small fixes.
What It Really Costs: The First-Year Breakdown

The $99 Apple fee is the easiest cost to budget. What surprised me were the extras that add up around it, like the AI credits draining during debugging loops, the paid data-layer tier once real accounts landed, and payment tooling. Here's the first-year picture in one place, with the starting price for each tool.
Costs readers forget:
- Extra AI credits or tokens burned during debugging loops as the app grows
- A paid Supabase or Firebase tier once you outgrow the free plan
- Payment tooling like RevenueCat to manage subscriptions
- The App Store commission Apple takes on digital goods
- Privacy and legal pages your submission needs
- Real-device testing time, since the simulator alone isn't enough
Tool subscriptions are easy to predict, but the AI credit burn during debugging is the cost that creeps up, so keep an eye on it as your feature list grows.
Common Mistakes to Avoid
Every one of these cost me time on the build, and every one is avoidable if you see it coming.
- Adding payments last: Bolting StoreKit on at the end forced a restructure, because payments touch nearly every screen. Plan the paywall early.
- Skipping version control before big AI edits: Without a commit to fall back on, one broad AI change can wipe out a working build. Commit first, every time.
- Shipping a web app and calling it native: A web-first prototype looks fine on a phone and still fails the native feel test. Rebuild in SwiftUI if you want App Store quality.
- Letting AI change too much at once: Broad edits are hard to trace and easy to break. Accept changes one file at a time so you can see what moved.
- Treating App Store review as a formality: Review takes days and asks for real fixes like a privacy policy and Terms. Prepare those before you submit.
Advanced Tips: Keeping AI From Breaking Your App
The discipline below is what kept the app alive as it grew past a prototype. These are the practices I learned mid-build and would start with next time.
- Keep a CLAUDE.md-style memory file: A short project file with your conventions means fresh AI sessions pick up where the last one left off.
- Checkpoint before every big change: A commit right before an AI refactor turns a broken build into a one-step rollback.
- Make one change at a time: Narrow, specific asks are easy to review and easy to undo. One giant "fix everything" prompt is neither.
- Do onboarding and animations last: Save the polish for the end, since reworking it repeatedly burns AI credits you'll want for the hard logic.
AI buys you speed. Commits, a memory file, and one change at a time keep the app stable as it grows toward launch.
How Emergent Helps You Build an iOS App Faster
Building an iOS app with AI often means connecting code generation, the data layer, version control, and payments by hand. Each tool handles one part of the build, and the handoffs are where non-specialists often stall.
Emergent is one option that brings more of the build into one workflow, including the interface, data, logic, integrations, and testing. You can also start an Emergent build from the Claude or ChatGPT chat you're already planning in through the Emergent MCP Connector.
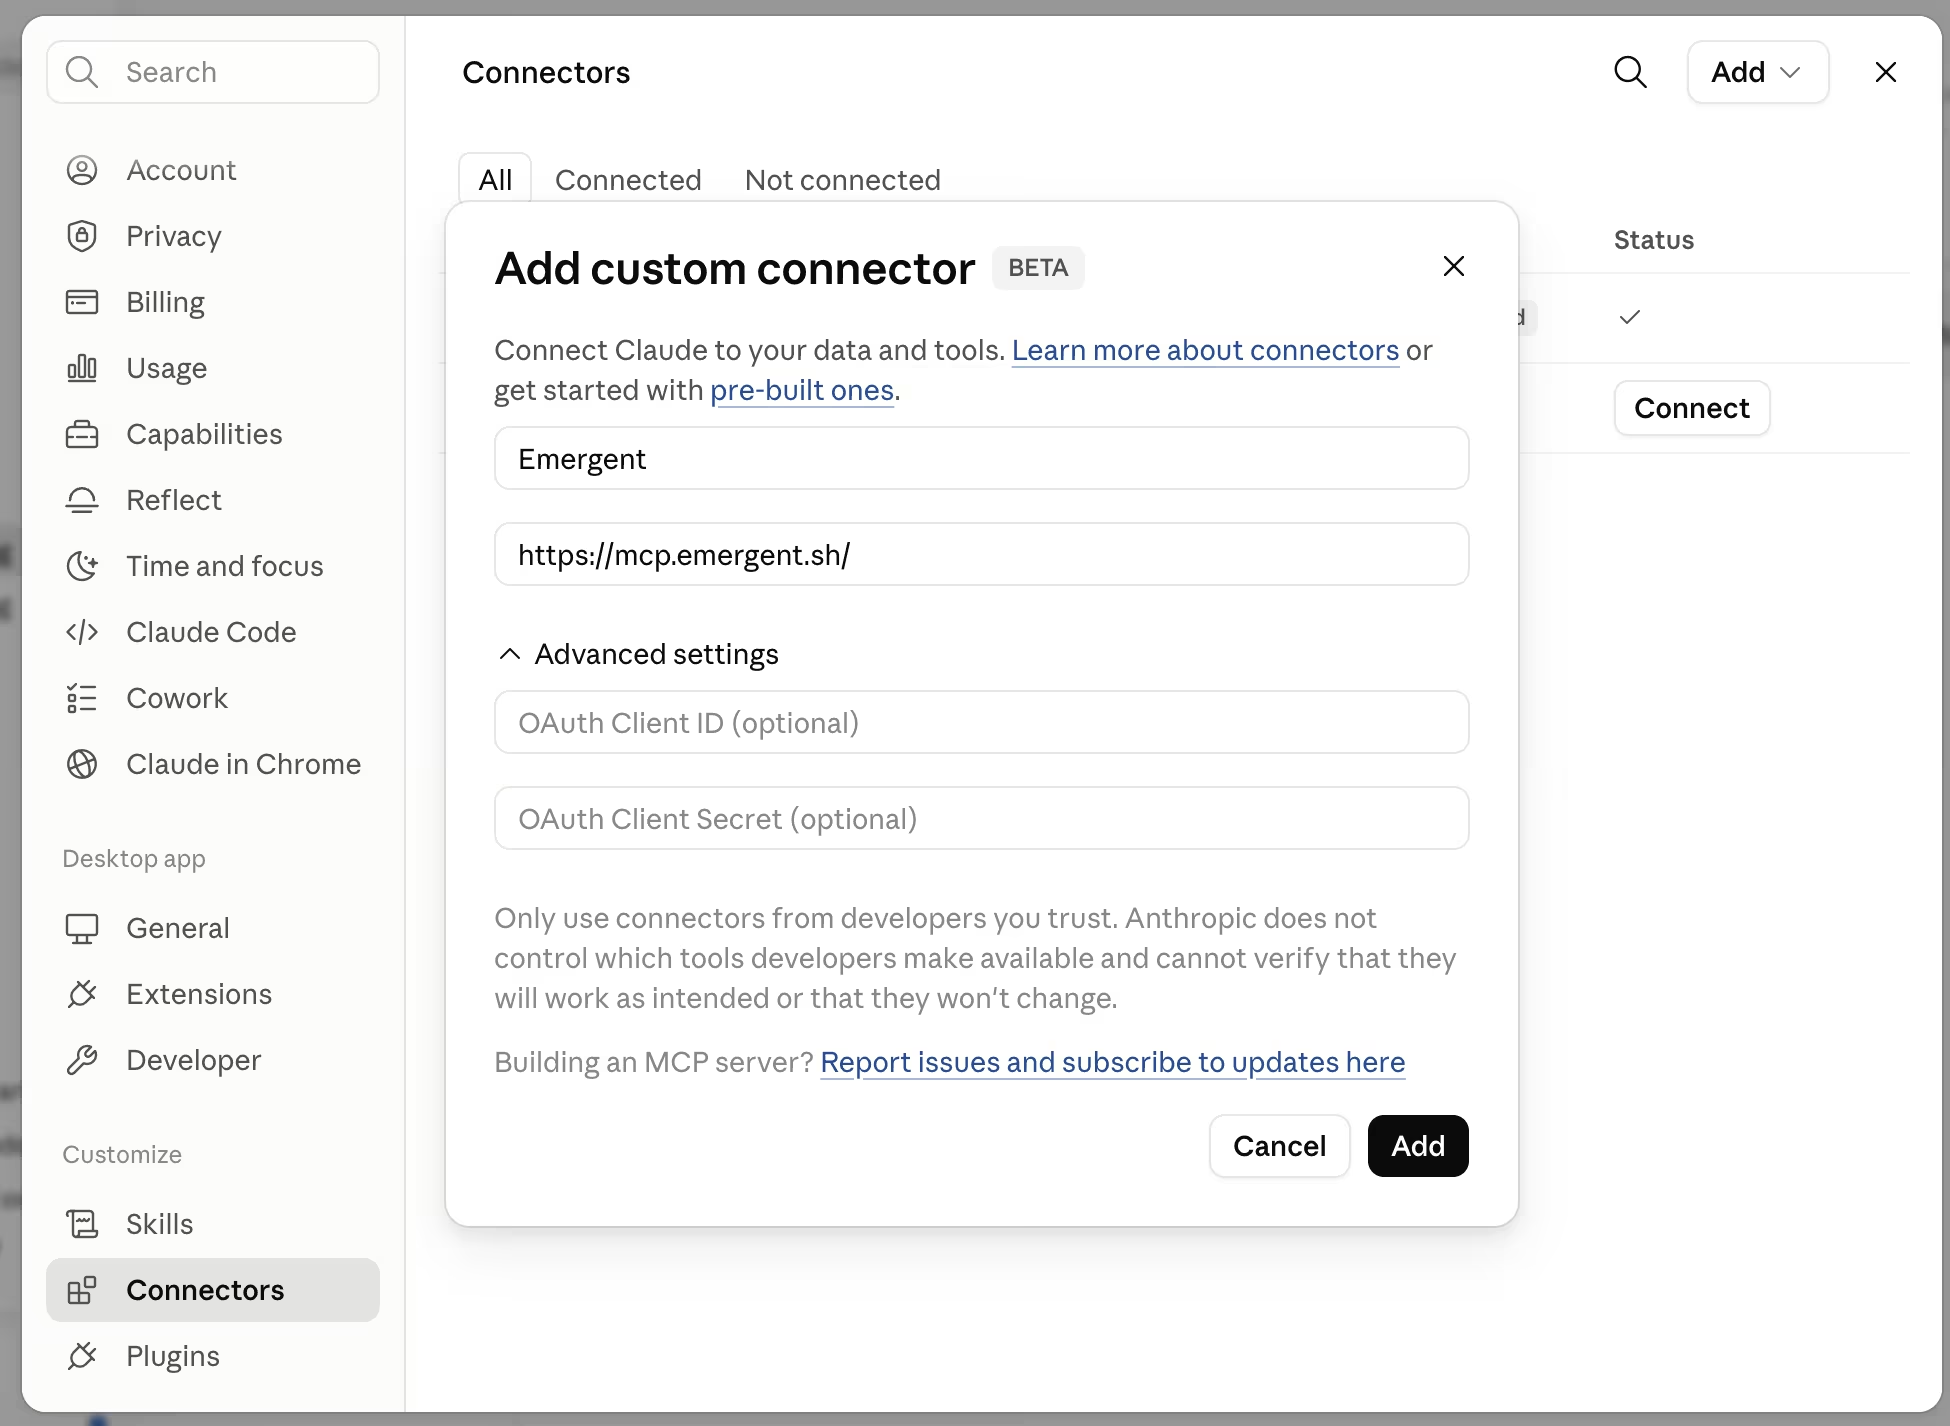
Here’s what that looks like:
- A working app, wired end to end: The goal is an app with accounts and payments already connected and ready to run.
- Data and accounts handled together: The account and data plumbing that usually needs a separate setup step is carried inside the build.
- Fewer tools to wire by hand: Less jumping between a coding tool, a database console, and a payments dashboard.
- A testing pass on every build: Testing agents run the app and review the code before deploy, aimed at the kind of regression that broke my reminders and stats view on feature five.
Emergent starts with a free tier, and its Standard plan runs $20/month, so test it against your own build the way I did. If integration work is where you keep getting stuck, it may fit better than handling each setup step yourself.

Describe what you want and Emergent builds it. A real, production-ready app you can launch the same day.
- One prompt to build
- Zero code required
- Deploy in minutes